TP-Link Powerline Adapter Reset: How to Restore Factory Default Settings Using Two Methods
A factory reset restores your TP-Link Powerline adapter to its original default settings, removing any custom configurations or pairing data. You may need to reset a TP-Link Powerline adapter when troubleshooting connection issues, clearing an existing network configuration, preparing the device for a new network, or getting it ready for resale.
This guide covers two methods to reset TP-Link Powerline: using the Pair/Reset button on the device, or using your computer with the tpPLC Utility or Powerline Scan Utility. After a reset, you may need to re-pair your Powerline adapters.
Key Takeaways
- There are two ways to reset a TP-Link Powerline adapter to factory default: pressing the physical Pair/Reset button on the device, or using the tpPLC Utility or Powerline Scan Utility on a computer.
- For TL-PA models (TL-PAxxxx), press and hold the Pair button for 15 seconds until all LEDs turn off and come back on.
- For TL-WPA models (TL-WPAxxxx), press and hold the Reset button for 10 seconds. The reset is complete when the LEDs turn back on after going off.
- For newer models (TL-WPA4220 V2, TL-WPA8630, and above), the tpPLC Utility can reset the device via Basic > Reset.
- For older models (TL-WPA281, TL-WPA271, and TL-WPA4220 V1), use the Powerline Scan Utility. Click Reset Local Device on the System page.
- After a factory reset, the adapter may need to be re-paired with the Powerline network.
How to Reset a TP-Link Powerline Adapter
Method 1: Reset a Powerline device by Pair Button
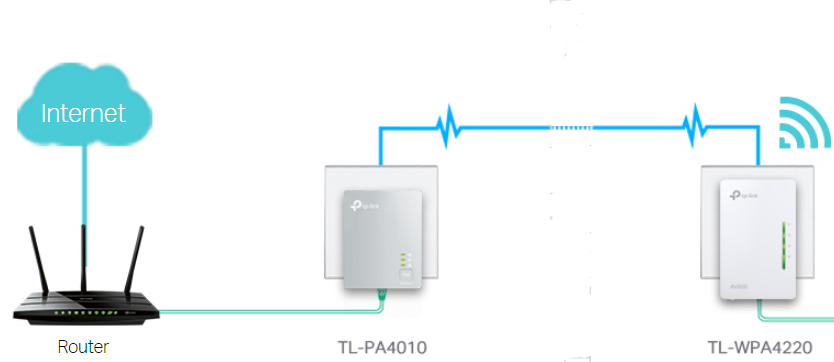
For TL-PA4010 (or models starting with TL-PAxxxx), press and hold the Pair button for 15 seconds until all LEDs turn off and come back on.
For TL-WPA4220 (or models beginning with TL-WPAxxxx), press and hold the Reset button for 10 seconds. The reset is complete when the LEDs turn back on after going off.
Method 2: Reset a Powerline device using Utility
This method applies to TL-WPA4220 V2, TL-WPA8630, and above.
a. Reset Using tpPLC Utility
To reset a device to factory default settings, follow the steps below:
Note: If the Utility hasn’t been installed yet, please refer to How to prepare for using the tpPLC Utility.
1. Open the utility, move your mouse over a device, and click the Basic icon.
Note: Login is required the first time you access the basic settings of a Powerline extender. The default username and password are both admin.
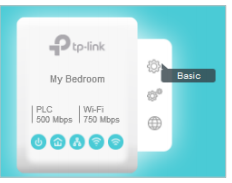
2. Go to the Reset page, and click Reset.

This device will now be restored to its factory default settings.
Note: After a reset, the device may leave the existing powerline network if it does not use the default network name (HomePlugAV). If this happens, refer to the Quick Installation Guide to re-pair the device.
b. Reset Using Powerline Scan Utility
This method applies to TL-WPA281, TL-WPA271, TL-WPA4220 V1, and similar models.
To reset the device using this method, install the Powerline Utility on your computer first. Run the CD included with the adapter, select your model, and click Management Utility, or download the utility from the TP-Link Download Center.
Once installed, open the utility and go to the System page. Click Reset Local Device as shown below.
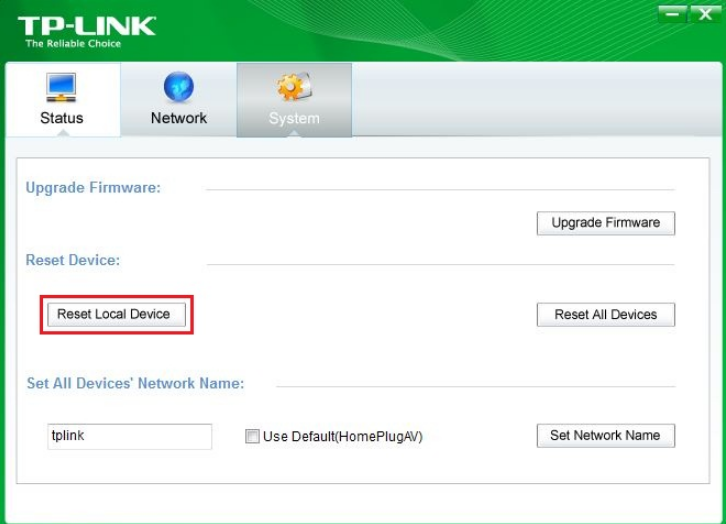
Click Reset Local Device to restore the adapter to factory default settings.
After the reset, all settings are restored to factory default.
For more details on configuration and features, download the manual for your product from the TP-Link Download Center.
Looking For More
Is this faq useful?
Your feedback helps improve this site.
KIT-4.0-package_1569220872757v.jpg)


TP-Link Community
Still need help? Search for answers, ask questions, and get help from TP-Link experts and other users around the world.