How to log in to the cloud camera’s Web Interface
This Article Applies to:
Note:This FAQ is suitable for all TP-Link cloud cameras including NC200, NC220, NC250 and so on. Here we take NC200 as example.
There are two ways to log in the web interface of cloud camera:
Method 1 using tpCamera APP
Note: NC Class Cameras work with tpCamera app only.
If you haven’t setup cloud camera please refer to the QIG or How to set up cloud camera with tpCamera APP?
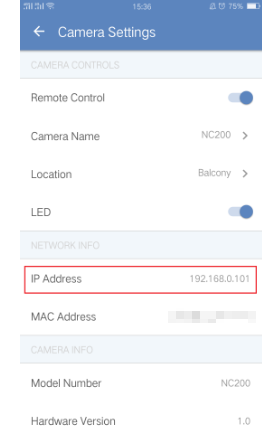
1)Go to Settings, it will display the IP Address of the camera.
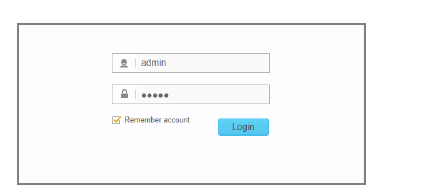
2)Open a web browser and input the camera’s ip address and the following screen will come up--input ‘username’ and ‘password’ as ‘admin’:
Method 2 using a PC
1)Connect the camera to a PC and assign a static ip for the PC; by default the camera has ip address of 192.168.0.10 and you need to assign 192.168.0.X for your computer ( 1<X<10 or 10<X<254)
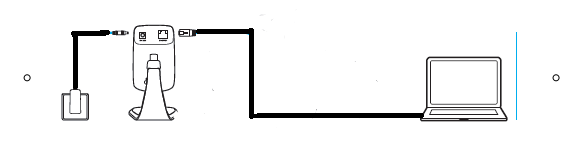
2)open a web browser and log into the web interface by typing the default access 192.168.0.10, the following screen will come up--enter ‘admin’ for both ‘username’ and ‘password’ as :
Then you are in!
Method 3: using a router
1)Connect the camera and a PC( or smartphone etc) to the router and refer to this link to check the camera’s ip address( the router will assign an ip address for the camera and it might not be 192.168.0.10 any more)
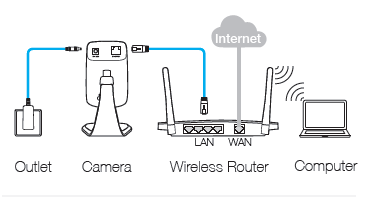
2) Open a web browser and input the camera’s ip address and the following screen will come up--input ‘username’ and ‘password’ as ‘admin’:
Note: If you’ve created a new password for the camera when configured it on the tpCamera App, please log in the web management page with the new password.
Is this faq useful?
Your feedback helps improve this site.
TP-Link Community
Still need help? Search for answers, ask questions, and get help from TP-Link experts and other users around the world.