How to connect to the WLAN-PS network of the TL-WPS510U on Windows 8.1
User Application Requirement
Updated 11-25-2021 09:01:49 AM98838
Acest ghid este valabil pentru:
TL-WPS510U
Recent updates may have expanded access to feature(s) discussed in this FAQ. Visit your product's support page, select the correct hardware version for your device, and check either the Datasheet or the firmware section for the latest improvements added to your product. Please note that product availability varies by region, and certain models may not be available in your region.
Compared with Windows 7 and Windows 8, Windows 8.1 no longer shows Ad-hoc networks in the Wi-Fi list. As TL-WPS510U works on Ad-hoc mode as default, you cannot find the SSID “WLAN-PS” of TL-WPS510U on Windows 8.1. For how to connect to the WLAN-PS network of the TL-WPS510U on Windows 8.1 please follow steps below.
View the Ad-hoc wireless network
Step 1: Run cmd as administrator
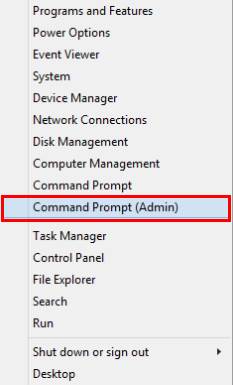
Right click on the Windows START icon at the left-hand corner in the task tray, left click on “Command Prompt (Admin) “
Step 2:View the name of wireless network(SSID)
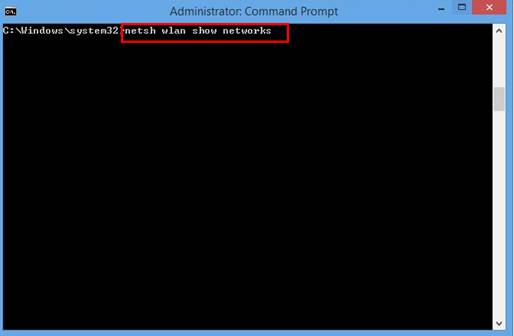
Run the following command as below to see all networks in range, including ad-hoc network:
>netsh wlan show networks
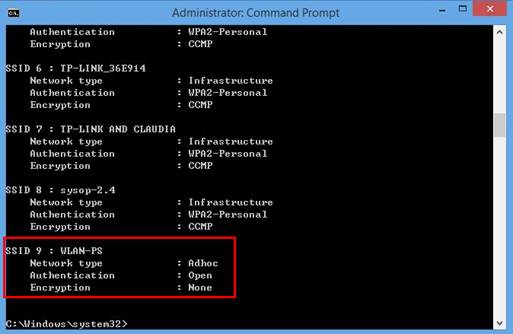
In this case, WLAN-PS is the ad-hoc wireless network name of the TL-WPS510U.Note down the detailed information of WLAN-PS.
Set up a visible ad-hoc wireless network and manually get it connected
Step1: Set up a new network
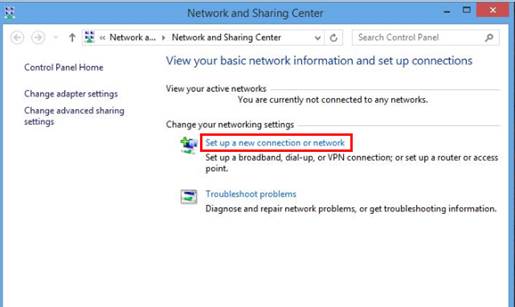
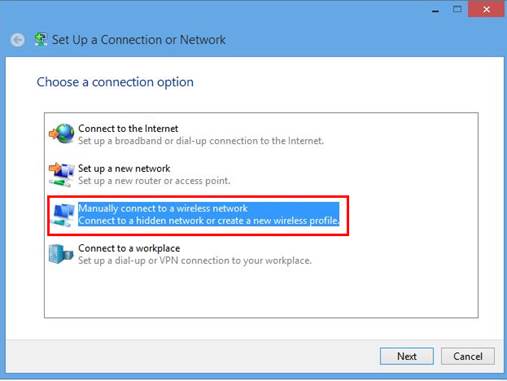
go to ‘control panel’→ ‘Network and Internet’→ ‘Network and Sharing Center’, click ‘Set up a new connection or network’
double click “Manually connect to a wireless network”
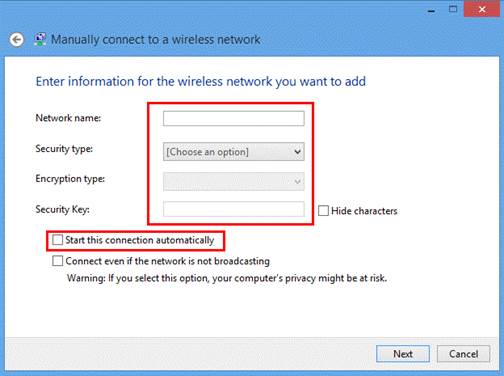
Enter the SSID, security settings of the ad-hoc network accordingly (you can find the detailed information in “view the ad-hoc wireless network”-setp2), uncheck “Start this connection automatically” (important)
click “Next”, then “close”
Note: The Network name of the TL-WPS510U is WLAN-PS, Security type of the TL-WPS510U is No authentication(open)
Step 2: Complete the parameter of the ad-hoc wireless network
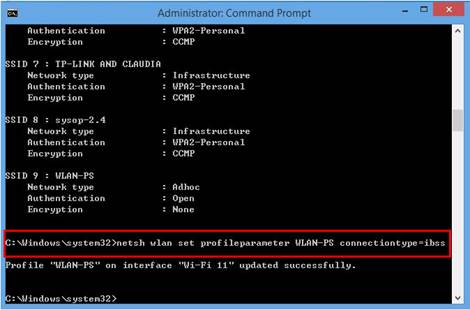
Run the command as below (important):
>netsh wlan set profileparameter WLAN-PS connectiontype=ibss
Step 3: Run cmd and connect the ad-hoc network
After setting up, run this command whenever you want to connect the ad-hoc network:
>netsh wlan connect WLAN-PS
Then you can see that you are currently connected to WLAN-PS in “Network and Sharing Center” window
Now you can connect your Windows 8.1 PC to WLAN-PS and continue to install and configure the TL-WPS510U.
A fost util acest FAQ?
Părerea ta ne ajută să îmbunătățim acest site.
Ce probleme ai avut cu acest articol?
Nemulțumit de produs
Prea complicat
Titlu confuz
Nu se aplică pentru mine
Prea vag
Alt motiv
Mulțumim
Apreciem părerea ta.
From United States?
Get products, events and services for your region.
Acest site web folosește cookie-uri pentru a îmbunătăți experiența navigării web, a analiza activitățile online și a oferi utilizatorilor cea mai bună experiență pe site-ul nostru. Te poți opune utilizării cookie-urilor în orice moment. Poți afla mai multe informații în politica de confidențialitate .
Cookie-uri de bază
Aceste cookie-uri sunt necesare pentru funcționarea site-ului web și nu pot fi dezactivate în sistemele tale
Cookie-urile de analiză ne permit să analizăm activitățile tale de pe site-ul nostru web a îmbunătăți și ajusta funcționalitatea site-ului.
Cookie-urile de marketing pot fi setate prin intermediul site-ului nostru web de către partenerii noștri publicitari pentru a crea un profilul intereselor tale și a-ți afișeze reclame relevante pe alte site-uri web.