How to Troubleshoot a TP-Link Powerline Adapter With No Internet Connection
If your TP-Link powerline adapter isn't working and leaves you without Internet access, the cause may vary depending on your setup. This guide covers five scenarios to help you pinpoint the problem, whether it's a TP-Link powerline with no internet after initial configuration, a pairing failure, or a device-specific connectivity issue. The steps apply to TP-Link powerline adapters generally. Check your device's user guide for model-specific details. Identify the scenario that matches your situation before diving in.
Key Takeaways
- If the powerline light is off after configuration, the most common cause is that the two powerline devices are on different electrical circuits in the home.
- If the powerline light is on but there is no Internet, the issue is likely related to the Ethernet connection between the main adapter and the router, or to the router itself.
- Wireless-only issues on a powerline extender (models beginning with TL-WPA) can be caused by Wi-Fi settings, channel interference, MAC filtering, or Parental Controls.
- If only one specific device cannot connect, the issue may be with that device's wireless adapter, network profile, IP settings, or channel compatibility rather than the powerline adapter itself.
- Upgrading to the latest firmware and re-pairing the powerline devices are recommended steps across multiple scenarios. It can resolve both connectivity and pairing issues that persist after other troubleshooting steps.
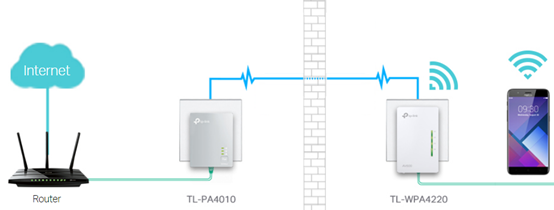
Below is a typical Powerline network topology using the TL-WPA4420 KIT.
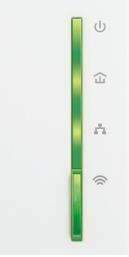
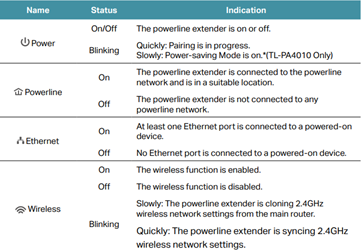
Please refer to the LED explanation (e.g., TL-WPA4220) and troubleshoot.
How to Fix a TP-Link Powerline Adapter With No Internet
Case 1: Powerline Light Is Off After Configuration
Step 1: Verify that the Powerline devices are on the same electrical circuit.
If the Powerline units can be paired in the same room, but when moved to another area, the Powerline light goes out, it usually means they are plugged into different circuits, preventing them from communicating. In this case, the Powerline device may not be right for your home; please consider other options, such as a range extender or an access point.
For pairing instructions, please refer to "How to secure your powerline network by pairing?"
Notes:
1. Plug powerline devices into wall sockets rather than power strips.
2. Bring both powerline devices into the same room to configure them. Once set up, move the second device to its intended location.
Step 2: Reset the Powerline devices and pair them again.
How to Reset the Powerline Adapter to Factory Default?
Step 3: Try different configuration methods.
How to add a device to the network using tpPLC Utility?
How to add a device using the tpPLC App (Smartphone)?
Step 4: Upgrade to the latest firmware and repair them.
How to upgrade firmware of TP-Link Powerline Adapter
Case 2: Powerline Light Is On but No Internet
Step 1: Make sure the Ethernet light on the main adapter is lit.
Verify the Ethernet light of the main adapter, which is connected to your wireless router via Ethernet cable, is lit up. If not, the issue may be related to the router’s Ethernet port, Ethernet cable, or the Powerline adapter’s Ethernet port. Please run the comparison tests below and identify the source of the problem.
1. Change different ports of the main router
2. Change different Ethernet cables
3. Take another Powerline device to connect to the same cable
4. Unplug the Ethernet cable from the main adapter, then connect to a wired computer and check if the computer can work with the main router
Step 2: Restart the router and Powerline devices.
Unplug Powerline devices from the wall socket and unplug the router's power supply. Wait 2 minutes, then plug them back in.
Step 3: Connect a computer directly to your router via an Ethernet cable to check the connection.
If there is no internet access from your router, please reboot it. If it persists, please contact your router support for help.
Step 4: Upgrade to the latest firmware and pair again.
Update the firmware of Powerline Extender
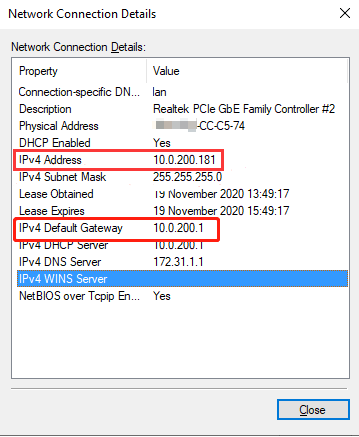
Step 5: Check the IP Address and Default Gateway information of the Powerline device.
Please connect one of your devices to the Powerline device (wired or wireless), then check the IP Address and Default Gateway.
How to find IP address on your devices?
a. If the Default Gateway is 192.168.0.254
1. Please connect the same device to the wireless router, then check the IP Address and Default Gateway.
Note: On iPhone, 'Router' refers to the Default Gateway.
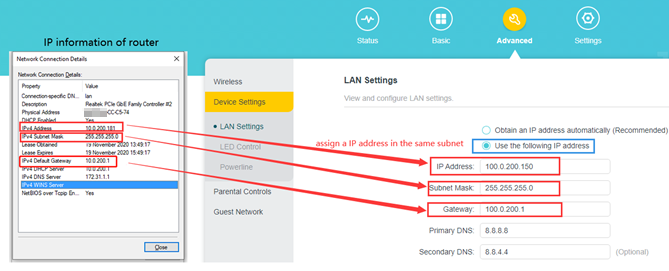
2. Configure the information on the Powerline extender’s management page to refer to the IP information of the router.
How to log into the web-based management interface of Powerline ac Extender (new logo)?
Go to Advanced > Device Settings > LAN Settings.
b. If the Default Gateway is the same as the wireless router
1. Make sure the main router doesn’t enable any security settings, like MAC Filtering or Access control.
2. Connect your computer to the Powerline and ping the Default Gateway of the wireless router (Optional).
Case 3: Wireless Connection Not Working
Please note that only models that start with TL-WPAxxxx have Wi-Fi; the "W" in "TL-WPAxxxx" means "Wireless".
If none of your devices work properly with the TP-Link device, please try the following troubleshooting steps.
1. Cannot see the Wi-Fi Name on the Wi-Fi list.
a. Wi-Fi light is on
Step 1: If you have pressed the Wi-Fi button on the Powerline extender, it will copy wireless settings from the main router. Please move the Powerline extender to a different location and check whether the wireless router's signal strength improves.
Step 2: Change the wireless settings of the Powerline extender.
How to customize wireless settings on tpPLC Utility (new logo)?
How to customize Powerline AC Extender's wireless settings via web-based management interface?
Step 3: Reset the Powerline units and reconfigure.
How to reset: Press and hold the RESET button/hole for 10 seconds until all lights are flashing.
b. Wi-Fi light is off
Step 1: Press and hold the Wi-Fi button for 5 seconds to turn on Wi-Fi.
Step 2: Reset the Powerline extender to check and reconfigure.
Instructions for resetting the powerline device
2. Can see the Wi-Fi Name, but is unable to connect
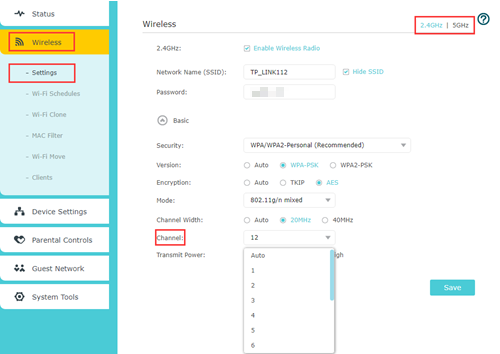
Step 1: Try different wireless channels.
Connect a wired computer directly to the Powerline Extender, then refer to the instructions below to change channels.
Instruction for changing the powerline device's wireless setting
Note: For 2.4 GHz, change the channel to 1, 6, or 11. For 5 GHz, change the channel to 36, 48, or 149.
Step 2: Change the Network name (SSID) and password.
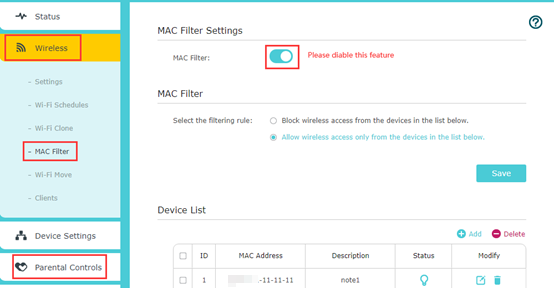
Step 3: Disable special settings, such as MAC Filter or Parental Control, if you have set them up before.

Step 4: Reset the Powerline device and wait for the indicators to stabilize, then try using the default Wi-Fi password printed on the label to connect to the Wi-Fi. If it is a success, reconfigure the Powerline device.
3. Connected to Wi-Fi but No Internet
Step 1: Restart the Powerline extender and end device, then check again.
Step 2: Forget the network and reconnect.
How to connect to wireless networks and remove its profile
Step 3: Upgrade to the latest firmware.
Step 4: Disable the special settings, such as MAC Filter or Parental Control, if you have set them up before.
If you don’t have a wired device and cannot access the internet via Wi-Fi, please refer to Case 2 for troubleshooting.
Case 4: Wired Connection Has No Internet
Step 1: Check the corresponding Ethernet light on the Powerline device.
If the Ethernet light isn't lit, the Ethernet cable or port may not be working properly.
1. Change the different ports of the Powerline device
2. Change different Ethernet cables
3. Take another Powerline device to connect to the same cable
4. Connect another device to the router using the same Ethernet cable on the same port. If the Internet works on another device, then the issue should be on the original device itself. Please contact the device's technical support for assistance.
Step 2: Reboot both the end device and the Powerline device.
Step 3: Check the device's IP information. The device should obtain an IP address automatically. If it’s not, please switch it.
Note: On the Network Connection Details page for Windows, 'DHCP Enabled' should show 'Yes.' For Mac, go to Network > Advanced and confirm 'Configure IPv4' is set to 'Using DHCP.
Case 5: One Specific Device Cannot Connect
If only one specific client device, such as a TV or a printer, fails to get internet access from TP-Link devices or cannot connect to the TP-Link network at all.
Step 1: Make sure this specific device works properly with other networks.
If it cannot work with any network at all, this issue is more likely related to the device itself; please contact support for that specific device.
Step 2: Reboot both the end device and the Powerline device.
Step 3: Please try to re-enable the wireless adapter on your device and retry.
Step 4: Remove the existing wireless network profile.
Step 5: Try different wireless channels.
Note: For 2.4 GHz, change the channel to 1, 6, or 11. For 5 GHz, change the channel to 36, 48, or 140.

Step 6: Disable special settings, like MAC Filter or Parental Control, if you have set them up before.

Step 7: Verify the IP settings of your end device.
Make sure the device is set to obtain an IP address automatically. If a static IP is configured, you will need to manually enter the IP address, subnet mask, default gateway, and DNS server.
DHCP (Dynamic Host Configuration Protocol) is a setting that ensures clients can obtain the information they need from your wireless router to connect to the internet.
If the above suggestions do not resolve your issue, please contact the device's technical support for further assistance.
Citește despre:
A fost util acest FAQ?
Părerea ta ne ajută să îmbunătățim acest site.
3.0_1532428956469j.jpg)


TP-Link Community
Still need help? Search for answers, ask questions, and get help from TP-Link experts and other users around the world.