How to Troubleshoot Tapo and Kasa Notifications Not Working or Delayed
This article provides step-by-step instructions for resolving notification issues on Tapo and Kasa cameras and doorbells, including when notifications are not received or delayed. Tapo/Kasa notifications not working can be caused by disabled settings in the Tapo or Kasa app, phone system notification settings, Do Not Disturb mode, poor Wi-Fi or cellular connection, or battery optimization blocking the app from running in the background on Android. Refer to steps below to resolve these issues.
Note: Images in this article use Tapo as an example; Kasa settings are identical.
Key Takeaways
- If Tapo or Kasa notifications are not being received, first check that notification settings are enabled in both the Tapo or Kasa app and the phone's system settings.
- Do Not Disturb mode on iOS or Android can silently block Tapo and Kasa notifications even when app notifications are enabled.
- On Android, delayed notifications are often caused by battery optimization settings. Allow Tapo or Kasa to run in the background and disable battery limits.
- If notifications are still not received after troubleshooting, run FCM (Firebase Cloud Messaging) diagnostics on Android by entering ##426## in the dialer to check the Google push notification service status.
- Doorbell ring call notifications currently follow the same schedule as activity notifications. There is no separate schedule for ring calls.
Scenario 1: Cannot Receive Tapo or Kasa Notifications
Step 1. Ensure that notification settings are enabled in the Tapo/Kasa app.
Note: If you are unable to receive notifications at a specific time, we recommend setting the Notification Schedule to Always for testing.
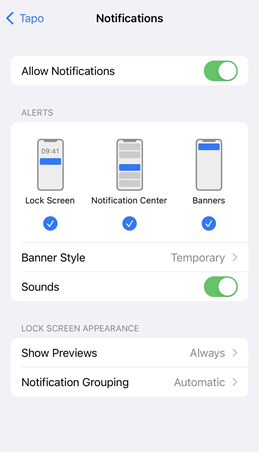
Step 2. Ensure that the Notifications setting on your phone is enabled.
- For iOS: Launch Settings > Notifications, ensure Show Previews is set to Always, and ensure Allow Notifications for the Tapo/Kasa App is on.
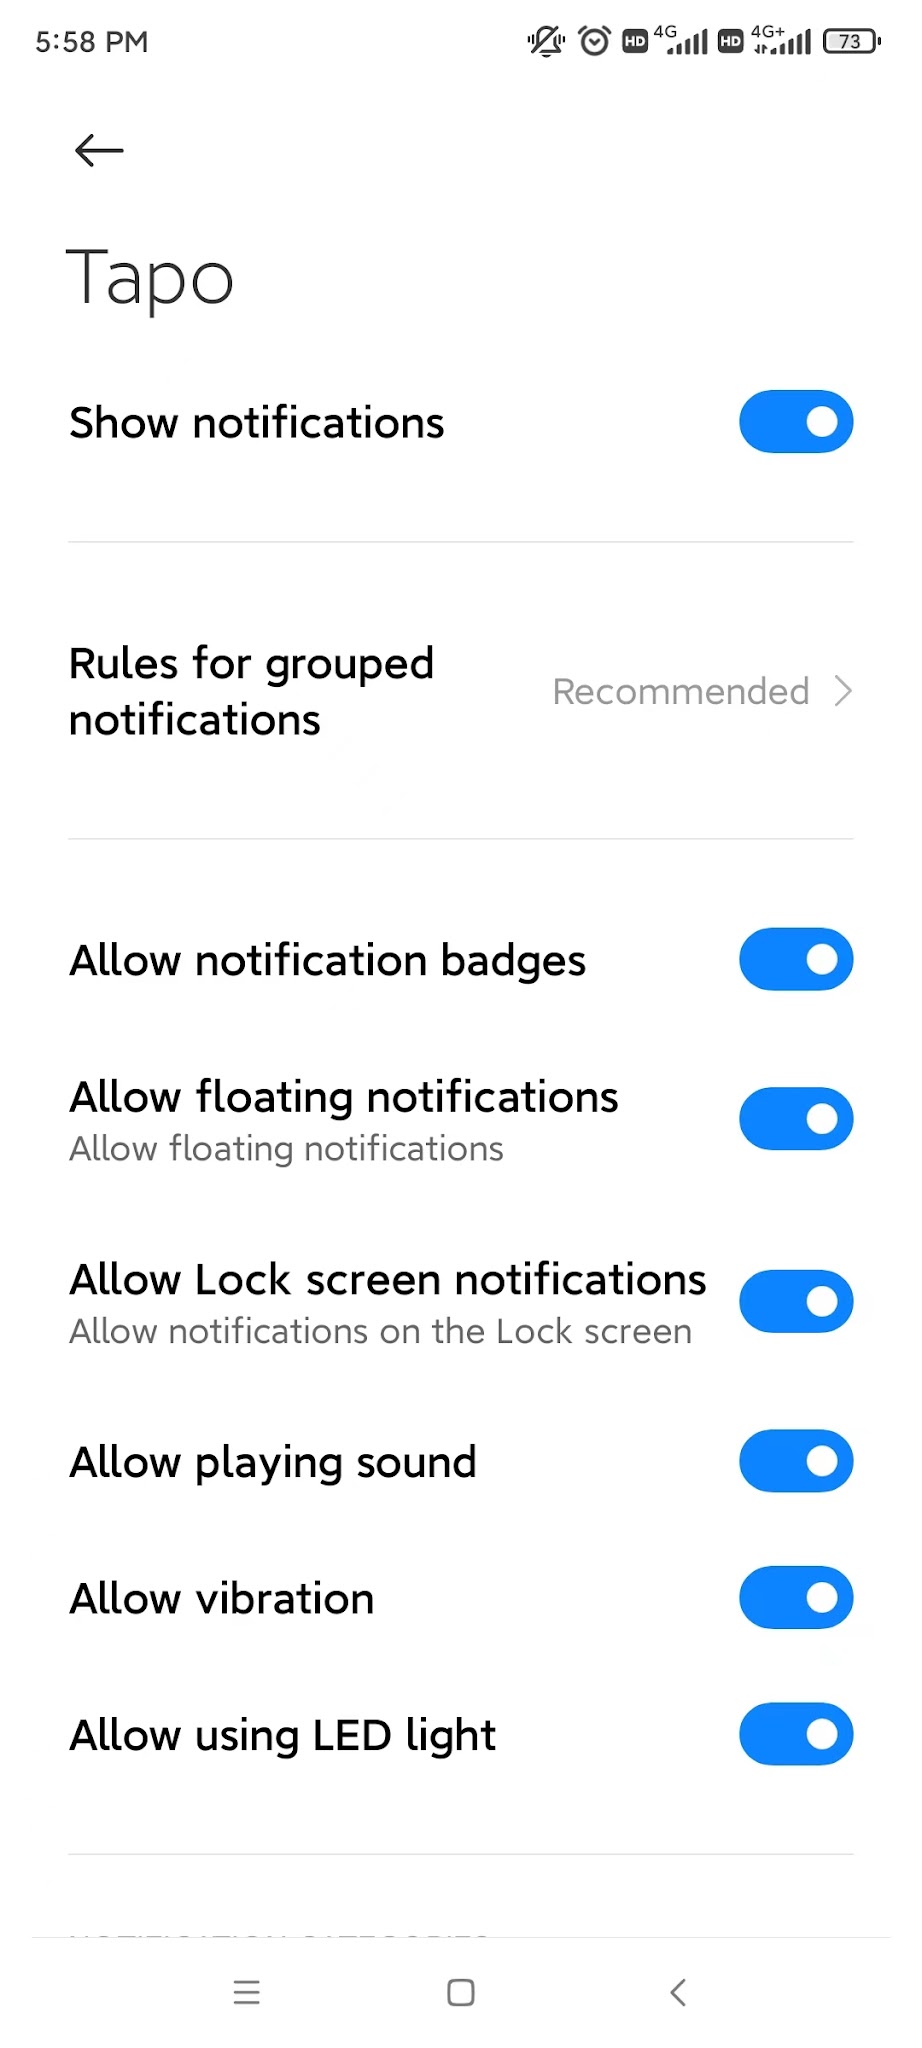
- For Android: Launch Settings > Notifications & status bar > App notifications, locate the Tapo/Kasa App and ensure the Show notifications option is on.
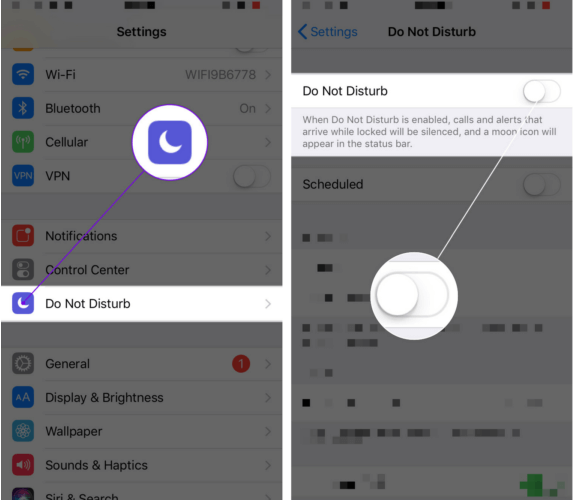
Step 3. Turn off Do Not Disturb.
- For iOS: Go to Settings > Do Not Disturb, then tap on the switch next to Do Not Disturb to turn it off.
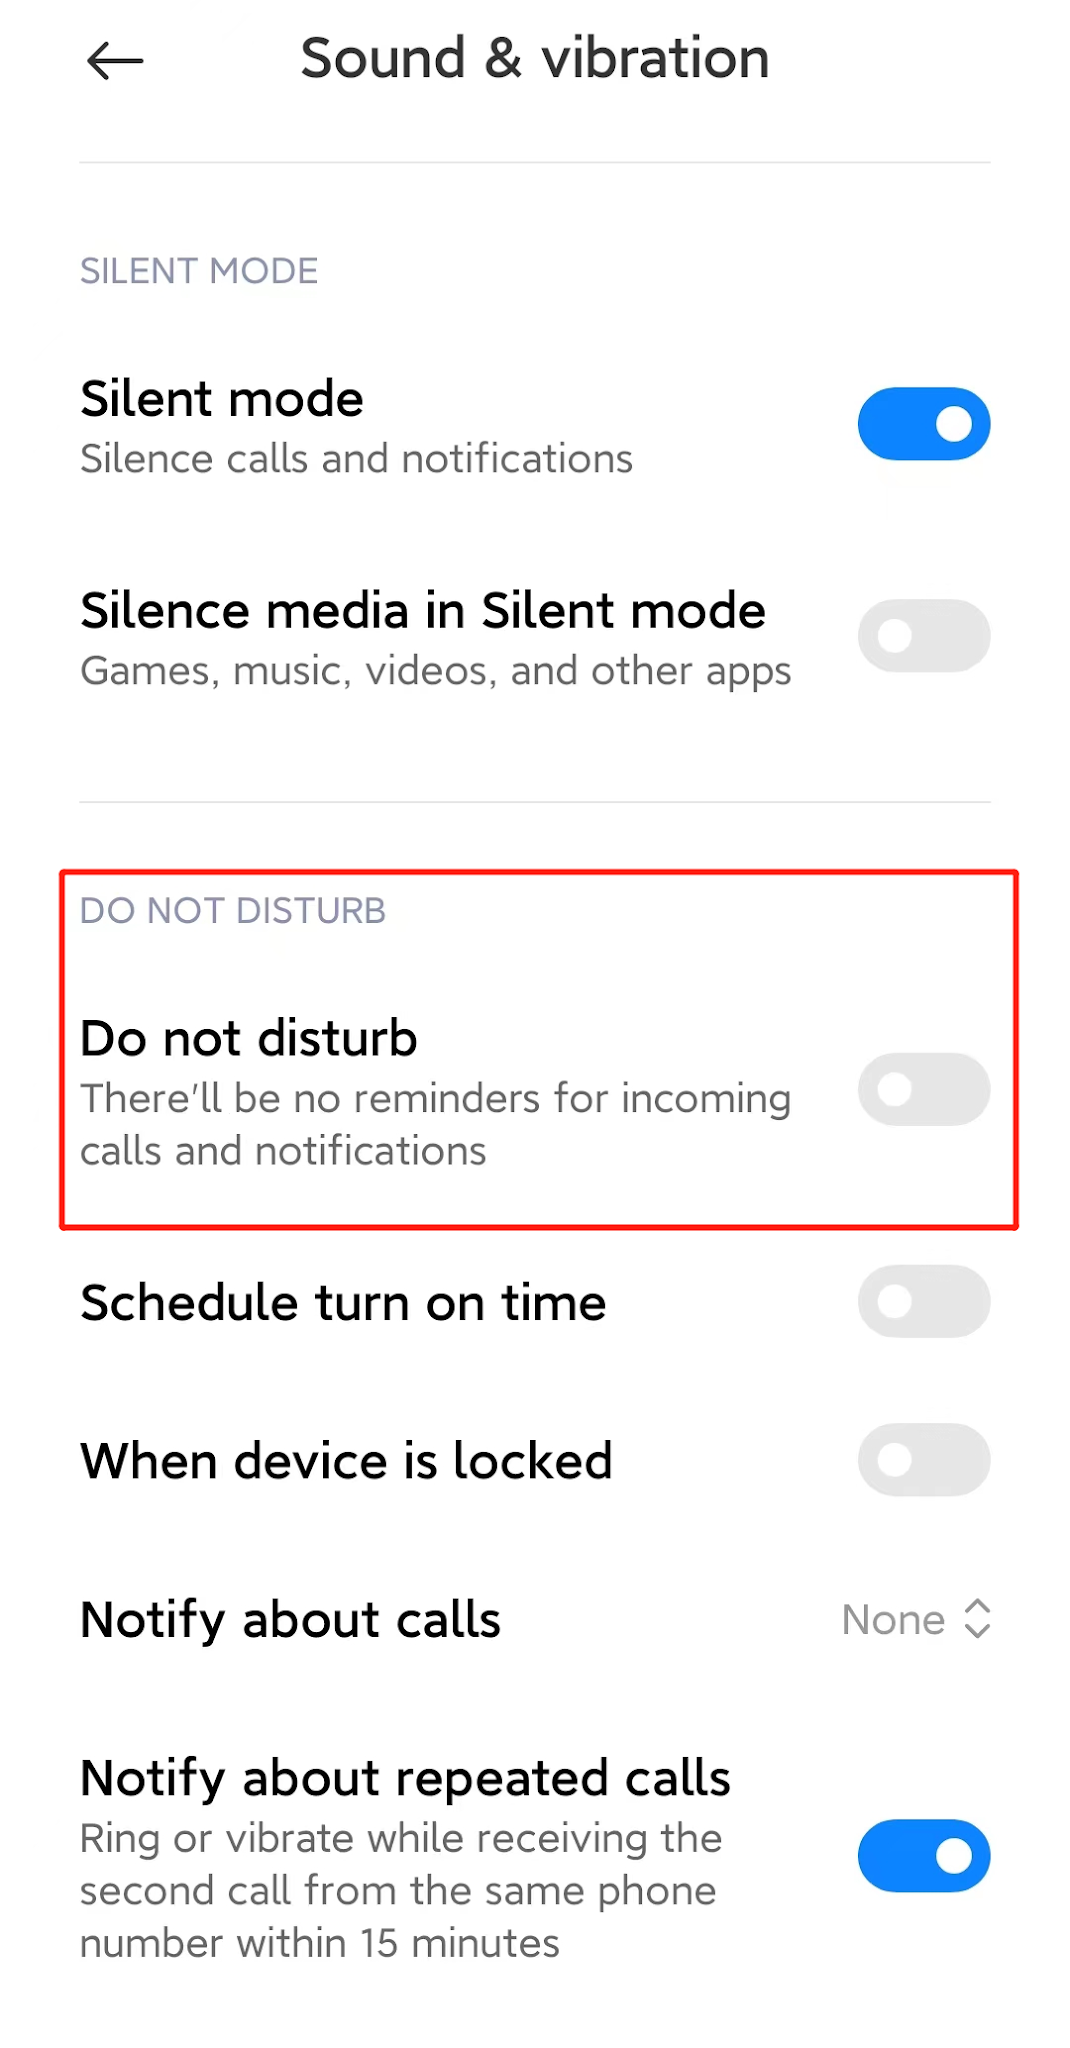
- For Android: Launch Settings > Sound & vibration > Do not disturb, then turn off the Do not disturb option.
Step 4. Ensure the phone's Wi-Fi or Cellular connections are working correctly and can access the internet.
Step 5. For Android: ensure your phone’s operating system and Google Play services are up to date. Run FCM diagnostics by opening the dialer and entering ##426##. This opens the FCM diagnostics page. Review the status. If it shows “Not connected,” FCM service is unavailable, and you should contact Google Support.
Reference Google’s official troubleshooting guide: Google FCM Android diagnostics FAQ.
Scenario 2: Tapo or Kasa Notifications Delayed
Case 1. General Android Devices
Step 1. Allow notification permissions in phone/tablet Settings for Tapo/Kasa.
Step 2. Allow Tapo/Kasa to auto‑start in Security/Settings > Autostart.

Step 3. Turn off battery optimization/limitations for the Tapo/Kasa app.
Step 4. Lock Tapo/Kasa in “recent pages” to ensure it runs in the background.
Step 5. If none of these work, reboot the Tapo/Kasa camera to make notifications take effect.
Case 2. Samsung Devices
Step 1. Prioritize notifications of the Tapo/Kasa app: Open Settings > Apps > Select Tapo/Kasa > Notifications, Toggle “Notification” ON, and set as a priority.
Step 2. Enable lock screen notifications: Open Settings > Notifications > Notifications (Lock screen), Toggle ON “Show on always‑on display”. Go to Do Not Disturb > Apps > Tapo/Kasa, ensure “Do Not Disturb” is not applied.
Step 3. Turn off battery limit: Open Settings > Battery > Background usage limits, Add Tapo/Kasa to “Never sleeping apps”.
Step 4. Lock the app: Tap Menu > Check “recent pages”, tap the Lock Icon of Tapo/Kasa, and tap Done.
Case 3. Huawei Devices
Step 1. Disable automatic App‑Launch management: Open Settings > Battery > App Launch > Find Tapo/Kasa, toggle OFF “Manage automatically” and allow background running.
Step 2. Allow lock screen notifications: Open Settings > Apps > Tapo/Kasa > Notifications, allow lock screen display.
Step 3. Lock the app: Tap Menu > Check “recent pages”, pull down Tapo/Kasa page until the lock icon appears.
Case 4. Xiaomi Devices
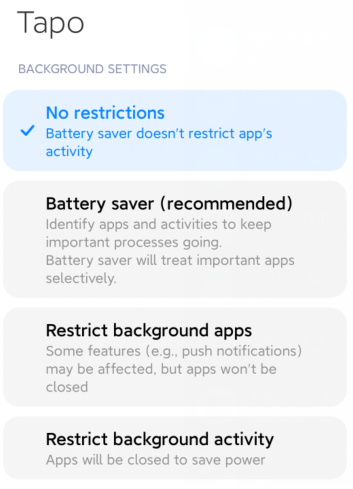
Step 1. Turn off battery limit: Open Settings > Battery & Performance > Tap Settings icon (top‑right) > Select “App battery saver” > Find Tapo/Kasa, Toggle ON “No restrictions”.
Step 2. Enable auto-start permission: Open Settings > Apps > Permissions > Auto-start, then find Tapo/Kasa and toggle ON.
Step 3. Lock the app: Tap Menu > Check “recent pages” > Long-press the Tapo/Kasa page, then tap the lock icon.
Case 5. OnePlus Devices
Step 1. Turn off battery limit: Open Settings > Battery > Battery Optimization > Find Tapo/Kasa, then toggle OFF.
Step 2. Enable auto-start permission: Open Settings > Apps > Auto‑Launch > Find Tapo/Kasa, then toggle ON.
Step 3. Lock the app: Tap Menu > Check “recent pages” > Long-press Tapo/Kasa page, then tap the lock icon.
QAs
Q1: Why am I still not receiving notifications after completing the troubleshooting steps?
Please check the notification source to confirm whether the detection event was triggered correctly. For reference, see Detection is not working on Tapo/Kasa Camera. If the issue persists, contact technical support and provide the app log. Instructions can be found here: How to get the log of Tapo Camera.
Q2: Why doesn’t my doorbell ringcall have its own schedule?
At present, ringcall and ring push notifications follow the same schedule as activity notifications. This means that the notification switches and schedules configured for activity notifications also affect the ring notification and ringcall.
To learn more about each function and configuration, please visit the Download Center to download the manual for your product.
Citește despre:
A fost util acest FAQ?
Părerea ta ne ajută să îmbunătățim acest site.
TP-Link Community
Still need help? Search for answers, ask questions, and get help from TP-Link experts and other users around the world.