
How to Use the WPS Button on Your TP-Link Router
Wi-Fi Protected Setup (WPS) lets devices connect to your TP-Link router quickly without entering a Wi-Fi password. This is useful for connecting printers, smart home devices, or other wireless hardware with a single button press. This page covers three methods for using WPS on a TP-Link router: the physical WPS button, a PIN (Personal Identification Number), and the WPS Wizard in the router's web interface. It also covers how to enable or disable the WPS feature. Note upfront: WPS is not supported on iOS devices and will not work if the router's wireless encryption is set to WEP.
Key Takeaways
- TP-Link routers support three WPS connection methods: the physical WPS button, a PIN, and the WPS Wizard in the router's web interface.
- To use the WPS button, tap the WPS icon on your device, then press the WPS button on the TP-Link router for one second within two minutes.
- WPS is not supported on iOS devices and will not work if the router's wireless encryption is set to WEP.
- Pressing the WPS button for more than five seconds will disable the wireless function on the TP-Link router. Hold it for one second only.
- To enable or disable WPS, go to System Tools > System Parameters > WPS in the router's web interface and check or uncheck the Enable WPS checkbox.
Before You Begin
WPS is not supported by iOS devices. The WPS function cannot be configured if the wireless function of the router is disabled. Also, the WPS function will be disabled if your wireless encryption is WEP. Please make sure the wireless function is enabled and is configured with the appropriate encryption before configuring the WPS.
Three Ways to Use WPS on Your TP-Link Router
Method 1: Use the WPS button
Wireless devices that support WPS, including Android phones and tablets, and most USB network cards, can be connected to your router using this method.
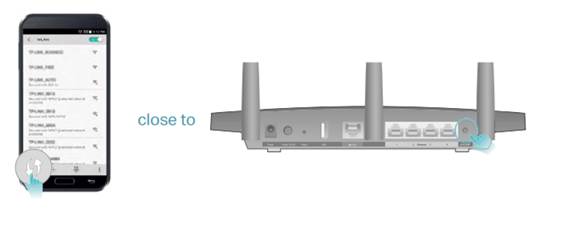
1) Tap the WPS icon on the device’s screen. Here we take an Android phone, for instance.
2) Within two minutes, press the WPS button for 1s on your router.
Note: If the TP-Link router enters pairing status, the WPS light will blink. Be careful when pressing the WPS button — if you hold it for more than five seconds, the wireless function will be disabled.
Method 2: Use a PIN
1) Log in to the web interface of your TP-Link router by following: How to Log In to Your TP-Link Router
2). Go to Advanced > Wireless > WPS > Router's PIN (Personal Identification Number).
The router's PIN is enabled by default, allowing wireless devices to connect with it.
You can use the default one or generate a new one.
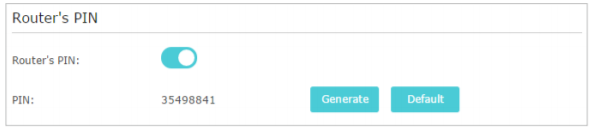
Note: PIN (Personal Identification Number) is an eight-character identification number preset to each router. WPS-supported devices can connect to your router with the PIN. The default PIN is printed on the router's label.
Method 3: Use the WPS Wizard
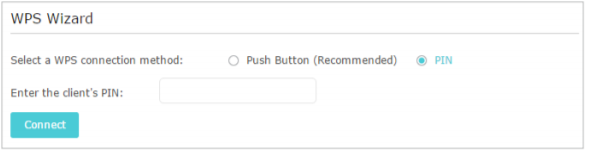
1) Select a setup method:
Push Button (Recommended): Click Connect on the screen. Within two minutes, press the WPS button on the client device.
PIN: Enter the client’s PIN, and click Connect.
2). "If the client has been successfully added to the network, 'Success' will appear on the screen and the WPS LED on the router will stay on for five minutes.
Enable/Disable WPS function
To enable or disable the WPS feature, go to System Tools > System Parameters > WPS, and tick or untick the Enable WPS checkbox.

Get to know more details of each function and configuration please go to the Download Center to download the manual of your product.
Looking For More
Is this faq useful?
Your feedback helps improve this site.

TP-Link Community
Still need help? Search for answers, ask questions, and get help from TP-Link experts and other users around the world.