How to configure IPSec VPN on TL-MR3020 (Router mode--new logo)
With IPSec VPN, you can access the network securely when out of home. To use the VPN Service, you need to configure Dynamic DNS Service or assign a static IP address for the router’s WAN port. And the System Time should be synchronized with the internet.
Here takes TL-MR3020 for demonstration.
IPSec VPN can only be set up after the product has been successfully configure as a router.
1. Configure the product as a 3G/4G router, wireless router or WISP client router.
How to configure 3G/4G Router Mode on TL-MR3020 (new logo)?
How to configure Wireless Router Mode on TL-MR3020 (new logo)?
How to configure WISP Client Router Mode on TL-MR3020 (new logo)?
2. Go to Advanced > VPN > IPSec VPN.
3. Enable Dead Peer Detection.

4. Click Add and enter correspond parameters.
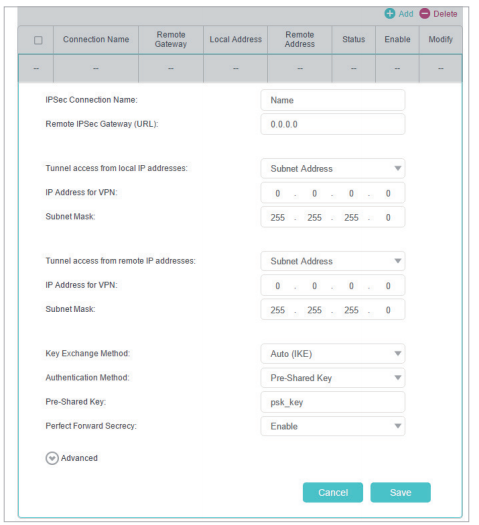
• IPSec Connection Name: Enter a name for the IPSec VPN connection.
• Remote IPSec Gateway (URL): Enter the destination gateway IP address which is the public WAN IP or domain name of the remote VPN server endpoint.
• Tunnel access from local IP addresses: Select Subnet Address if you want the whole LAN to join the VPN network, or select Single Address if you want a single IP to join the VPN network.
• IP Address for VPN: Enter the IP address of your LAN.
• Subnet Mask: Enter the subnet mask of your LAN.
• Tunnel access from remote IP addresses: Select Subnet Address if you want the whole remote LAN to join the VPN network, or select Single Address if you want a single IP to join the VPN network.
• IP Address for VPN: Enter the IP address of the remote LAN.
• IP Subnet Mask: Enter the subnet mask of the remote LAN.
• Key Exchange Method: Select Auto (IKE) or Manual to be used to authenticate IPSec peers.
• Authentication Method: Select Pre-Shared Key (recommended).
• Pre-Shared Key: Create a pre-shared key to be used for authentication.
• Perfect Forward Secrecy: Select Enable or Disable as an additional security protocol for the pre-shared key.
You can configure the advanced settings as needed. It’s recommended to keep the default values. If you want to change these settings, make sure that both VPN server endpoints use the same Encryption Algorithm, Integrity Algorithm, Diffie-Hellman Group and Key Lifetime in both phase1 and phase2.
5. Click Save.
Get to know more details of each function and configuration please go to Download Center to download the manual of your product.
Ez a GY.I.K. hasznos volt?
Véleménye segíti az oldal fejlesztését