Que dois-je faire si je ne parviens pas à configurer la caméra cloud ?
Remarque : cette FAQ convient à toutes les caméras cloud TP-Link, y compris NC200, NC220, NC450, etc. Ici, nous prenons NC450 comme exemple.
L'application tpCamera vous guidera étape par étape lors de la configuration initiale, cependant, vous ne pourrez peut-être pas franchir toutes les étapes en raison de certaines interférences. Cette FAQ vous indiquera quoi faire si vous avez du mal à franchir une certaine étape.
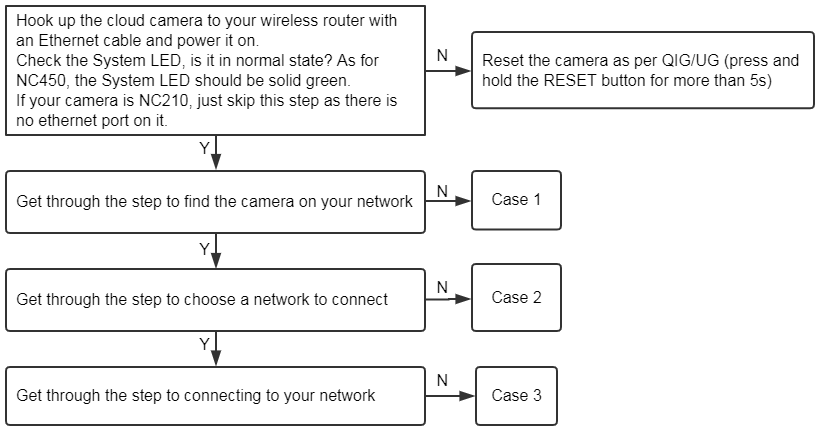
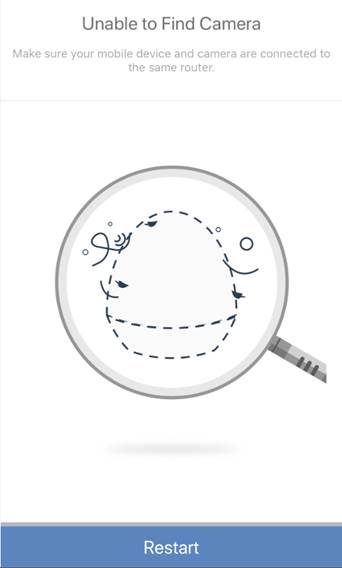
Impossible de trouver la caméra.
Étape 1
Vérifiez l'état du voyant système de la caméra et assurez-vous qu'il est vert fixe. Sinon, réinitialisez la caméra selon GIG/UG (appuyez sur le bouton RESET et maintenez-le enfoncé pendant plus de 5 s jusqu'à ce que la LED système s'éteigne).
Étape 2
Assurez-vous que votre smartphone est connecté au même routeur auquel votre caméra est connectée.
Étape 4
Désactivez la connexion VPN (le cas échéant) sur le téléphone ou utilisez un autre téléphone pour réessayer.
Étape 5
Réinitialisez la caméra conformément au QIG/UG et recommencez le processus.
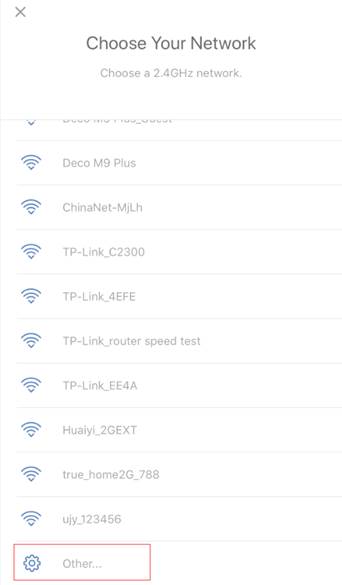
Impossible de trouver le nom Wi-Fi du réseau domestique.
Étape 1
La force du signal de votre réseau domestique doit être adéquate, rapprochez la caméra de votre routeur si ce n'est pas le cas. Ou il vous est suggéré de changer les canaux sans fil sur votre routeur.
Étape 2
S'il n'affiche pas automatiquement le nom Wi-Fi de votre routeur, veuillez dérouler et actualiser la liste Wi-Fi plusieurs fois pour voir si vous pouvez le trouver.
Étape 3
Si le SSID de votre routeur est masqué, veuillez choisir « Autre » pour saisir manuellement le SSID et le mot de passe.
Étape 4
Assurez-vous que votre réseau Wi-Fi domestique fonctionne sur 2,4 GHz, car les caméras cloud ne prennent pas en charge le réseau Wi-Fi 5 GHz.
Étape 5
Réinitialisez la caméra conformément au QIG/UG et recommencez le processus.
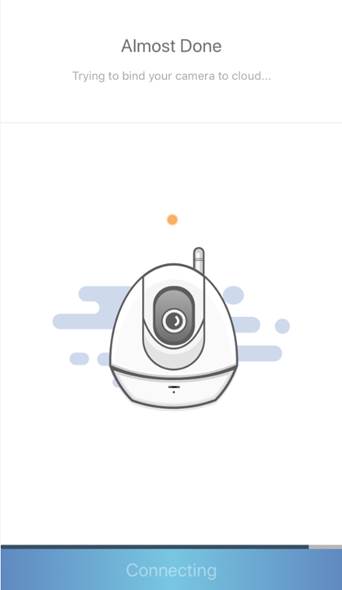
Impossible de terminer le processus de connexion
Étape 1
Attendez une minute ou deux, puis vérifiez l'état de la LED.
Si le voyant est normal, cela indique que la connexion réseau a été établie et que la caméra fonctionne maintenant. Vous pouvez débrancher le câble entre la caméra et le routeur et regarder la vue en direct ou modifier les paramètres de la caméra sur l'APP.
Étape 2
Confirmez le mot de passe Wi-Fi de votre routeur. Configurez à nouveau la caméra si le mot de passe Wi-Fi que vous avez saisi est erroné.
La longueur du mot de passe ne peut pas dépasser 64 caractères et confirmez que le mot de passe ne contient pas de caractères tels que des guillemets simples et doubles.
Étape 3
Réinitialisez la caméra conformément au QIG/UG et recommencez le processus.
Est-ce que ce FAQ a été utile ?
Vos commentaires nous aideront à améliorer ce site.