Guide d'installation
Caméra de sécurité extérieure à double objectif Tapo C575D avec panoramique et inclinable
Bienvenue dans le guide d'installation.
Pour garantir l'égalité d'accès à tous les utilisateurs, nous proposons ce guide d'installation accessible. Conçu pour répondre aux besoins d'accessibilité, ce guide vous permettra de réaliser une installation réussie. Il vous présentera l'apparence de la caméra, notamment ses ports, ses boutons et ses étiquettes, puis vous guidera tout au long du processus d'installation.
Étape 1. Familiarisez-vous avec votre caméra
Dans cette section, nous décrirons l'apparence de la caméra, y compris ses ports, ses boutons et ses étiquettes.
1. Vous trouverez votre caméra dans l'emballage.
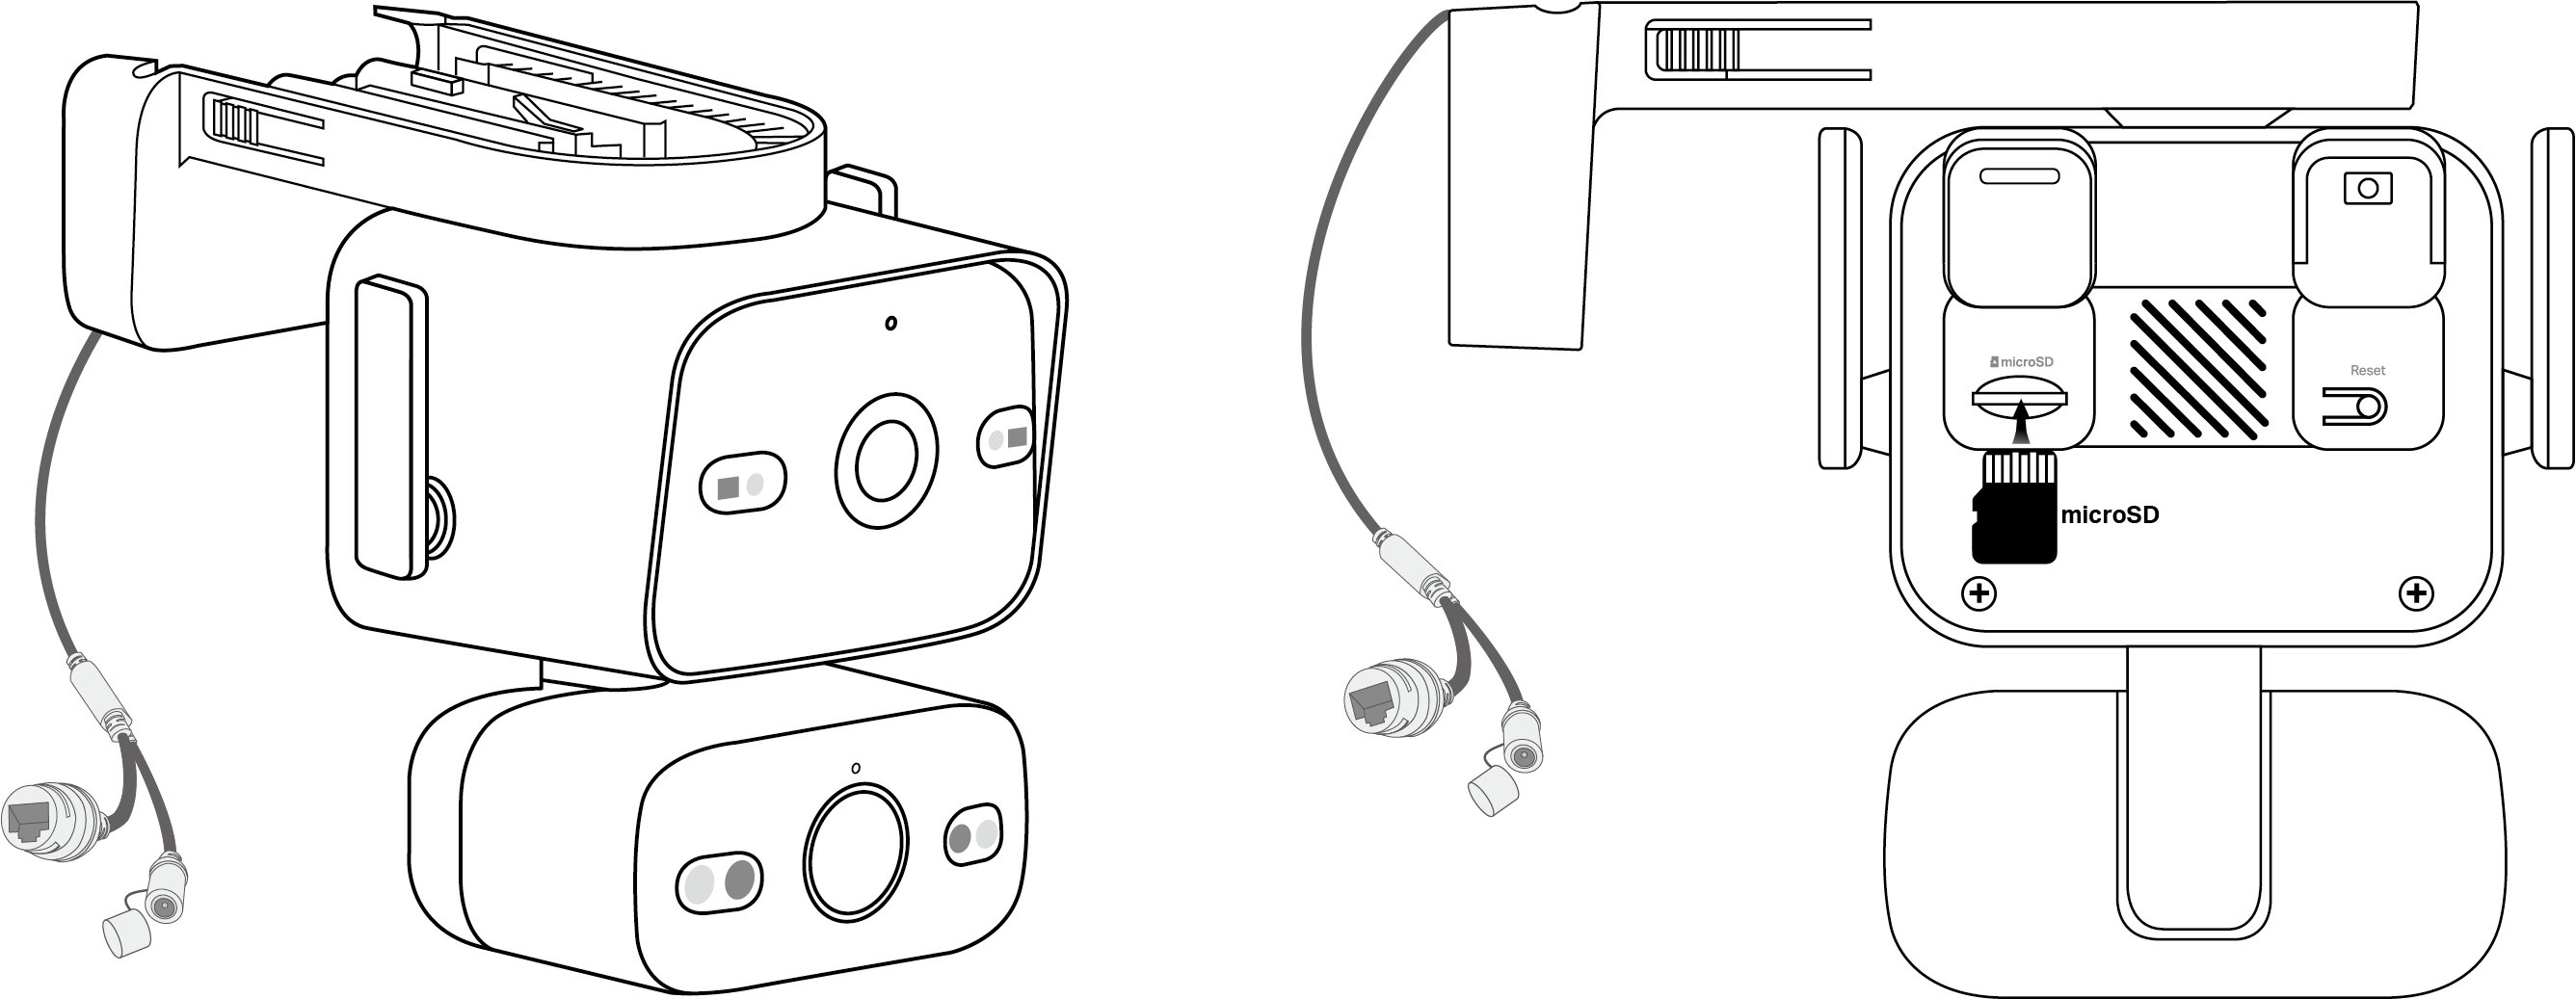
La caméra est composée de deux blocs rectangulaires. Le plus grand, muni d'une base, est placé au-dessus, et le plus petit en dessous.
2. Ensuite, placez le plus gros bloc en haut et le plus petit en bas.
Pour garantir un positionnement correct de la caméra, vous devez la positionner de manière à ce que les deux objectifs soient orientés vers l'avant.
3. Après avoir correctement positionné votre caméra, nous vous présenterons les ports, les boutons et les étiquettes de votre appareil dans un ordre précis.
Objectifs : Pour capturer les sujets dans leur champ de vision. L’objectif grand angle supérieur est fixe, mais permet un réglage manuel pour un angle de vue optimal. L’objectif téléobjectif inférieur est doté d’un panoramique et d’une inclinaison automatiques pour suivre les mouvements ou effectuer une mise au point sur différentes zones selon les besoins.
Microphone : Pour enregistrer votre voix. Il se trouve juste au-dessus de l’objectif supérieur.
LED infrarouges et à lumière blanche : pour créer des images en noir et blanc ou en couleur la nuit. Elles sont situées de part et d’autre des lentilles supérieure et inférieure.
Voyant système : situé juste au-dessus de l’objectif inférieur, il indique l’état de votre caméra. Vous pouvez consulter cet état via l’application Tapo.
Retournez le bloc principal pour trouver les protections en silicone, le haut-parleur et l' étiquette du produit . Ouvrez le couvercle de gauche pour accéder à l' emplacement pour carte microSD . Ouvrez le couvercle de droite pour accéder au bouton de réinitialisation.
Haut-parleur : Il est placé entre deux plaques pour produire le son, vous permettant ainsi d'entendre l'audio.
Étiquette du produit : Les informations relatives au produit sont partiellement gravées au laser. L’adresse MAC et le numéro de série sont imprimés sur une étiquette.
Emplacement pour carte microSD : face à l’emplacement, insérez une carte microSD avec l’encoche sur le côté gauche et les contacts dorés face à l’emplacement.
Bouton de réinitialisation : Le bouton de réinitialisation est un bouton circulaire en relief. Lorsque la caméra est allumée, maintenez le bouton RESET enfoncé pour le réinitialiser.
Maintenir enfoncé pendant 5 secondes : Réinitialiser uniquement les paramètres Wi-Fi.
Maintenir enfoncé pendant 10 secondes : Réinitialiser les paramètres d'usine.
Retournez votre caméra pour trouver le câble d'alimentation. À l'extrémité de ce câble se trouvent le connecteur d'alimentation CC et le port Ethernet .
Connecteur d'alimentation CC et capuchon étanche : Le capuchon est fixé au connecteur. Ouvrez-le pour brancher la caméra à l'adaptateur secteur et l'alimenter. Si vous utilisez un routeur PoE pour alimenter la caméra, recouvrez le connecteur d'alimentation avec le capuchon pour assurer l'étanchéité.
Port Ethernet : Permet de se connecter à un périphérique réseau via un câble Ethernet.
Étape 2. Configuration
1. Téléchargez l'application Tapo depuis l'App Store ou Google Play, puis connectez-vous.

2. Ouvrez le couvercle, puis maintenez enfoncé le bouton d'alimentation (à droite) de votre caméra pendant environ 3 secondes pour l'allumer. Attendez 30 secondes que l'appareil démarre. Vous entendrez un clic.
3. Appuyez sur le bouton + dans l'application et sélectionnez votre modèle de caméra. Suivez les instructions de l'application pour terminer la configuration.
Si vous avez besoin d'aide, veuillez consulter https://www.tapo.com/support/ pour obtenir une assistance technique, le guide de l'utilisateur, la FAQ, les informations sur la garantie et plus encore.
Pour plus de détails sur l'accessibilité de l'application Tapo, veuillez consulter la section Assistance à l'accessibilité .
Informations de sécurité
N’utilisez pas de chargeur ou de câble USB endommagé pour charger l’appareil.
N’utilisez aucun autre chargeur que ceux recommandés.
N’utilisez pas l’appareil dans les endroits où les appareils sans fil sont interdits.
L’adaptateur doit être facilement accessible.
Tenez l’appareil éloigné du feu et des sources de chaleur. NE PAS immerger dans l’eau ou tout autre liquide.
Ne pas démonter, réparer ou modifier le produit.
N’utilisez pas le produit si son boîtier est endommagé. Risque d’électrocution.
Ne jamais toucher le produit avec les mains mouillées.
Ne pas placer à proximité d’appareils à commande automatique tels que les alarmes incendie. Les ondes radio émises par ce produit peuvent perturber le fonctionnement de ces appareils et provoquer un accident.
Respectez les restrictions d’utilisation des produits sans fil dans les dépôts de carburant, les usines chimiques ou lors d’opérations de dynamitage.
N’utilisez pas de liquide pour nettoyer le produit. Utilisez uniquement un chiffon sec.
N’introduisez jamais d’objets métalliques à l’intérieur du produit. Si un objet métallique pénètre dans le produit, coupez le disjoncteur et contactez un électricien qualifié.
Ce produit n’est pas destiné à être utilisé dans le cadre de soins médicaux. Consultez le fabricant de tout dispositif médical personnel, comme un stimulateur cardiaque ou un appareil auditif, afin de vérifier s'il est correctement protégé contre les interférences radiofréquences (RF) externes.
N'utilisez pas ce produit dans les établissements de santé. Les hôpitaux et les établissements de santé peuvent utiliser des équipements sensibles aux RF externes.
Ne placez pas d'objets lourds sur le produit.
Lorsque vous n'utilisez pas le produit pendant une période prolongée, débranchez-le.
Ce produit peut interférer avec d'autres appareils électroniques tels que téléviseurs, radios, ordinateurs, téléphones ou autres appareils sans fil.
L'adaptateur doit être utilisé à l'intérieur, à une température ambiante inférieure ou égale à 40 °C.
Utilisez uniquement les alimentations mentionnées dans le mode d'emploi. Consultez le manuel d'utilisation sur la page d'assistance produit.
Température de fonctionnement : -30 °C à 60 °C (-22 °F à 140 °F).
Veuillez lire et respecter les consignes de sécurité ci-dessus lors de l'utilisation de l'appareil. Nous ne pouvons garantir l'absence d'accidents ou de dommages liés à une utilisation incorrecte de l'appareil. Veuillez utiliser ce produit avec précaution et à vos propres risques.