Como alterar o endereço IP LAN do modem roteador TP-Link personalizado pelo provedor de internet
Introdução
Este artigo fornece instruções passo a passo para alterar o endereço IP da LAN em Roteadores Modem TP-Link customizados para provedores (ISP).
Nota:
- Lembre-se do novo endereço IP da LAN do seu modem roteador. Caso queira retornar à interface web, você precisará fazer o login no roteador usando o novo endereço IP.
- Após alterar o endereço IP da LAN, reinicie o dispositivo.
Configuração
Caso 1: Para Roteadores Sem Fio e Roteadores Whole Home Mesh, como EX520, EB810v, HC220-G5, HX510, HB410, etc.
Passo 1. Certifique-se de que seu dispositivo esteja conectado ao roteador via Wi-Fi ou cabo Ethernet. Abra um navegador web e digite http://tplinkwifi.net na barra de endereços para acessar a interface web.
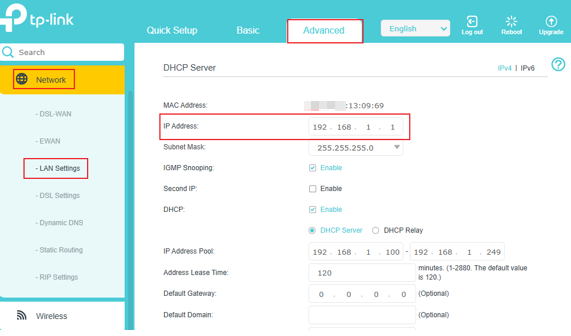
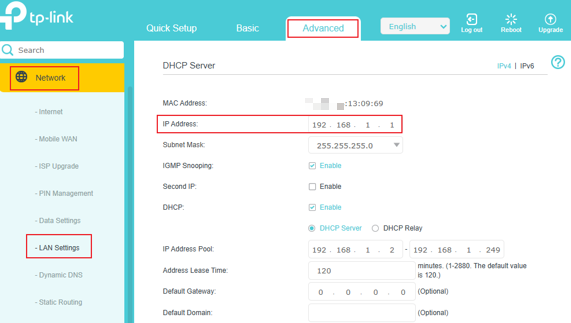
Passo 2. Vá em Advanced (Avançado) > Network (Rede) > LAN Settings (Configurações de LAN) > altere o IP Address (Endereço IP) para o desejado > Save (Salvar).
Caso 2: Para Roteadores Modem DSL, como Archer VR1600v, VX230v, VX420-G2v, etc.
Passo 1. Certifique-se de que seu dispositivo esteja conectado ao roteador via Wi-Fi ou cabo Ethernet. Abra um navegador web e digite http://tplinkmodem.net na barra de endereços para acessar a interface web.
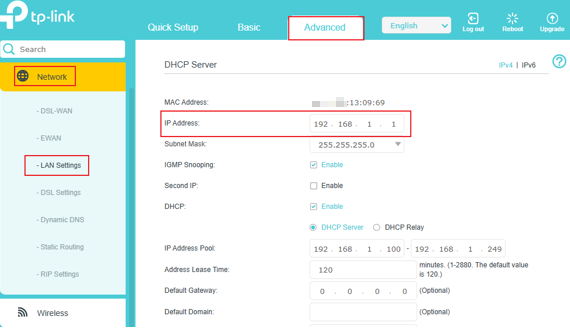
Passo 2. Vá em Advanced (Avançado) > Network (Rede) > LAN Settings (Configurações de LAN) > altere o IP Address (Endereço IP) para o desejado > Save (Salvar).
Caso 3: Para Roteadores 4G ou 5G customizados para ISP, como NX220v, MX510v, NE210-Outdoor, etc.
Passo 1. Certifique-se de que seu dispositivo esteja conectado ao roteador via Wi-Fi ou cabo Ethernet. Abra um navegador web e digite http://tplinkmodem.net na barra de endereços para acessar a interface web.
Passo 2. Vá em Advanced (Avançado) > Network (Rede) > LAN Settings (Configurações de LAN) > altere o IP Address (Endereço IP) para o desejado > Save (Salvar).
Esta FAQ é útil?
Seu feedback ajuda a melhorar este site.