How to build a VPN tunnel with TD-W9970 (new logo)
1. Log into web management page of the modem router.
How to login to the web management page of TD-W9970 (new logo)?
2. Go to Network → IPSec VPN, you can Add/Remove or Enable/Disable the IPSec tunnel connections on the screen as shown.

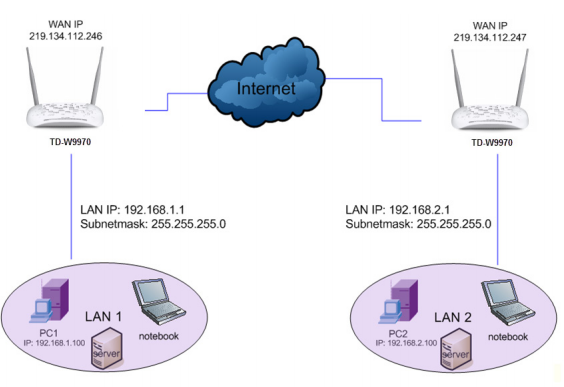
This section will guide you to configure a VPN tunnel between two modem routers. The topology is as follows.
Note: You could also use other VPN Routers to set VPN tunnels with the modem router. It supports up to 10 VPN tunnels simultaneously.
Click Add New Connection and then you will enter the screen shown below.
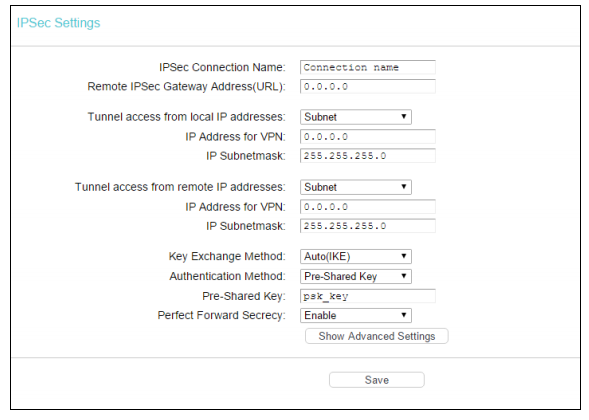
Enter the Remote IPSec Gateway Address (URL) in the box which is the public WAN IP or domain name of the remote VPN server endpoint. (For example: Input 219.134.112.247 in Device1, Input 219.134.112.246 in Device2).
Enter Tunnel access from local IP addresses: Choose Subnet if you want the whole LAN to join the VPN network, or else choose Single Address if you want a single IP to join the VPN network.
IP Address for VPN: Enter the IP address of your LAN. (For example: Input 192.168.1.1 in Device1, input 192.168.2.1 in Device2)
IP Subnetmask: Enter the Subnetmask of your LAN. ( For example: Input 255.255.255.0 in both Device1 and Device2)
Tunnel access from remote IP addresses: Choose Subnet if you want the Remote Whole LAN to join the VPN network, or else choose Single Address if you want single IP to join the VPN network.
IP Address for VPN: Enter the IP address of the Remote LAN. (For example: Input 192.168.2.1 in Device1,Input 192.168.1.1 in Device2)
IP Subnetmask: Enter the subnetmask of the remote LAN. ( For example: Input 255.255.255.0 in both Device1 and Device2)
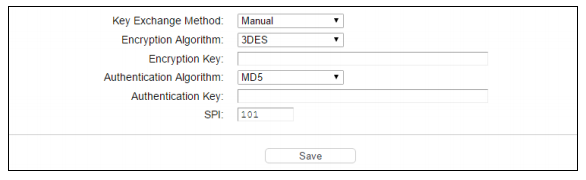
Key Exchange Method: Select Auto (IKE) or Manual.
If you select Manual as Key Exchange Method, the screen will display as follows:
If you select Auto as Key Exchange Method, the screen will display as follows:
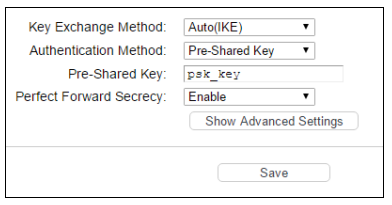
We recommend you leave the Advanced Settings as default value.
Note: If you want to change the default settings of Advanced Settings, please make sure that both VPN server endpoints use the same Encryption Algorithm, Integrity Algorithm, Diffie-Hellman Group and Key Life time in both phase1 and phase2.
After complete the basic settings and click Save/Apply in both Device1 and Device2, PCs in LAN1 could communicate with PCs in remote LAN2. (For example: You can ping the IP address of PC2 which is 192.168.2.100 in PC1)
Note: The VPN Servers Endpoint from both ends must use the same pre-shared keys and Perfect Forward Secrecy settings.
Get to know more details of each function and configuration please go to Download Center to download the manual of your product.
¿Es útil esta pregunta frecuente?
Sus comentarios nos ayudan a mejorar este sitio.
