如何在TL-WR702N上設定路由器模式
這篇文章適用於:
注意:本常見問題僅適用於韌體版本為 130314 或更早版本的 TL-WR702N;不適用於 130528 或更高版本。
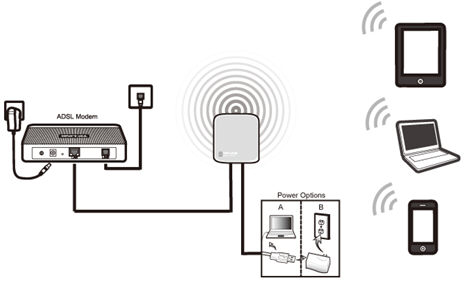
定義:TL-WR702N 連接到 DSL 或有線數據機,並作為普通的無線路由器運作。
應用場景:一個使用者可以透過 DSL 或有線數據機連接到互聯網,但多個用戶需要共享互聯網。
實體連接
第一步:
使用乙太網路線將 WR702N 直接連接到電腦的乙太網路連接埠;
步驟二:
開啟 WR702N 的電源
.jpg)
電腦初始設定 – 適用於 Windows 7、Vista 和 XP 系統(Mac OS X 系統請至第 3 頁)
第一步:
Windows 7和Windows Vista:前往“開始” -> “控制台”- > “網路和共用中心”
Windows XP:前往“開始” -> “控制台” -> “網路連線”
.jpg)
步驟二:
Windows 7:前往“網路和共用中心” -> “變更適配器設定”
Windows Vista:前往“網路與共用中心” -> “管理網路連線”
Windows XP:(進入下一步)
.png)
步驟 3:
Windows 7、Vista 和 XP:右鍵點選本機連線> 選擇屬性 - > 雙擊Internet 協定版本 4 (TCP/IPv4)或Internet 協定 (TCP/IP)(適用於 Windows XP)。
.png)
第四步:
Windows 7、Vista 和 XP:選擇“使用下面的 IP 位址: ”
請輸入以下資訊:
1. IP位址:192.168.0.10
2.子 網路遮罩:255.255.255.0
點選「確定」退出
Click OK again to apply the settings.
.png) Windows 7, Vista & XP
|
Initial Computer Setup– For Mac OS X
Go to the Apple>System Preferences->Network-> Highlight Ethernet ->Configure IPv4: Using DHCP with manual address
Input the IPv4 Address: 192.168.0.10
Click Apply
.jpg)
Access the Management Page
Open a Web Browser -> Type 192.168.0.254 in the address bar -> Press Enter
.jpg)
Enter the default User Name: admin
Enter the default Password: admin
Click OK
.jpg)
Run Quick Setup
Step 1:
Go to Quick Setup-> Click Next
.jpg)
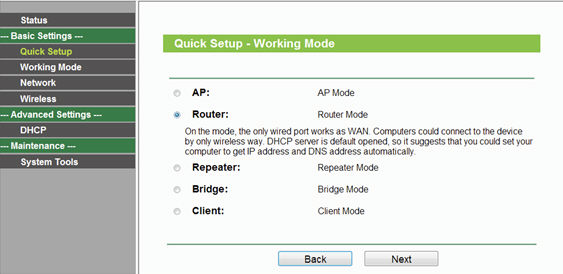
Step 2:
Select Router-> Click Next
Step 3:
Customize your wireless name (SSID) and password
|
Wireless Radio: Enable
SSID: (Rename Your Wireless Name)
Region:(Select Your Current Location)
Channel: Auto
Mode: 11bgn mixed
Channel Width: Auto
Security Options: WPA-PSK/WPA2-PSK
PSK Password: (Create a Private Password)
Click Next
|

Step 4:
Choose the WAN Connection your ISP is using. For most DSL and cable ISP, they use Dynamic IP.
If you’re not sure, please consult with your ISP customer service.
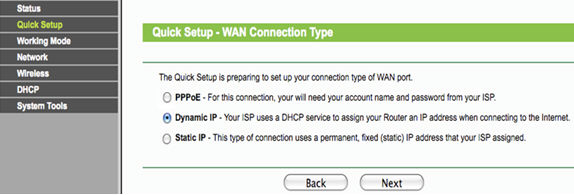
Procedures are different according to the Connection Type you choose.
1) Select Dynamic IP, and click Next;
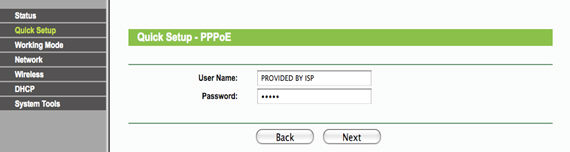
2) Select PPPoE, input the Username and Password provided by ISP and then click Next;
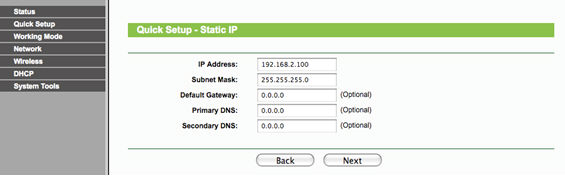
3) Select Static IP, input the IP parameters provided by ISP and then click Next;
Step 5:
Click: Reboot, and wait until it goes to 100%
.jpg)
At the same time please reboot your modem.
Relocate the WR702N
You may now connect the WR702N directly into the LAN Ethernet port on the back of your Modem.
Congratulations! Youcan share your internet to multiple wireless devices.
Final Computer Reversion– For Windows 7, Vista & XP (For Mac OS X, please go to page 9)
Step 1:
Windows 7&Windows Vista: Go to Start->Control Panel ->Network and Sharing Center
Windows XP: Go to Start->Control Panel->Network Connections
Step 2:
Windows 7:前往“網路和共用中心” -> “變更適配器設定”
Windows Vista:前往“網路與共用中心” -> “管理網路連線”
Windows XP:(進入下一步)
步驟 3:
Windows 7、Vista 和 XP:右鍵點選本機連線 - > 選擇屬性 - > 雙擊Internet 協定版本 4 (TCP/IPv4)或Internet 協定 (TCP/IP)(適用於 Windows XP)。
第四步:
Windows 7、Vista 和 XP:選擇「自動取得 IP 位址」和「自動取得 DNS 伺服器位址」。
點選「確定」退出
再次按一下“確定”以套用設定。
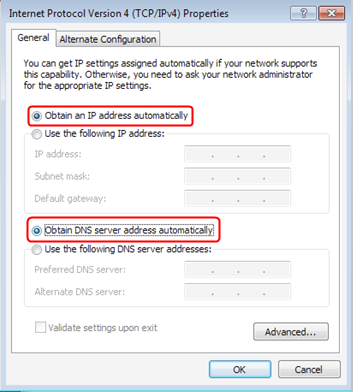 Windows 7、Vista 和 XP
|
最終電腦版本 – 適用於 Mac OS X
前往蘋果選單 - >系統偏好設定->網路-> 選擇乙太網路 - > 設定 IPv4:使用 DHCP
點擊“申請”
如果出現問題,請隨時與我們聯繫(support@tp-link.com)。
如需了解各項功能和配置的更多詳細信息,請前往下載中心下載您產品的使用手冊。
這篇faq是否有用?
您的反饋將幫助我們改善網站