M7350 V6.2 User Guide
Chapter 8 Manage Your Mobile Wi-Fi
This chapter presents how to manage and maintain your Mobile Wi-Fi.
It includes the following sections:
•Save the Mobile Wi-Fi’s Power
1. Save the Mobile Wi-Fi’s Power
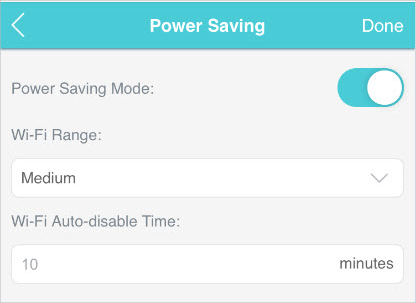
The Power Saving feature allows you to slow down the power consumption of your Mobile Wi-Fi. You can reduce the Wi-Fi range to save power. Alternatively, you can enable the Wi-Fi Auto-disable Time feature to disable the Wi-Fi of your Mobile Wi-Fi in the idling period.
1.Visit http://tplinkmifi.net, and log in with the password you set for the Mobile Wi-Fi.
2.Go to Device > Power Saving.
•To set Wi-Fi Range:
1.Enable Power Saving Mode.
2.Select Long, Medium or Short from the Wi-Fi Range drop-down list.
 Note:
Note:
The shorter the Wi-Fi Range is, the less power your Mobile Wi-Fi uses.
3.Tap Done.
4.Tap Restart Wi-Fi on the pop-up to make the configurations take effect, and then reconnect to the Mobile Wi-Fi after the Wi-Fi restarts.
•To set Wi-Fi Auto-disable Time:
1.Enable Power Saving Mode.
2.Specify the Wi-Fi Auto-disable Time.
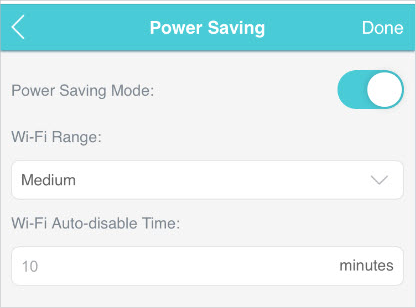
3.Tap Done. If there are no devices connected to the Mobile Wi-Fi during the period you have specified, the Wi-Fi will be disabled automatically.
Note:
To recover the Wi-Fi, press the Power Button or the Menu Button.
The account management feature allows you to change your login password of the web management page to prevent other users from logging in to your web management page.
1.Visit http://tplinkmifi.net, and log in with the password you set for the Mobile Wi-Fi.
2.Go to Device > Account.
3.Enter the current password. Then enter the new password twice (both case-sensitive) and tap Done.
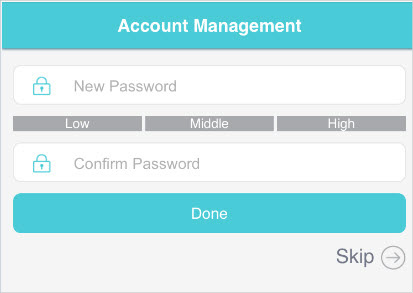
4. Use the new password for future logins.
System time is the time displayed when the Mobile Wi-Fi is running. The system time you configure here will be used for time-based functions.
Note:
Make sure your Mobile Wi-Fi has access to the internet before you set the system time. Otherwise, it can not synchronize the current time and date.
1.Visit http://tplinkmifi.net, and log in with the password you set for the mobile Wi-Fi
2.Go to Device > Advanced > Time Settings.
3.Select your local Time Zone from the drop-down list.
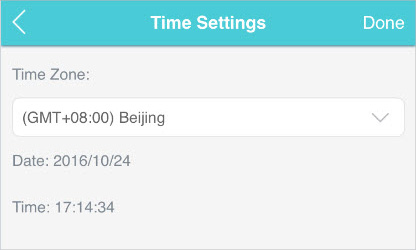
4.Tap Done.
4. Restore Configuration Settings
The Factory Defaults feature allows you to restore your Mobile Wi-Fi to its factory defaults. After you restore your Mobile Wi-Fi, all previous settings will be cleared and you have to reconfigure them.
•To reset on the Mobile Wi-Fi:
With the Mobile Wi-Fi powered on, remove the cover. Use a pin to press and hold the RESET button until the “Power Off” appears on the screen.
•To reset on the webpage:
1.Visit http://tplinkmifi.net from the PC login entry, and log in with the password you set for the Mobile Wi-Fi .
2.Go to Advanced > Device > Factory Defaults.
3.Click Restore.

4.Wait a few minutes for the resetting and rebooting.
 Note: During the resetting process, do not power off the Mobile Wi-Fi and make sure it has sufficient power.
TP-Link is dedicated to improving product features to enrich your network experience. We will inform you through the screen and web management page if there’s any newly released update firmware for your Mobile Wi-Fi. Also, the latest firmware will be released at TP-Link official website, you can download it from the Support page of our website www.tp-link.com for free.
Note:
1.Make sure the latest firmware file is matched with the hardware version (as shown in the Download section of the Support page).
2.Make sure that you have a stable connection between the Mobile Wi-Fi and your computer.
3.Do NOT power off the Mobile Wi-Fi during the firmware update and make sure it has sufficient power.
•To update the firmware on screen:
1. Press  (the power button)to update your Mobile Wi-Fi when the following screen appears.

2.Wait a few minutes for the update and reboot.
•To update the firmware locally:
1.Download the latest firmware file for the Mobile Wi-Fi from our website
www.tp-link.com.
2.Visit http://tplinkmifi.net from the PC login entry, and log in with the password you set for the Mobile Wi-Fi.
3.Go to Advanced > Device > Firmware Update.
4.Select Update via the local server, click Browse to locate the downloaded file, and then click Update.
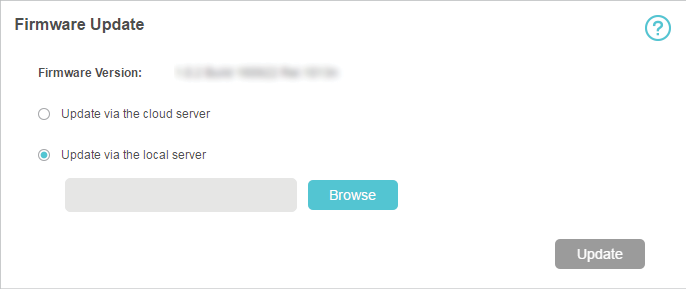
5.Wait a few minutes for the update and reboot.
•To update the firmware online:
1.Visit http://tplinkmifi.net from the PC login entry, and log in with the password you set for the Mobile Wi-Fi.
2.Go to Advanced > Device > Firmware Update.
3.Select Update via the cloud server.
4.Click Update.
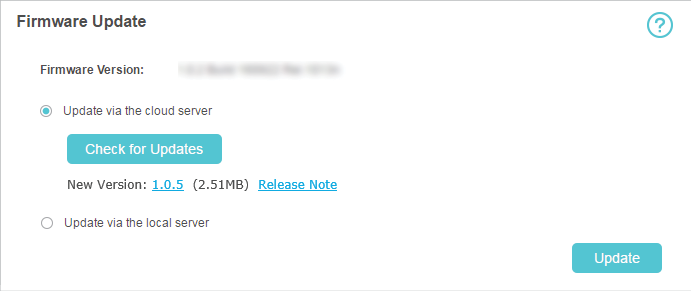
5.Wait a few minutes for the update and reboot.
Note:
To download the latest firmware file, you can also click the New Version number, such 1.0.5 in the page above. To view update details, click Release Note.
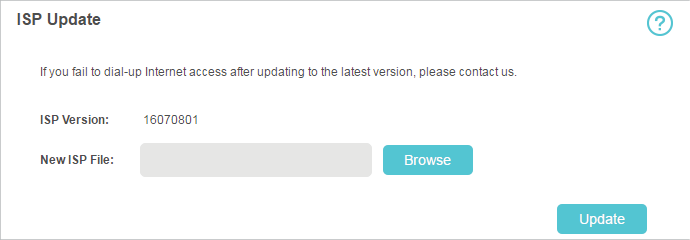
You can update the ISP information.
1.Download the latest ISP update file from the Support page at www.tp-link.com.
2.Visit http://tplinkmifi.net from the PC login entry, and log in with the password you set for the Mobile Wi-Fi.
3.Go to Advanced > Dial-up > ISP Update.
4.Click Browse to locate the downloaded file.
5.Click Update.
When the Mobile Wi-Fi does not work normally, you can save the system log and send it to our technical support for troubleshooting.
1.Visit http://tplinkmifi.net from the PC login entry, and log in with the password you set for the Mobile Wi-Fi.
2.Go to Advanced > Device > System Log.
•To save the system logs in local:
Click Save Logs to save the logs to your local device.
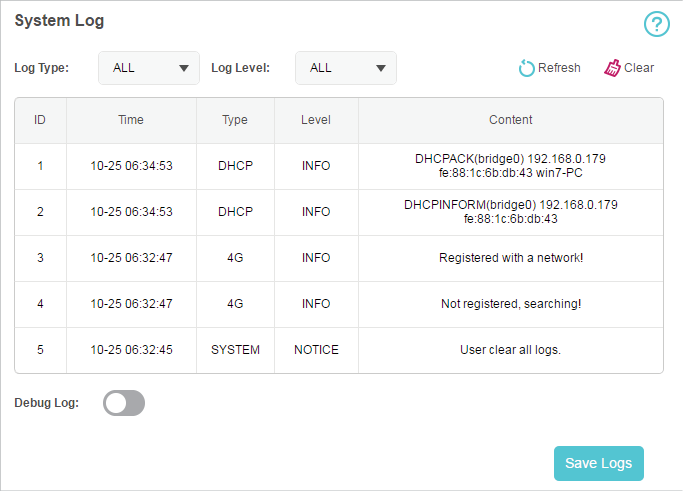
•To debug logs:
The Debug Log feature can save logs for specific troubleshooting. This function should be enabled under the requirement of our technical support.
1.Insert an SD card of at least 100MB storage in your Mobile Wi-Fi.
2.Put the file provided by our technical support in the SD card.
3.Go to the Advanced > Storage Sharing and set By Wi-Fi as Access Mode.
4.Enable Debug Log.
5.Click Save Logs.
6.Visit the SD card and send the saved files to our technical support.

Note:
Do not remove the SD card or switch the storage sharing mode when using this function.