How to configure the TP-Link Travel Router in Hotspot/WISP mode
Introduction
The TP-Link Travel Routers support multiple operating modes to accommodate diverse connectivity needs, including Wireless Router/Access Point/Range Extender/Client/Hotspot mode. This article provides step-by-step instructions for configuring them in hotspot mode effectively.
When operating in hotspot/WISP Mode, the device establishes connectivity with public wireless networks and distributes the connection to client devices. This mode is particularly effective when accessing restricted networks that enforce client limitations or mandate authentication credentials.
If it doesn’t match your network environment, identify which operation mode is suitable for you first.
Configuration
Note: This guide uses TL-WR902AC and TL-WR3602BE as reference models to show the installation steps. The actual interface and function options shown in this FAQ may vary slightly from those of your product model. For more details, please refer to your router's User Guide.

Step 1. Switch the operating mode to Share Hotspot, then plug the router into an electrical outlet within range of the public Wi-Fi network (public hotspot).
Note: There is no physical switch button on the TL-WR802N and TL-WR810N to control the operating mode; you can select the mode after accessing the web management.
Step 2. Connect one computer to the router wirelessly or via an Ethernet cable. The Wi-Fi network name (SSID) and password are on the router’s label.
Step 3. Open a browser to visit tplinkwifi.net to log in to the web management page with the username and password you set for the router. The default is admin (all lowercase) for both the username and the password.
Step 4. Click Next to start the Quick Setup.
Note: For the TL-WR802N and TL-WR810N, select Hotspot Router, then go to Step 5.
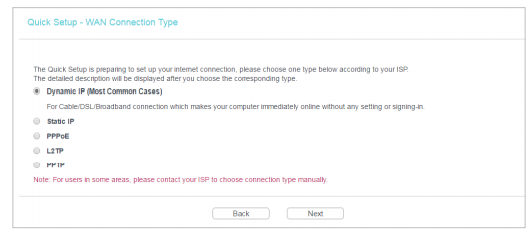
Step 5. Select the WAN Connection Type. When using the router in a hotel room or a small office, select Dynamic IP. We take the Dynamic IP that requires no more parameters, for instance. For other connection types, please enter the parameters provided by your ISP.
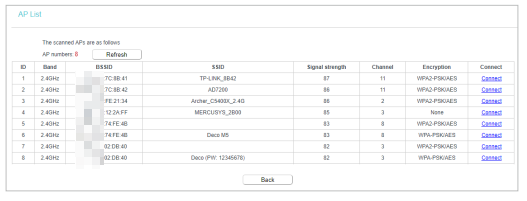
Step 6. Click Connect to connect to the public Wi-Fi in the AP List page.
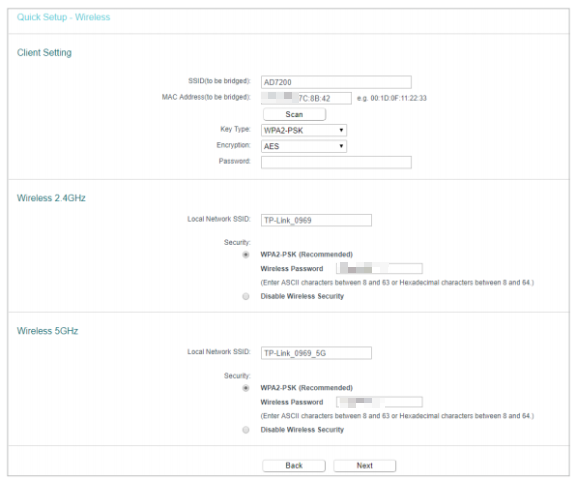
Step 7. Enter the password of the public Wi-Fi in the Password field of the Client Setting section. In the Wireless 2.4GHz/5GHz section, either customize your Local Network SSID and Wireless Password for the 2.4GHz/5GHz network or keep the default ones, and then click Next.
Step 8. Click Finish to apply the settings.
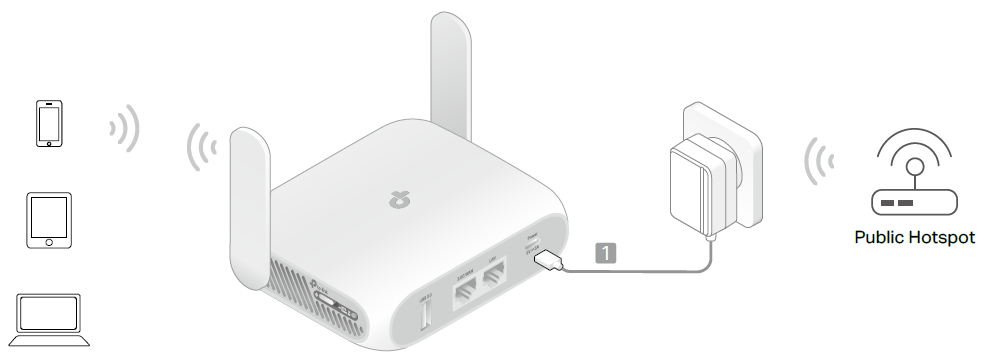
Step 1. Power on the travel router near the public Wi-Fi network (Public Hotspot), and then wait until the LED turns solid (red or blue) before moving on.
Step 2. Connect one device to the travel router wirelessly or via a wired connection.
- Wirelessly: Connect your computer to the router’s Wi-Fi. The default wireless network name (SSID) and wireless password are printed on both the Wi-Fi info card and the label at the bottom of the router.
- Wired: Turn off the Wi-Fi on your computer and connect to the LAN port of the router with an Ethernet cable.
Step 3. Open a browser to visit tplinkwifi.net or 192.168.0.1 to create a local password to sign in to the web management page, and refer to Step 4 to start the Quick Setup.
Note: If it asks you to enter the local password, it means the router has already been configured before. It's recommended to get a pin to press the reset hole for 6 seconds to perform a hard reset. Once finished, access the web management to start Quick Setup.
Step 4. After logging in, configure your time zone and set Wi-Fi as the internet source. Then click NEXT.
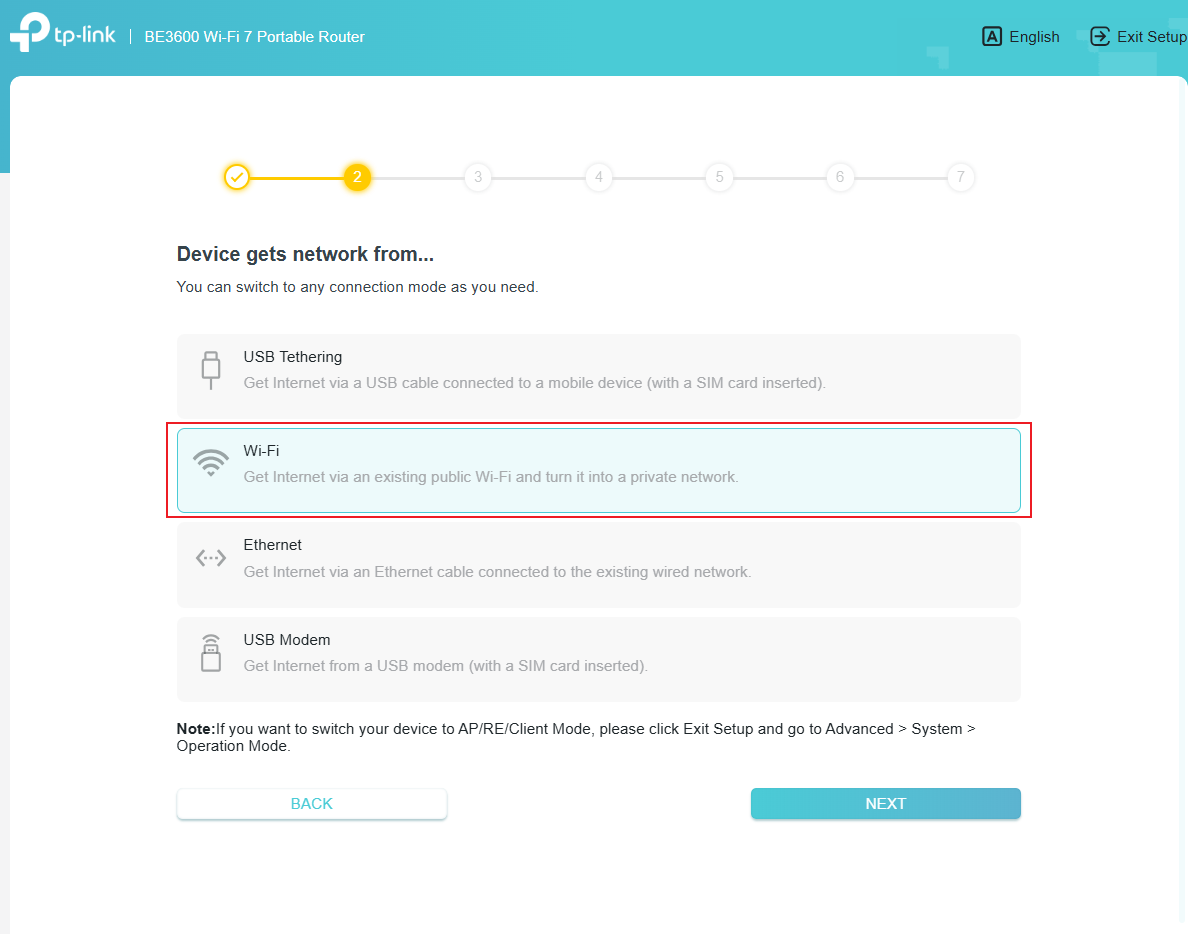
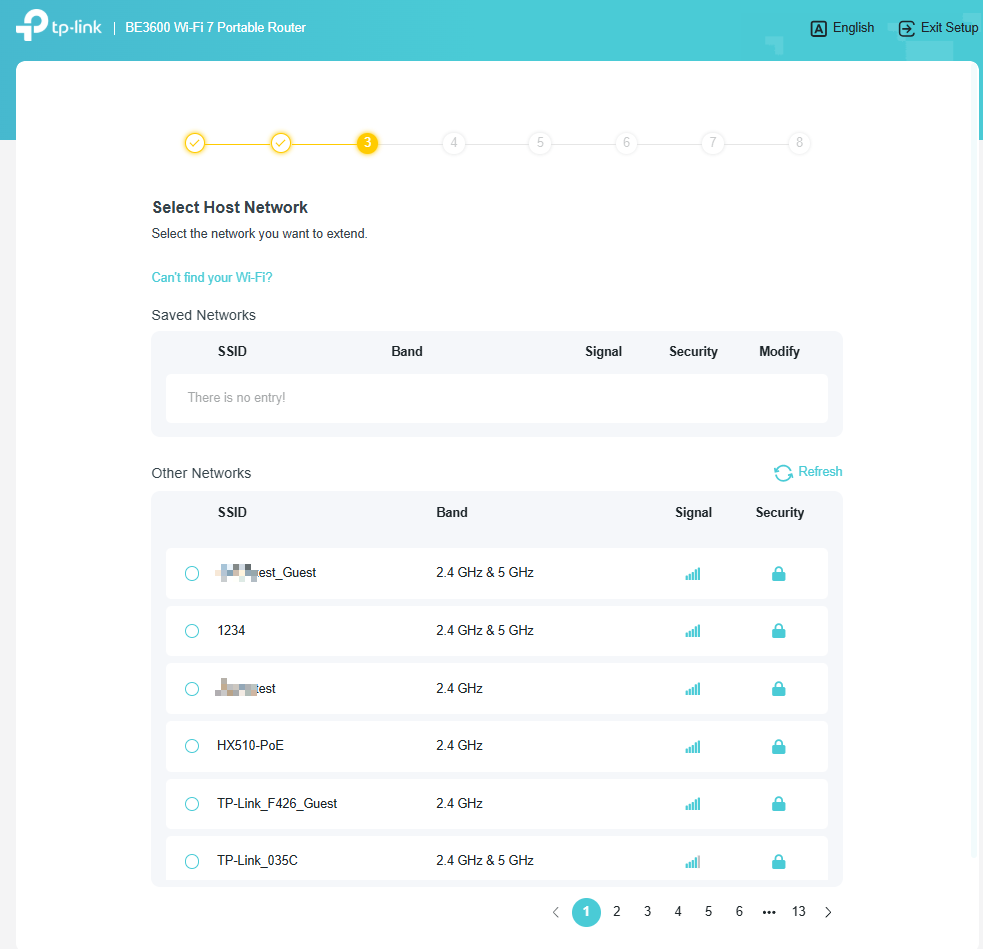
Step 5. Select the host network you want to extend, and enter the correct password to establish the connection.
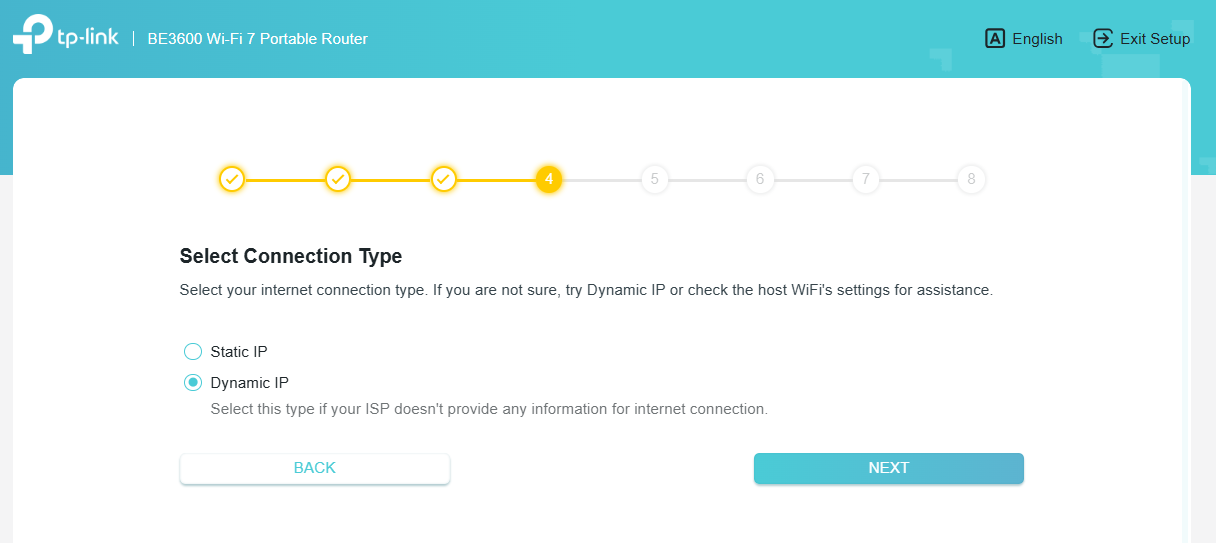
Step 6. Select the Connection Type, and click NEXT.
When using the router in a hotel room or a small office, select the Dynamic IP. For other connection types, please enter the relevant parameters as needed.
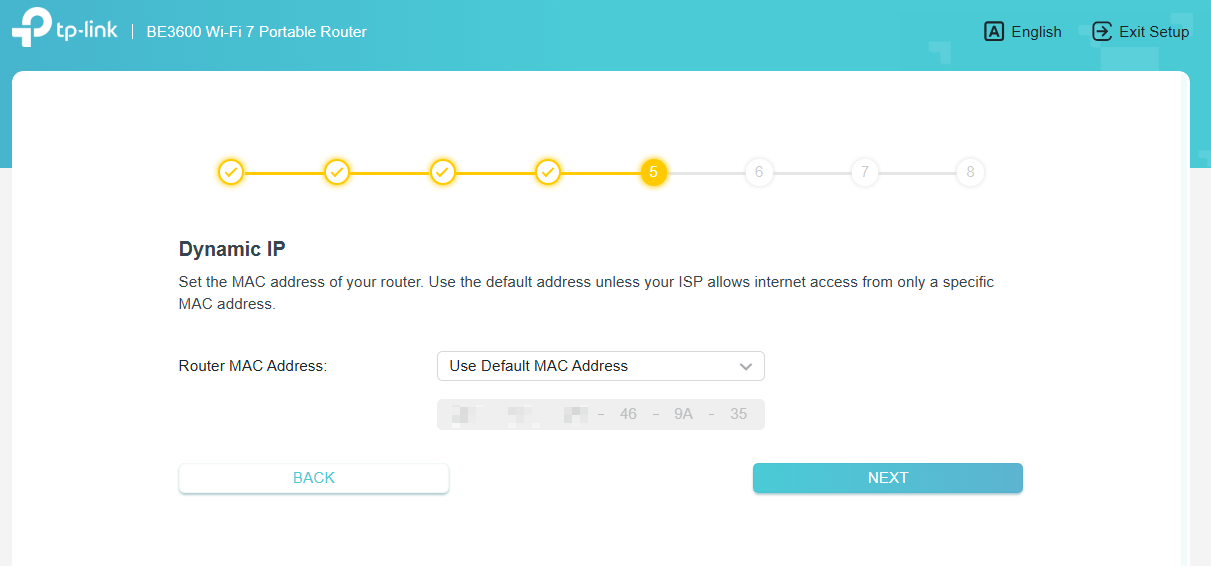
Step 7. Select Use Default MAC Address (recommended for most configurations). And click NEXT.
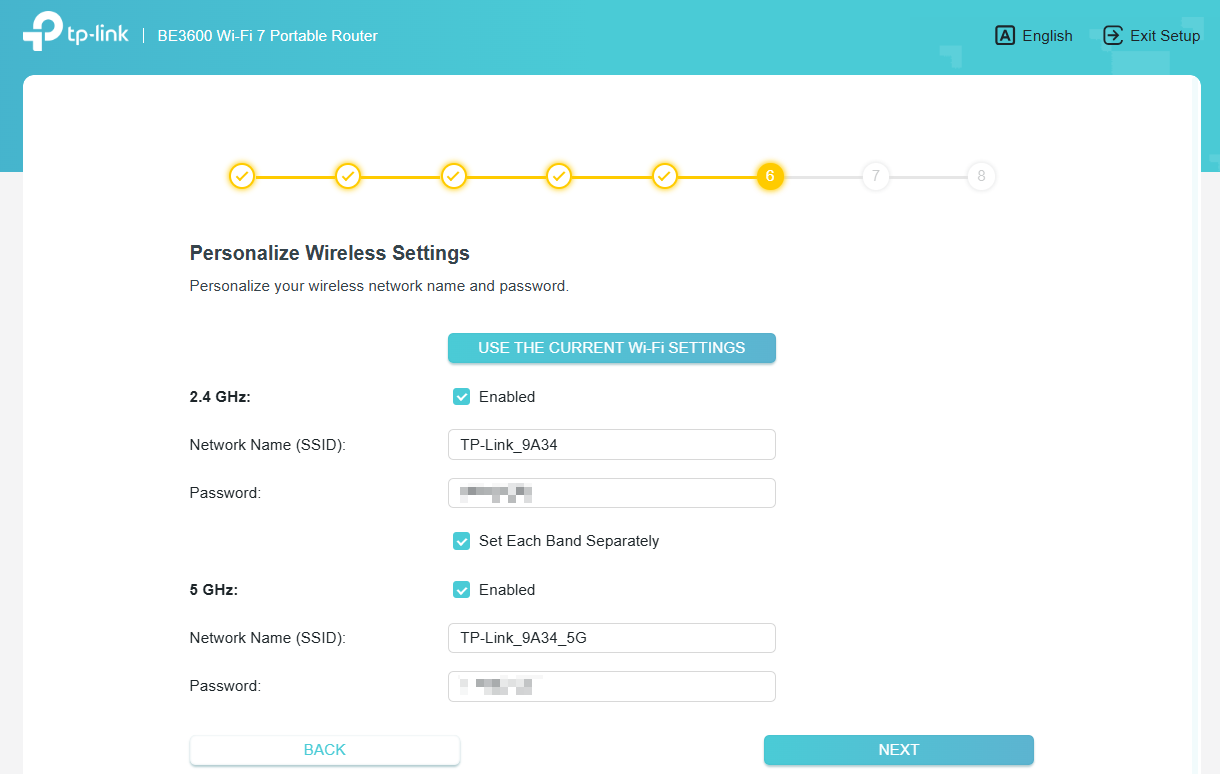
Step 8. Either customize your local network SSID and Wireless Password for the 2.4GHz/5GHz network or click USE THE CURRENT Wi-Fi SETTINGS to keep the default ones, and then click NEXT.
Note: Selecting NEXT activates the updated Wi-Fi configuration immediately. If you are using a wireless device to access the web management, manually reconnect to the router's network, including scenarios where the default Wi-Fi settings are kept.
Step 9. Then complete the setup by following the on-screen instructions.
TO get to know more details of each function and configuration, please go to the Download Center to download the manual for your product.
Is this faq useful?
Your feedback helps improve this site.
TP-Link Community
Still need help? Search for answers, ask questions, and get help from TP-Link experts and other users around the world.