How to Configure Repeater Mode on TL-WR700N
Acest ghid este valabil pentru:

Definition:The TL-WR700N copies and reinforces the existing wireless signal to extend the coverage of the signal. So the network name(SSID) and password don't change. This mode is especially useful for a large space to eliminate signal-blind corners.
Application: Large house,office,warehouse or other spaces where the existing signal is weak.
Physical Connection
Step 1:
Connect the WR700N directly to your computer’s Ethernet port by an Ethernet cable;
Step 2:
Power on the WR700N
.png)
Initial Computer Setup– For Windows 7, Vista & XP (For Mac OS X, please go to page3)
Step 1:
Windows 7&Windows Vista: Go to Start->Control Panel ->Network and Sharing Center
Windows XP: Go to Start->Control Panel->Network Connections
.jpg)
Step 2:
Windows 7: Go to Network andSharing Center>Change Adapter settings
Windows Vista: Go to Network andSharing Center>Manage Network Connections
Windows XP: (Go to Next Step)
.png)
Step 3:
Windows 7, Vista and XP: Right Click Local Area Connection >Select Properties > Double Click Internet Protocol Version 4 (TCP/IPv4) or Internet Protocol (TCP/IP) forWindows XP.
.png)
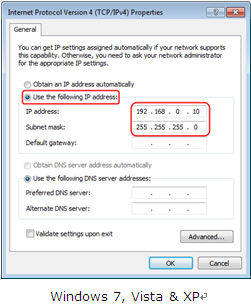
Step 4:
Windows 7, Vista and XP: Select “Use the Following IP address:”
Type the following information:
1. IP address: 192.168.0.10
2. Subnet mask: 255.255.255.0
Click OK to exit
Click OK again to apply the settings.
Initial Computer Setup– For Mac OS X
Go to the Apple->System Preferences->Network-> Highlight Ethernet ->Configure IPv4: Using DHCP with manual address
Input the IPv4 Address: 192.168.0.10
Click Apply
.jpg)
Access the Management Page
Open a Web Browser -> Type 192.168.0.254 in the address bar -> Press Enter
.jpg)
Enter the default User Name: admin
Enter the default Password: admin
Click OK
.jpg)
Run Quick Setup
Go to Quick Setup-> Click Next
.jpg)
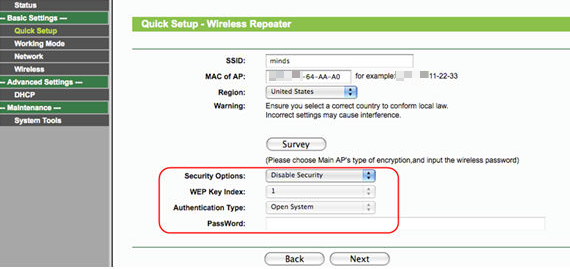
Select Repeater-> Click Next
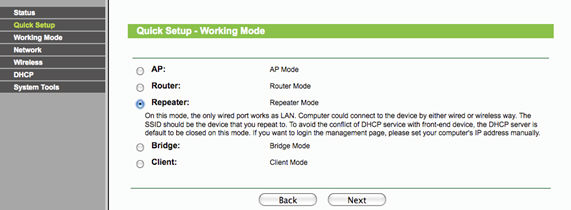
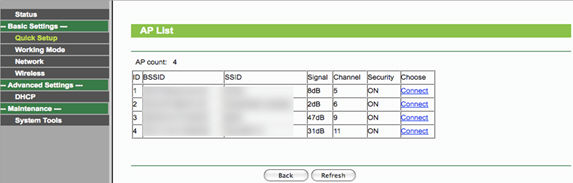
Click Survey
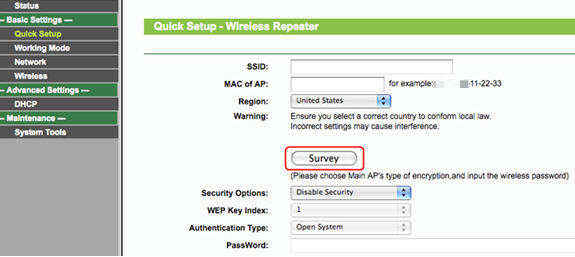
Locate your router network name under the SSID column -> Click Connect
Security Options: (Please match Security Options with your existing router)
Please refer to Original Equipment Manufacturer for details
Password: (Please match Security Password with your existing router)
Click: Next
Click: Reboot, and wait until it goes to 100% percent
.jpg)
Relocate the WR700N
You may now relocate the WR700N to a centralized location in order to make the most of Repeater Mode.
Congratulations! Your wireless signal has been enhanced. All your wireless devices have a more stable connection.
Final Computer Reversion– For Windows 7, Vista & XP (For Mac OS X, please go to page 9)
Step 1:
Windows 7&Windows Vista: Go to Start->Control Panel ->Network and Sharing Center
Windows XP: Go to Start->Control Panel->Network Connections
Step 2:
Windows 7: Go to Network and Sharing Center->Change Adapter settings
Windows Vista: Go to Network and Sharing Center->Manage Network Connections
Windows XP: (Go to Next Step)
Step 3:
Windows 7, Vista and XP: Right Click Local Area Connection ->Select Properties -> Double Click Internet Protocol Version 4 (TCP/IPv4) or Internet Protocol (TCP/IP) for Windows XP.
Step 4:
Windows 7, Vista and XP: Select “Obtainan IP address automatically” and “Obtain DNS server address automatically”
Click OK to exit
Click OK again to apply the settings.
Final Computer Reversion – For Mac OS X
Go to the Apple->System Preferences->Network-> Highlight Ethernet ->Configure IPv4: Using DHCP
Click Apply.
Get to know more details of each function and configuration please go to Download Center to download the manual of your product.
A fost util acest FAQ?
Părerea ta ne ajută să îmbunătățim acest site.