How to change wireless settings on TP-Link Wireless Router
Introduction
This article provides clear, step-by-step instructions for adjusting the TP-Link Wireless Router's wireless settings (SSID, password, channel, etc.), helping you secure your network and optimize Wi-Fi performance with verified configurations.
Requirements
- One device which can open web browsers, such as a computer, tablet, or smartphone.
- One device which is installed with the Tether app by visiting the Google Play Store or App Store.
- Power on the TP-Link Wireless Router and wait for it to reboot completely.
Configuration
Scenario 1: Via web management page
Here, Archer AXE75 is taken as an example. The actual interface and the function options shown on this FAQ may vary slightly from your product model. For more details, please refer to your router's User Guide.
Step 1. Connect your computer to the TP-Link Wireless Router, then open a browser and visit tplinkwifi.net or 192.168.0.1 to log in to the router’s web management page.
Step 2. Click Advanced > Wireless > Wireless Settings to open the wireless settings page.
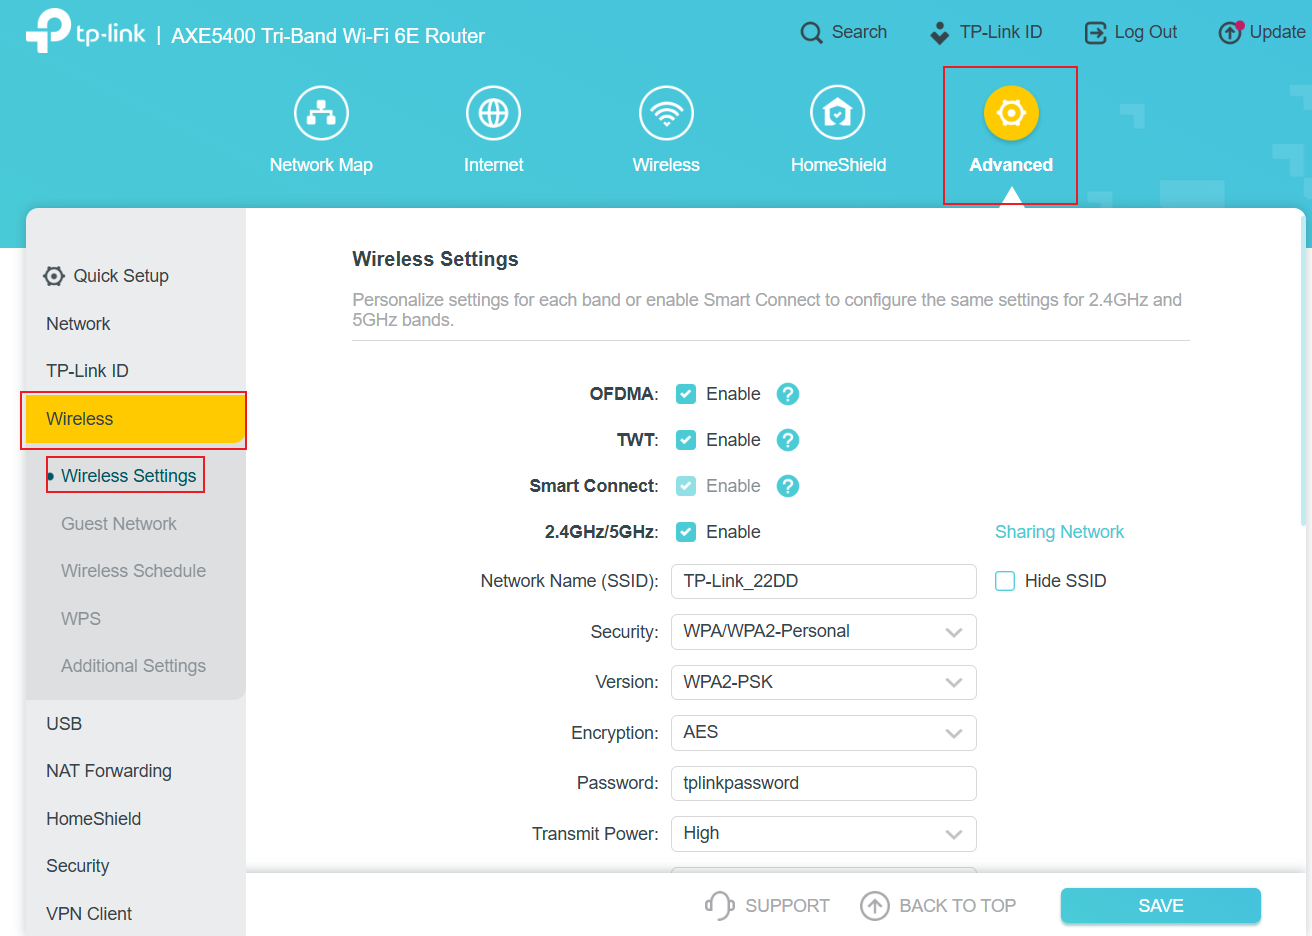
Step 3. Change the desired settings and click the SAVE button.
- Smart Connect
When it is enabled, the router’s 2.4GHz and 5GHz networks share the same SSID (network name) and password. And it can balance traffic for faster speeds and seamless switching without manual adjustments.
- 2.4GHz/5GHz/6GHz
These options are enabled by default. To disable wireless functionality for specific Wi-Fi bands, simply uncheck the corresponding Enable checkbox. It also displays as Enable Wireless Radio on some models.
- Hide SSID
Once it's enabled, this Wi-Fi network name is hidden when you scan for available networks on your wireless device, and you need to manually join the network by entering the network name and password on the device.
- Network Name (SSID) & Password
You can customize the Wi-Fi name and password; the password is case-sensitive. If you use a wireless device to log in to the web management page, it will be disconnected after the new Wi-Fi name and its password are saved.
- Channel & Chanel Width
A wireless channel determines which operating frequency will be in use. It is not necessary to change the channel unless you’re experiencing interference from nearby access points. The Channel Width setting is preset to Auto, allowing the client’s channel width to adjust automatically.
- Security
We recommend you choose WPA2-PSK[AES] or WPA3-Personal+WPA2-PSK[AES]. If you select other options, configure the related parameters as described on the help page.
For other wireless settings, we recommend retaining the default configurations unless specific parameters need to be adjusted for operational reasons. Preset values are engineered to ensure optimal security and network performance in typical usage scenarios.
Scenario 2: Via Tether app
Here, Archer BE805 is taken as an example. The actual interface and the function options shown on this FAQ may vary slightly from the product model.
Step 1. Check the compatibility list to ensure your router is compatible with the Tether App.
Step 2. Connect your phone/iPad that downloaded the Tether App to the router's Wi-Fi network.
Step 3. Open the Tether App and log in to the router with the device password.
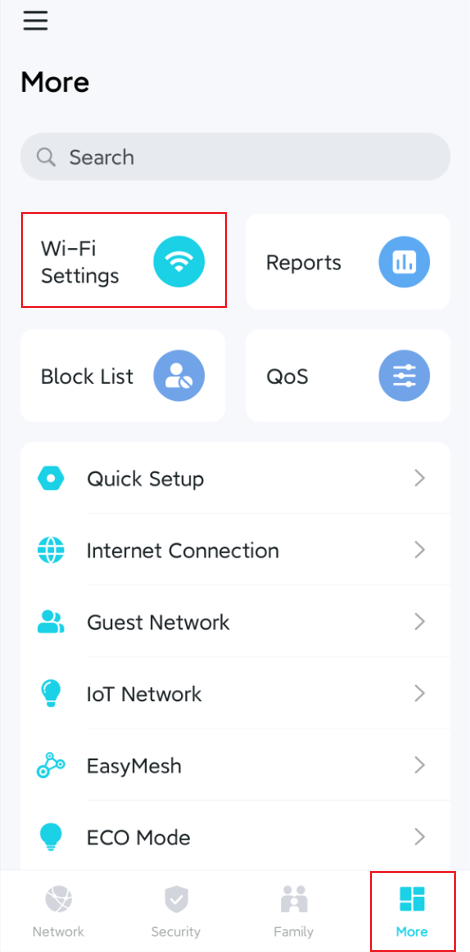
Step 4. Tap More > Wi-Fi Settings, select the network you want to modify.
The networks you can modify here include the 2.4 GHz Network, 5 GHz Network, 6 GHz Network, and MLO Network.
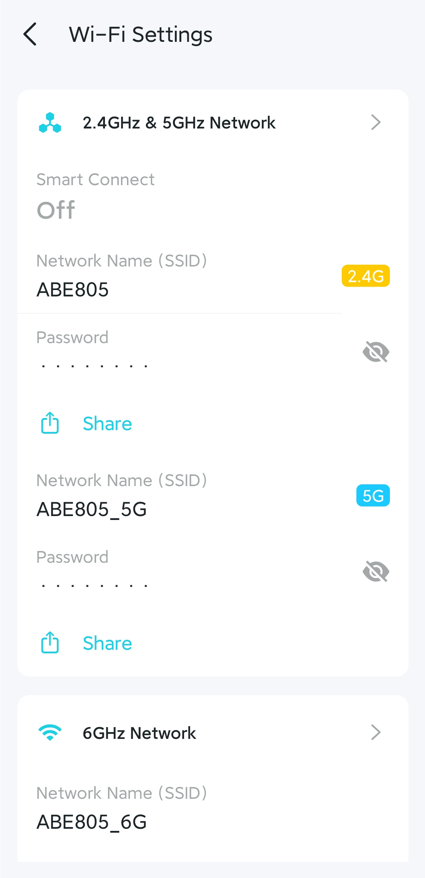
Step 5. Change the settings, and click Save/Done to finish.
Due to system limitations, we can only modify the Wi-Fi settings below.
- Smart Connect (Click 2.4GHz & 5GHz Network tab to enable/disable it.)
- Network Name and Password
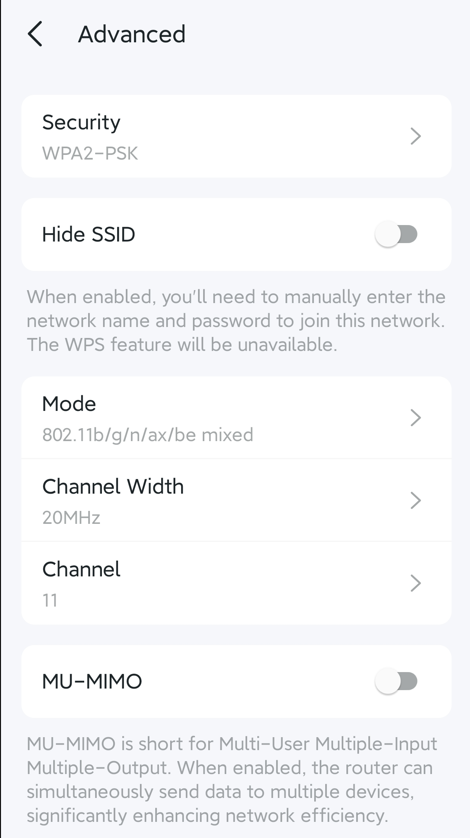
- Advanced Settings (Select one Wi-Fi network, then tap Advanced)
Including Security, Hide SSID, Mode, Channel Width, Channel, and MU-MIMO.
QA
Q1: What should I do if I am unable to configure the 2.4 GHz and 5 GHz bands separately?
A1: It may occur when the Smart Connect is active. Please disable it and give it a try.
Q2: Why does the phone still only detect one single network name even though the Smart Connect is disabled?
A2: After the Smart Connect is disabled, the 2.4GHz Wi-Fi name and 5GHz Wi-Fi name still use the same one, except for modifying one of them to a different Wi-Fi name manually.
Q3: What should I do if I cannot find the Wi-Fi network?
A3: First, determine whether the problem is that certain Wi-Fi signals can't be detected, or if it only affects your TP-Link router's signal. Subsequently, apply the appropriate troubleshooting measures based on the identified scenario.
Get to know more details of each function and configuration. Please go to the Download Center to download the manual for your product.
A fost util acest FAQ?
Părerea ta ne ajută să îmbunătățim acest site.