How to Set Up a VPN Server or VPN Client on a TP-Link Travel Router
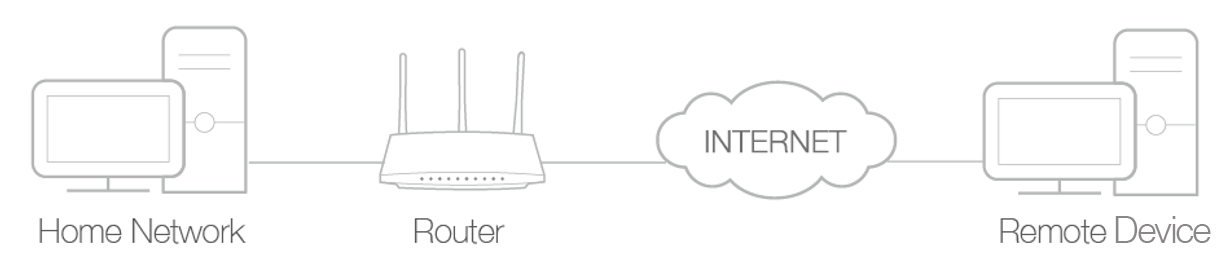
TP-Link travel routers support both VPN server and VPN client modes to meet all your VPN needs. VPN server mode lets remote devices securely access your home network over the internet. VPN client mode lets all devices connected to the travel router use a remote VPN service without installing software on each device individually. All setup is done through the router's web interface. This page includes step-by-step instructions for each VPN protocol.
Key Takeaways
- TP-Link travel routers support four VPN server protocols: OpenVPN, PPTP, L2TP/IPSec, and WireGuard — each with different levels of security, speed, and compatibility.
- OpenVPN offers the highest security and stability and is suitable for restricted environments such as campus or corporate networks.
- PPTP is easy to set up using the built-in VPN software on most computers and mobile devices, but it is less secure and may be blocked by some ISPs.
- L2TP/IPSec is more secure than PPTP but slower, and may have difficulty getting through firewalls.
- WireGuard is a modern, fast, and secure VPN protocol based on UDP that uses current encryption standards.
- VPN Client mode allows all devices connected to the travel router to connect to a remote VPN server without installing VPN software on each device.
Follow the steps below to set up your VPN Server on your TP-Link Travel Router. Here we take TL-WR1502X as an example.
Set Up OpenVPN Server
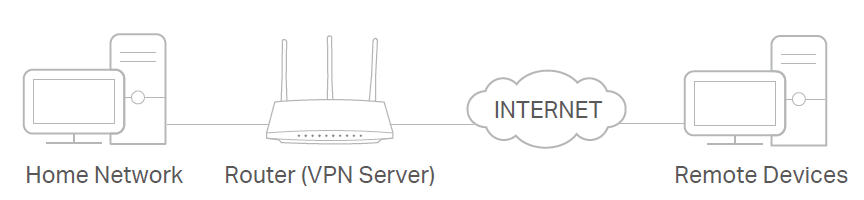
In an OpenVPN connection, the home network can act as a server, and the remote device can access it through the router, which serves as the OpenVPN Server gateway.
To use the VPN feature, you should enable OpenVPN Server on your router and install and run VPN client software on the remote device. Please follow the steps below to set up an OpenVPN connection.
Step 1. Visit http://tplinkwifi.net, and log in with your TP-Link ID or the password you set for the router.
Step 2. Go to Advanced > VPN Server > OpenVPN, and tick the Enable box of OpenVPN.
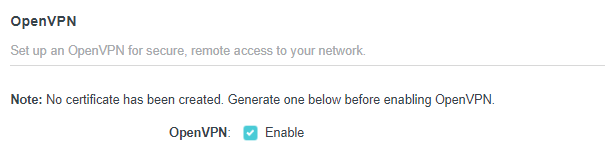
Step 3. Enter the necessary information and save the settings.
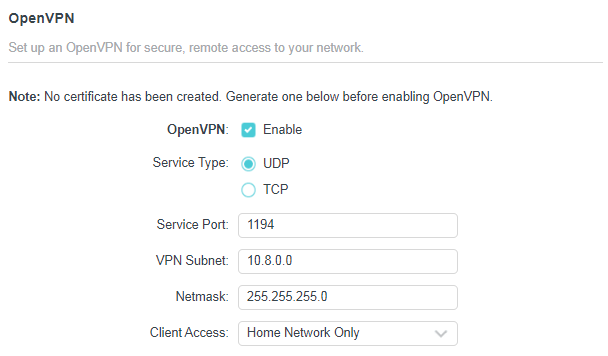
- Service Type: Select the service type (communication protocol) for OpenVPN: UDP/TCP.
- Service Port: Enter a VPN service port to which a VPN device connects, and the port number should be between 1024 and 65535.
- VPN Subnet/Netmask: Enter the range of IP addresses that can be leased to the device by the OpenVPN server.
- Client Access: Select your client access type. Select Home Network Only if you only want the remote device to access your home network. Select Internet and Home Network if you also want the remote device to access the internet through the VPN server.
Step 4. Click GENERATE to get a new certificate.

Step 5. Click EXPORT to save the OpenVPN configuration file which will be used by the remote device to access your router.

Step 7. Now you need to configure the OpenVPN connection on your remote device.
a. Visit https://openvpn.net/community-downloads/ to download the OpenVPN software and install it on the device where you want to run the OpenVPN client.
Note: Install the OpenVPN client utility on each device that will connect to the travel router via VPN. On mobile devices, download a third-party OpenVPN app from Google Play or the Apple App Store.
b. After the installation, copy the file exported from your router to the OpenVPN client utility’s “config” folder (for example, C:\Program Files\OpenVPN\config on Windows). The path depends on where the OpenVPN client utility is installed.
c. Run the OpenVPN client utility and connect it to the OpenVPN Server.
Set Up PPTP VPN Server
A PPTP VPN Server is used to create a PPTP VPN connection for remote devices to access your home network.
To use the VPN feature, you need to set up a PPTP VPN Server on your router and configure the PPTP connection on remote devices.
Please follow the steps below to set up a PPTP VPN connection.
Step 1. Visit http://tplinkwifi.net, and log in with your TP-Link ID or the password you set for the router.
Step 2. Go to Advanced > VPN Server > PPTP, and tick the Enable box.

Step 3. Enter the necessary information and save the settings.
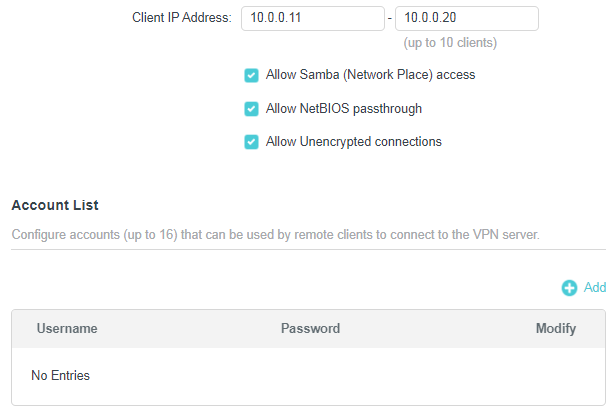
- Client IP Address: Enter the range of IP addresses (up to 10) that the PPTP VPN server can lease to devices.
- Allow NetBIOS passthrough: Enable it to allow your VPN device to access your Samba server using the NetBIOS name.
- Allow unencrypted connections: Enable it to allow unencrypted connections to your VPN server.
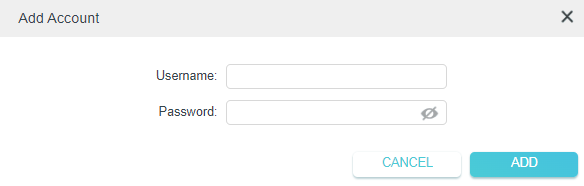
- Account List: Add the PPTP VPN connection account (user name and password) for the remote device. You can create up to 16 accounts.

Step 4. Now you need to configure PPTP VPN on your remote device. The remote device can use Windows' built-in PPTP software or third-party PPTP software to connect to a PPTP server. Here, we use the Windows built-in PPTP software as an example.
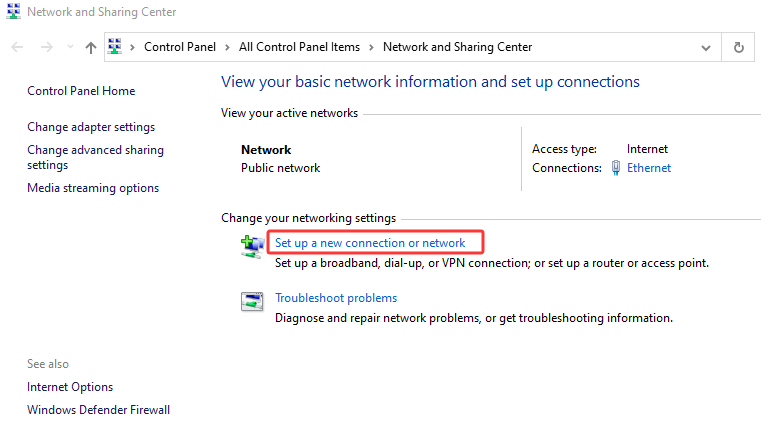
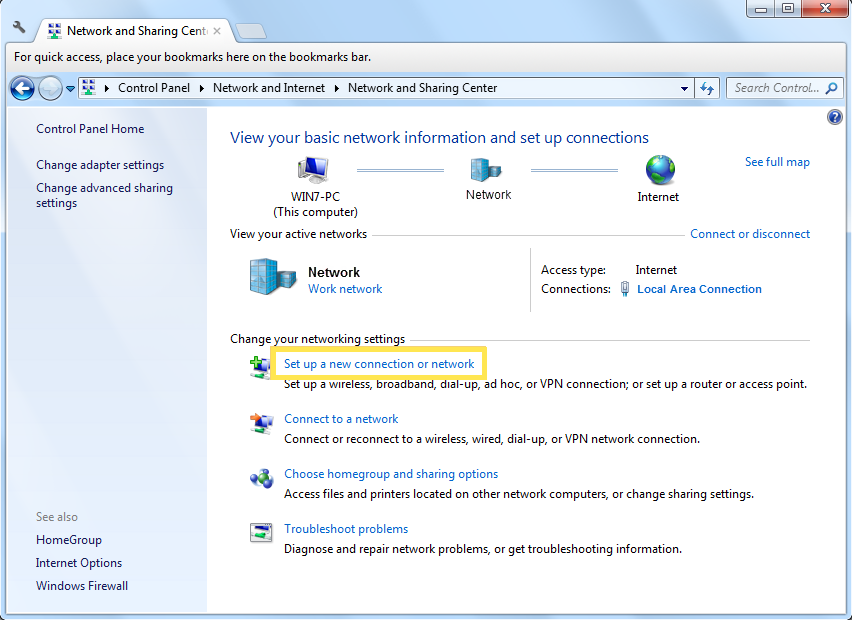
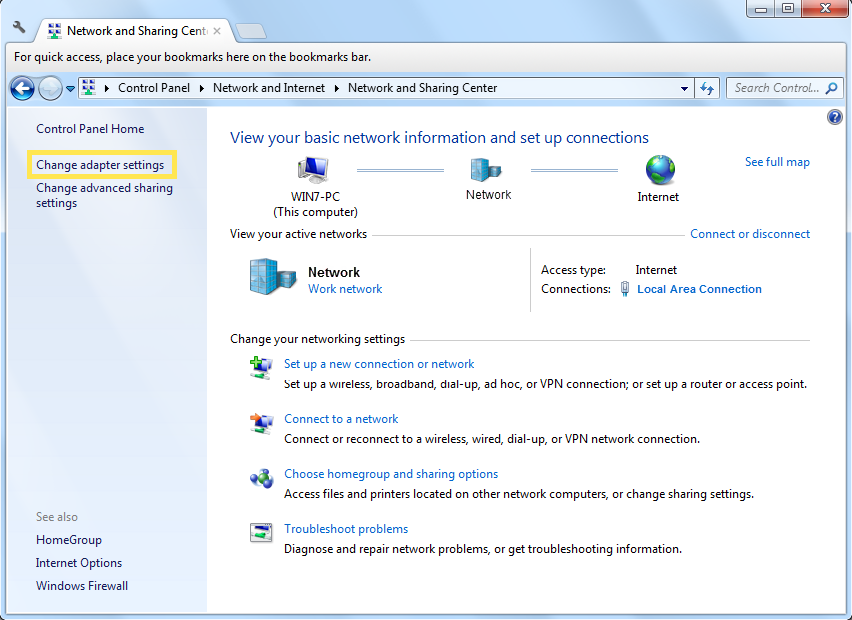
a. Go to Start > Control Panel > Network and Internet > Network and Sharing Center.
b. Select Set up a new connection or network.
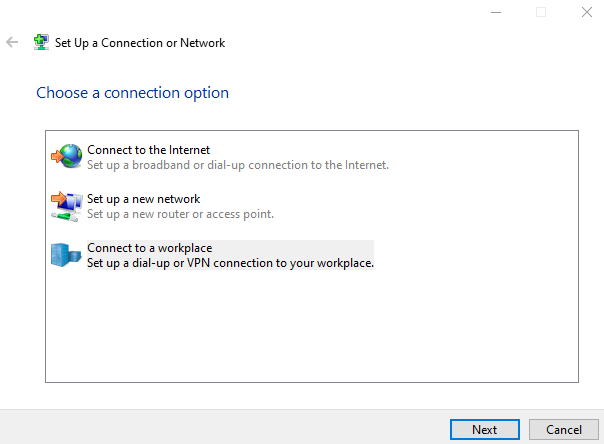
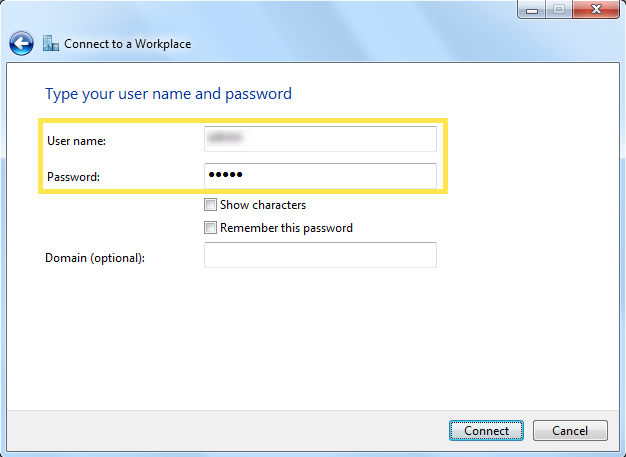
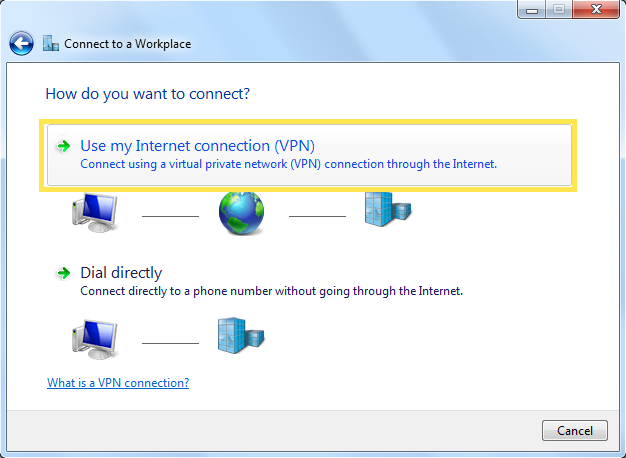
c. Select Connect to a workplace and click Next.
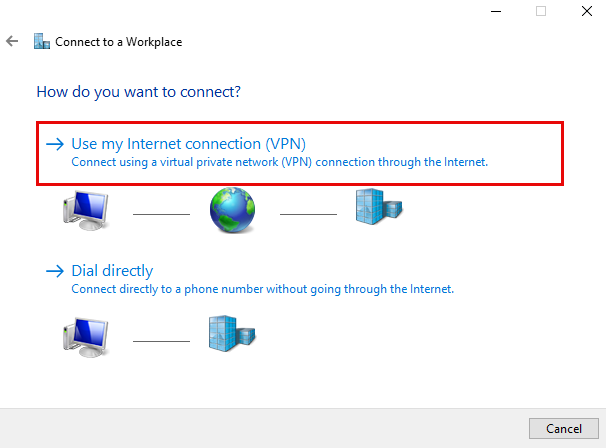
d. Select Use my Internet connection (VPN).
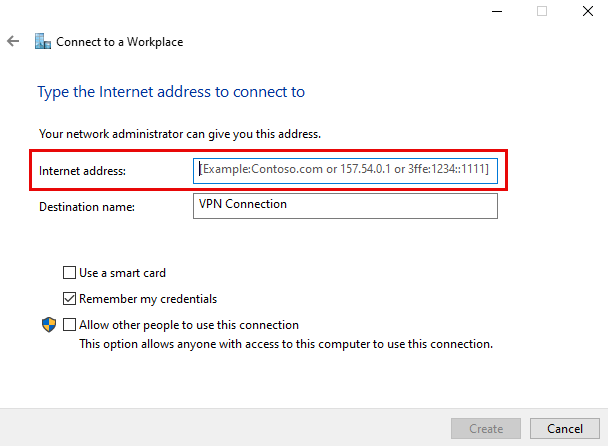
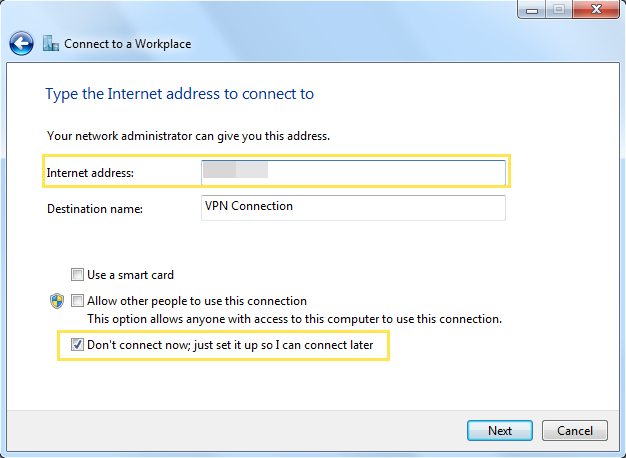
Step 5. Enter the router's Internet IP address in the Internet address field. Click Create.
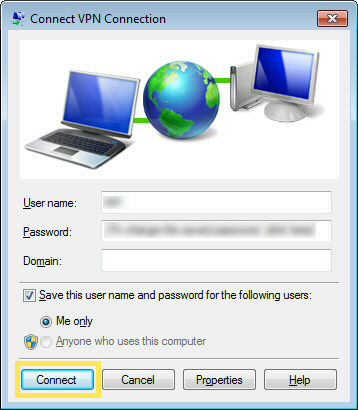
Step 6. Enter the user name and Password you set for the PPTP VPN server on your router, then click Connect.
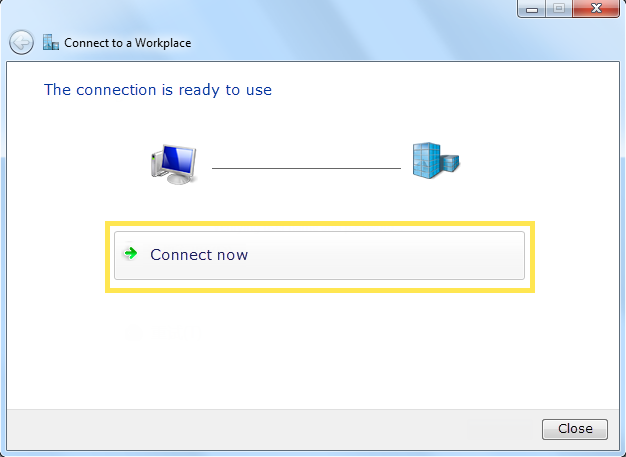
Step 7. Click Connect Now when the VPN connection is ready to use.
Set Up L2TP/IPSec VPN Server
An L2TP/IPSec VPN Server is used to create an L2TP/IPSec VPN connection that allows remote devices to access your home network.
To use the VPN feature, you need to set up an L2TP/IPSec VPN Server on your router and configure the L2TP/IPSec connection on remote devices.
Step 1. Visit http://tplinkwifi.net, and log in with your TP-Link ID or the password you set for the router.
Step 2. Go to Advanced > VPN Server > L2TP/IPSec, and tick the Enable box of L2TP/IPSec.

Step 3. Enter the necessary information and save the settings.
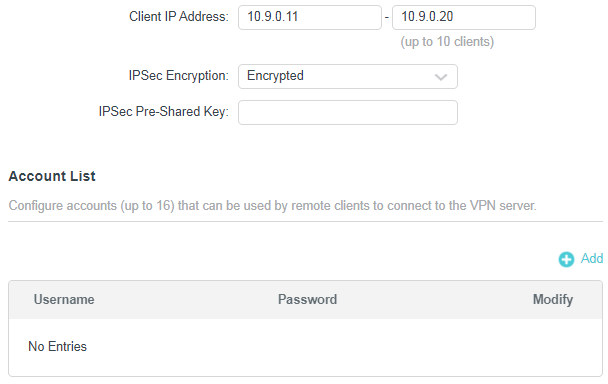
- Client IP Address: Enter the range of IP addresses (up to 10) that the L2TP/IPSec VPN server can lease to devices.
- IPSec Encryption/IPSec Pre-Shared Key: Keep IPSec Encryption set to Encrypted and create an IPSec Pre-Shared Key.
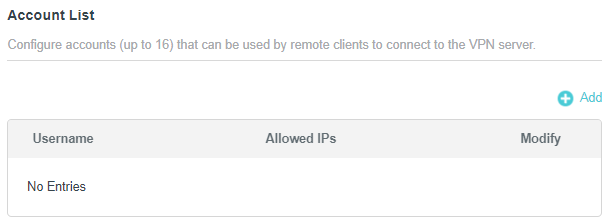
- Account List: Add the L2TP/IPSec VPN connection account (user name and password) for the remote device. You can create up to 16 accounts.
Step 4. Now you need to configure L2TP/IPSec on your remote device. The remote device can use the built-in Windows or macOS L2TP/IPSec software or third-party L2TP/IPSec software to connect to the L2TP/IPSec Server. Here we use the Windows built-in L2TP/IPSec software as an example.
a. Go to Start > Control Panel > Network and Internet > Network and Sharing Center.
b. Select Set up a new connection or network.
c. Select Connect to a workplace and click Next.

d. Select Use my Internet connection (VPN).
e. Enter the router's Internet IP address in the Internet address field. Select Don’t connect now; just set it up so I can connect later. Then click Next.
f. Enter the User name and Password you set for the L2TP/IPSec VPN server on your router, then click Connect.

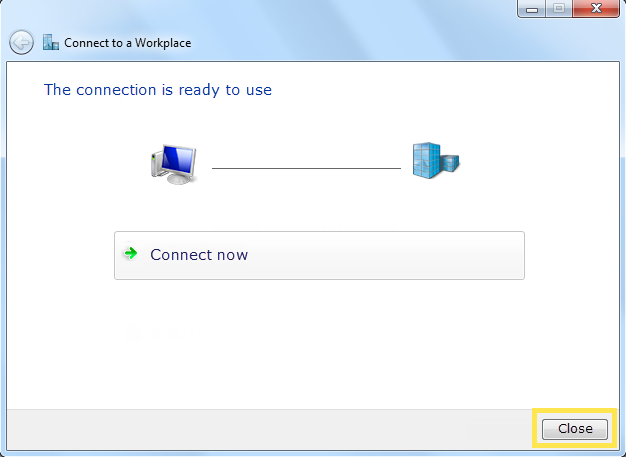
g. Click Close when the VPN connection is ready to use.
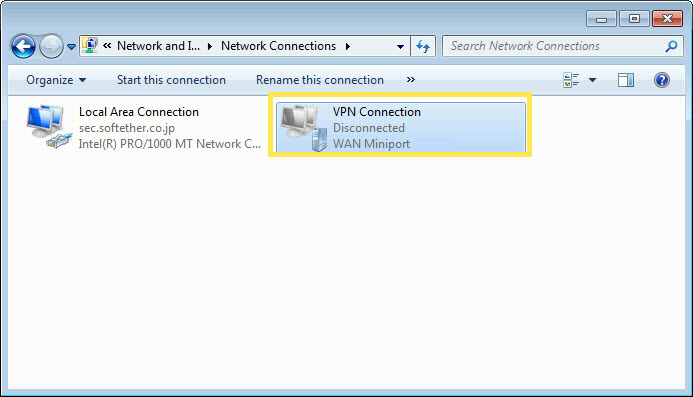
h. Go to the Network and Sharing Center and click Change Adapter Settings.
i. Find the VPN connection you created, then double-click it.
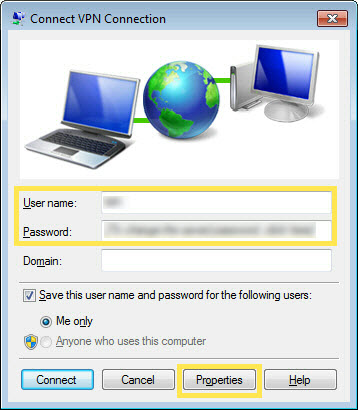
j. Enter the Username and Password you have set for the L2TP/IPSec VPN server on your router, and click Properties.
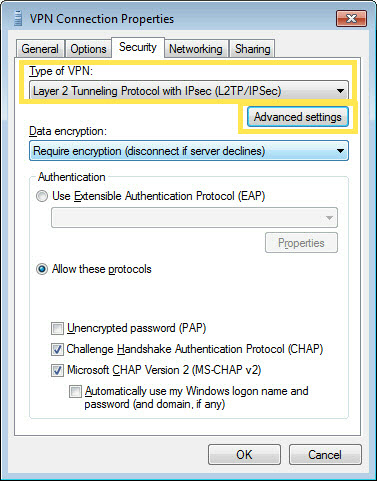
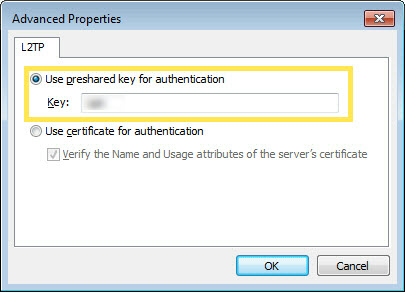
k. Switch to the Security tab, select Layer 2 Tunneling Protocol with IPsec (L2TP/IPSec), and click Advanced settings.
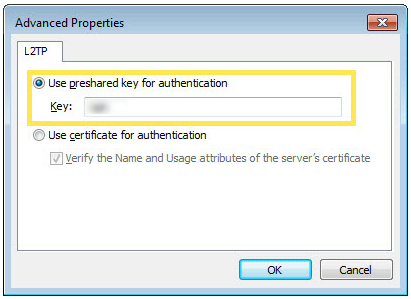
l. Select Use preshared key for authentication and enter the IPSec Pre-Shared Key you have set for the L2TP/IPSec VPN server on your router. Then click OK.
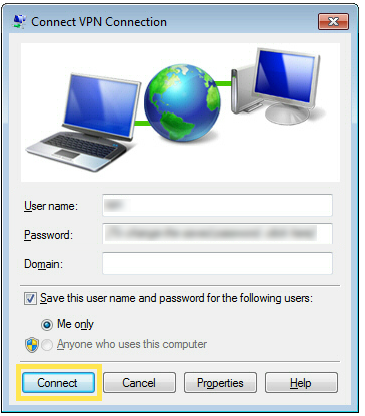
m. Done! Click Connect to start VPN connection.
Set Up WireGuard VPN Server
A WireGuard VPN Server is used to create a VPN connection that remote devices can use to access your home network.
Step 1. Visit http://tplinkwifi.net, and log in with your TP-Link ID or the password you set for the router.
Step 2. Go to Advanced > VPN Server > WireGuard, and tick the Enable box of WireGuard.

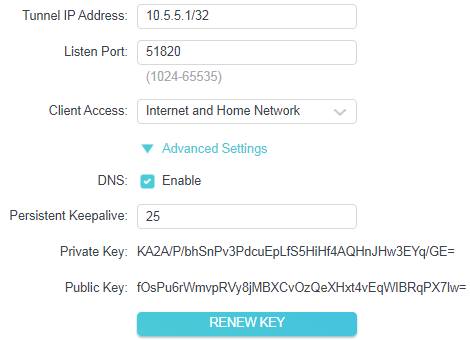
Step 3. View the default WireGuard VPN settings, as shown above. The parameters are automatically filled in, and do NOT change them unless necessary.
- Client Access: Select your client access type. Select Home Network Only if you only want the remote device to access your home network. Select Internet and Home Network if you also want the remote device to access the internet through the VPN server.
- (Optional) Click Advanced Settings to display more settings. If DNS is enabled, the router will serve as the DNS server for the VPN client that connects to it. Change the Persistent Keepalive time (25 seconds by default) to send heartbeats regularly. You can also click RENEW KEY to update the private and public keys.
Step 4. In Account List, click Add to create an account.
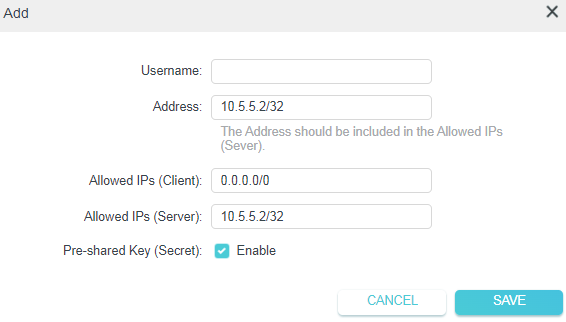
- Username: Give a name to this account.
- Address: Enter the address of the virtual interface assigned to this account. Do NOT change it unless necessary.
- Allowed IPs (client): Traffic sent from the WireGard VPN client to the allowed IPs (client) will be transmitted through the tunnel. By default, all network traffic from clients will be transmitted through the tunnel. Do NOT change it unless necessary.
- Allowed IPs (server): Traffic sent from the WireGard VPN server to the allowed IPs (server) will be transmitted through the tunnel. Do NOT change it unless necessary.
- Pre-shared key: Enable or disable pre-shared key.
Step 5. Click SAVE, then a window pops up as shown below.
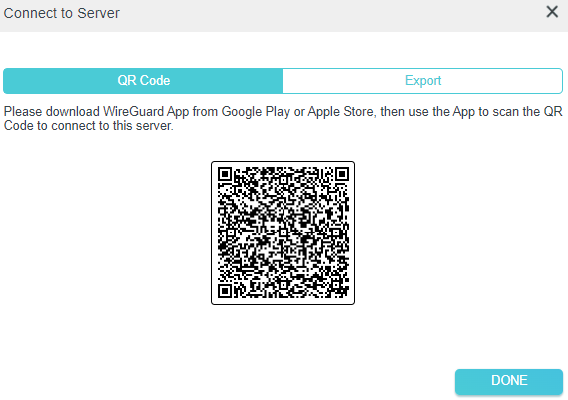
Step 6. Done. Now connect to the WireGuard server.
- For mobile phones, download the WireGuard App from Google Play or Apple Store, then use the App to scan the QR Code to connect to this server.
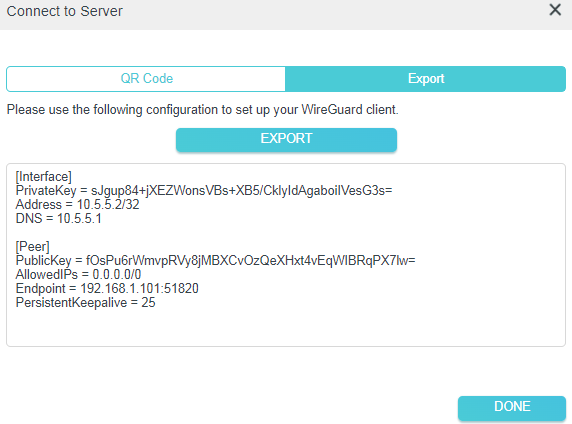
- For other devices (e.g., the TP-Link WireGuard VPN client), click EXPORT to save the WireGuard VPN configuration file, which the remote device will use to access your router.
Set Up VPN Client on a TP-Link Travel Router
VPN Client is used to create VPN connections for devices in your home network to access a remote VPN server.
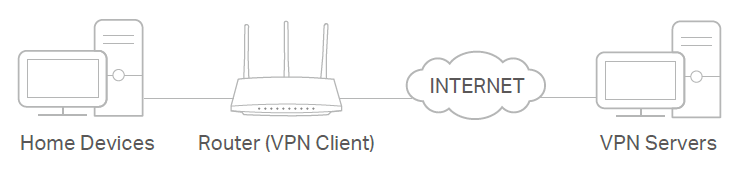
To use the VPN Client feature, configure a VPN connection on the router and select which devices will use it — those devices can then access the remote VPN server without any additional software. Please follow the steps below:
Step 1. Visit http://tplinkwifi.net, and log in with your TP-Link ID or the password you set for the router.
Step 2. Go to Advanced > VPN Client and enable it.

Step 3. Add VPN servers in the Server List, and enable the one you need.
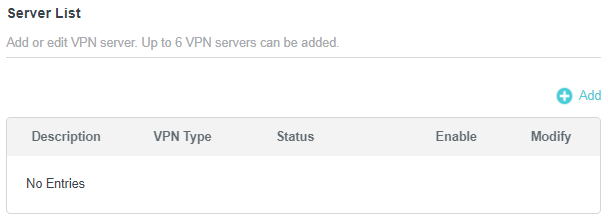
a. In the Server List section, click Add.
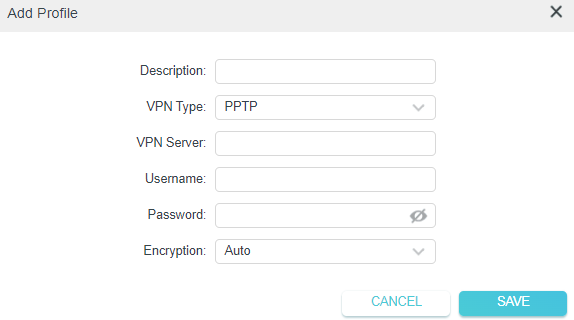
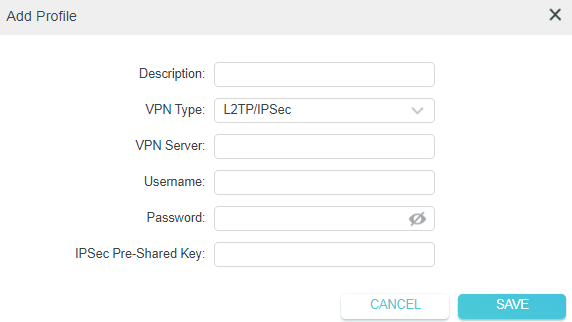
b. Specify a description for the VPN, and choose the VPN type.
c. Enter the VPN information provided by your VPN provider.
- OpenVPN: Enter the VPN username and password if required by your VPN provider; simply leave them empty. Then import the configuration file provided by your VPN provider.
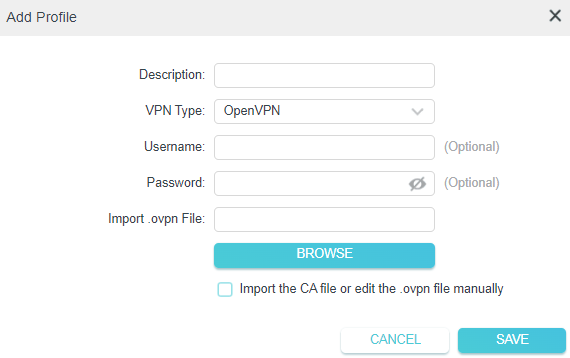
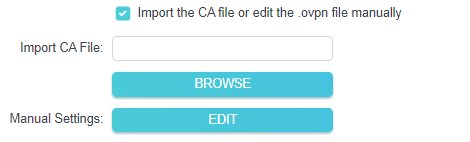
You can also select Import the CA file or edit the .ovpn file manually, then upload the CA file or manually configure the settings.
- PPTP: Enter the VPN server address (for example: 218.18.1.73) and the VPN username and password provided by your VPN provider.
- L2TP/IPSec VPN: Enter the VPN server address (for example: 218.18.1.73), VPN username and password, and IPSec pre-shared key provided by your VPN provider.
- WireGuard VPN: Give a description, and click BROWSE to import the WireGuard VPN server configuration. Then you will see the detailed parameters. Do NOT change the parameters unless necessary.
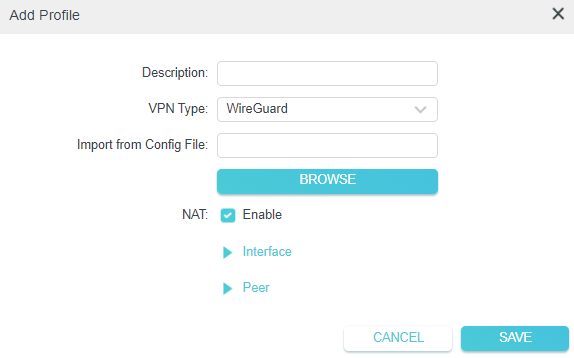
d. Save the settings.
e. Specify a description for the VPN, and choose the VPN type.
Step 4. In Device List, add VPN clients that will access the VPN server you have configured.
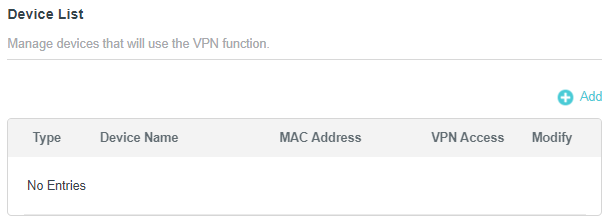
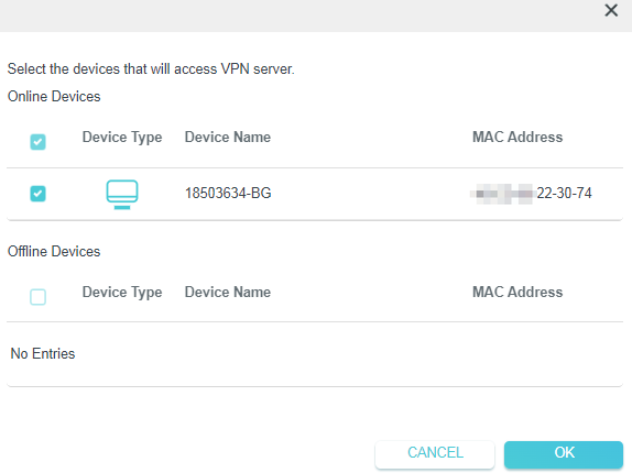

Step 5. Done! Now the devices you specified can access the VPN server you enabled.
For more details on your camera's functions and configuration, visit the Download Center to download your product's manual.
Looking For More
Is this faq useful?
Your feedback helps improve this site.
TP-Link Community
Still need help? Search for answers, ask questions, and get help from TP-Link experts and other users around the world.