How to set up a Dynamic DNS service account on AC VDSL/ADSL Modem Router (new logo)
Most ISPs (Internet service providers) assign a dynamic IP address to the router and you can use this IP address to access your router remotely. However, the IP address can change any time and you don’t know when it changes. In this case, you might need the DDNS (Dynamic Domain Name Server) feature on the router to allow you and your friends to access your router and local servers (FTP, HTTP, etc.) using domain name, in no need of checking and remembering the IP address.
Note: DDNS does not work if the ISP assigns a private WAN IP address (such as 192.168.1.x) to the modem router.
To set up DDNS, please follow the instructions below:
Here takes Archer VR2800 as demonstration.
1. Log in the web interface of the modem router. You can refer to How to log into the web-based interface of the AC VDSL/ADSL Modem Router (new logo)?
2. Go to Advanced > Network > Dynamic DNS.
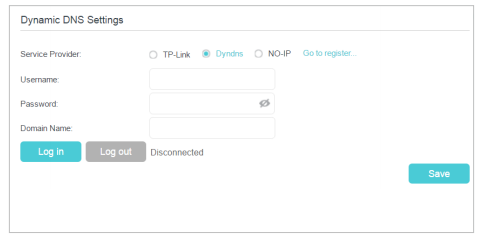
3. Select the DDNS service provider (TP-Link, Dyndns or NO-IP).
4. To use TP-Link DDNS service, you should log in with your TP-Link ID.
5. If you choose other DDNS service, you should also log in with your DDNS account, select a service provider and click Go to register ... Enter the username, password and domain name of the account (such as lisa.ddns.net).

6. Click Log in and Save.
Tips: If you want to use a new DDNS account, please Logout first, then login with the new account.
Get to know more details of each function and configuration please go to Download Center to download the manual of your product.
¿Es útil esta pregunta frecuente?
Sus comentarios nos ayudan a mejorar este sitio.