How to Install Your Solar Cam 4K (2-Cam Kit)
The Solar Cam 4K (2-Cam Kit) comes with one CentralHubTM and two solar cameras, one system that powers, protects, and connects your home. This article provides step-by-step instructions to help you install as needed.
Install Your Camera
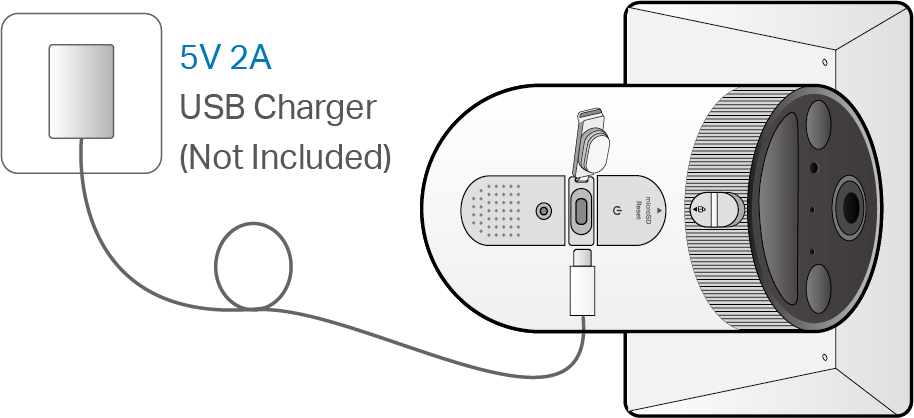
Charge the Battery
The battery comes partially charged. We recommend fully charging the battery before mounting. A full charge can take up to 5 hours.
Notes:
1. Peel off the film from the camera before use.
2. Check the battery status on the Tapo app after setup.
3. The camera may not power up after falling. Plug in the USB charger to power it on again.
4. Keep the ports firmly covered when not in use to ensure waterproof and dustproof performance.
5. Do not tear off the silicone part by force as it may affect the waterproof and dustproof performance.
6. Charge the battery using the included USB cable. Some third-party cables may cause slow or failed charging.
7. When you plug in the USB charger, the LED should blink amber quickly for 3 seconds. If not, make sure the power is running and check your connection.
Solar Panel Mounting Tips
The position and tilt angle of the solar panel greatly affect solar efficiency.
- Choose a location where the solar panel receives the most sunlight throughout the year. Regularly wipe the panel to remove dust and debris.
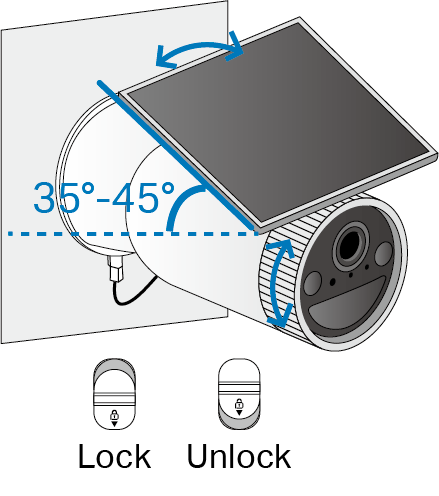
- Position the panel south-facing in the Northern Hemisphere or north-facing in the Southern Hemisphere. The recommended tilt angle between the panel and the horizontal ground is 35° ~ 45°.
Camera Mounting Tips
- Avoid placing behind windows or glass. Both windows and glass can block the motion sensor of your camera, preventing motion detection.
- Choose your mounting location. Proper camera mounting will prevent issues such as frequent false alerts.
- Avoid pointing the camera directly at swaying trees.
- Avoid pointing the camera at high-traffic areas unless that is the desired monitoring location.
- Avoid pointing the camera directly at streetlights or sunlight.
- Do not place the camera upside down.
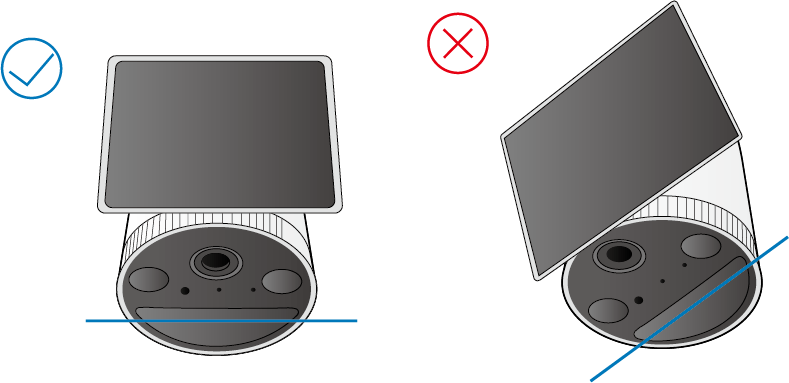
- Keep the motion sensor level for optimal results.
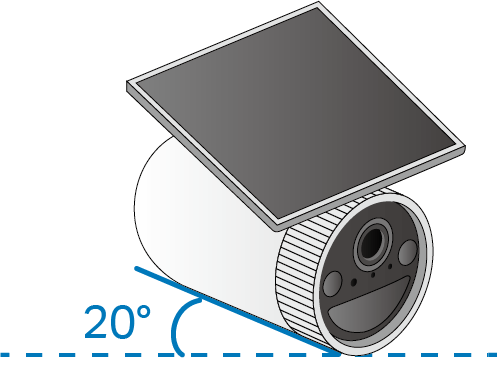
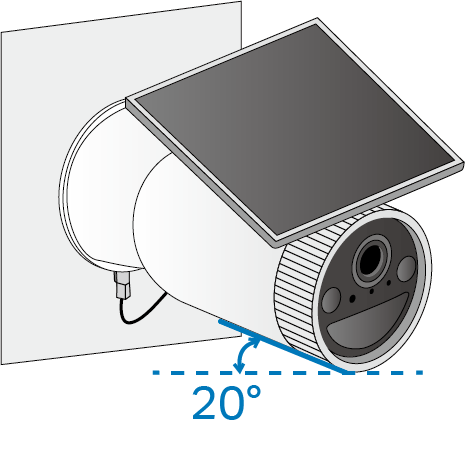
- Tilt the camera lens down to about 20°.
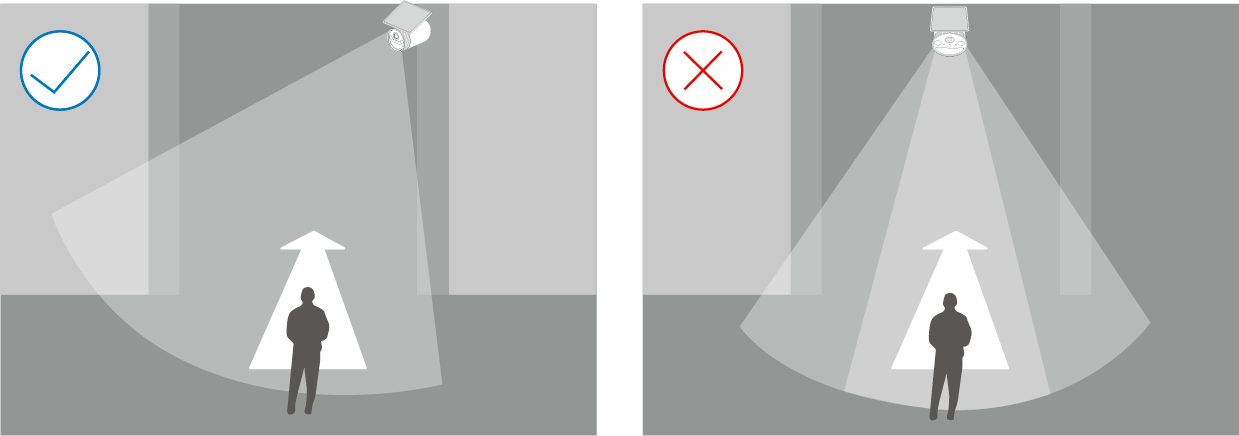
- Mounting your camera at an angle so movement crosses the lens’s field of view will provide more accurate motion and AI detection.
Note: Do not mount facing the direction of movement.
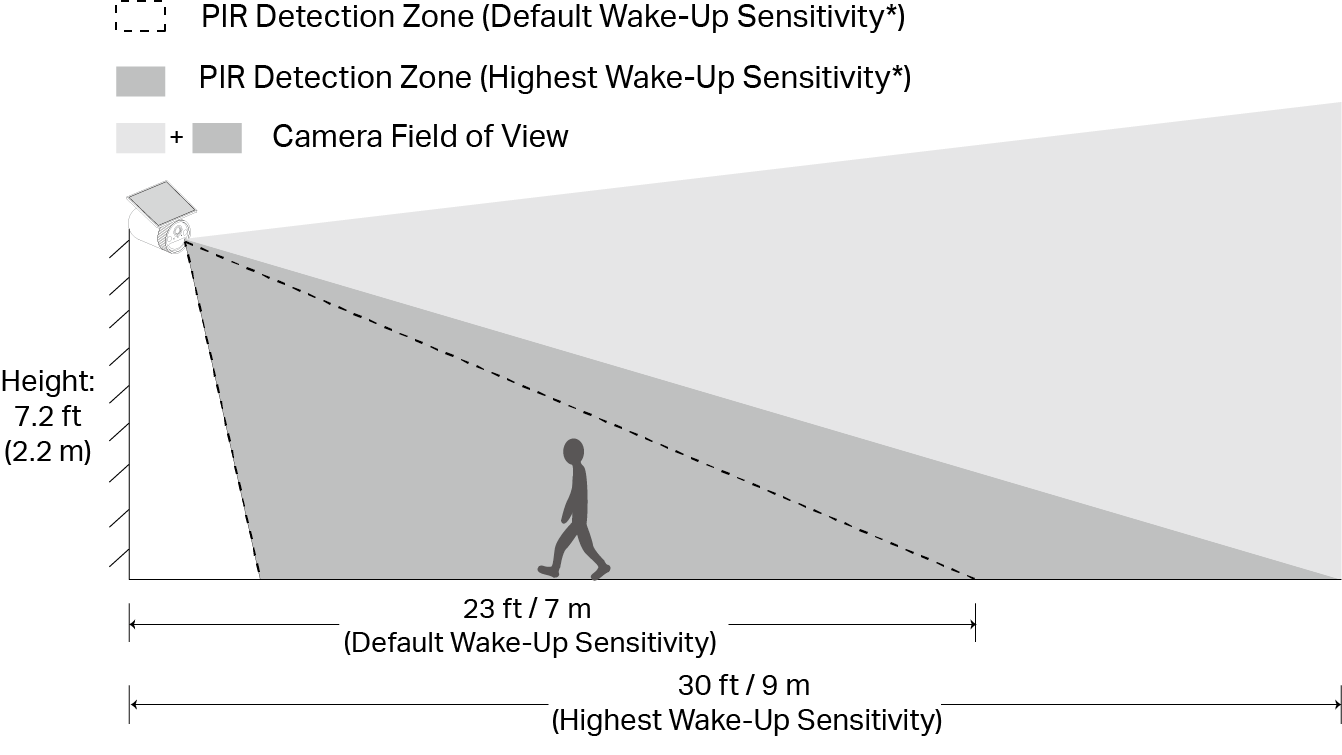
- For optimal detection performance, mount the camera 7.2 ft (2.2 m) above ground.
Note: You can adjust the sensitivity in Camera Settings > Detection > Wake-Up Sensitivity.
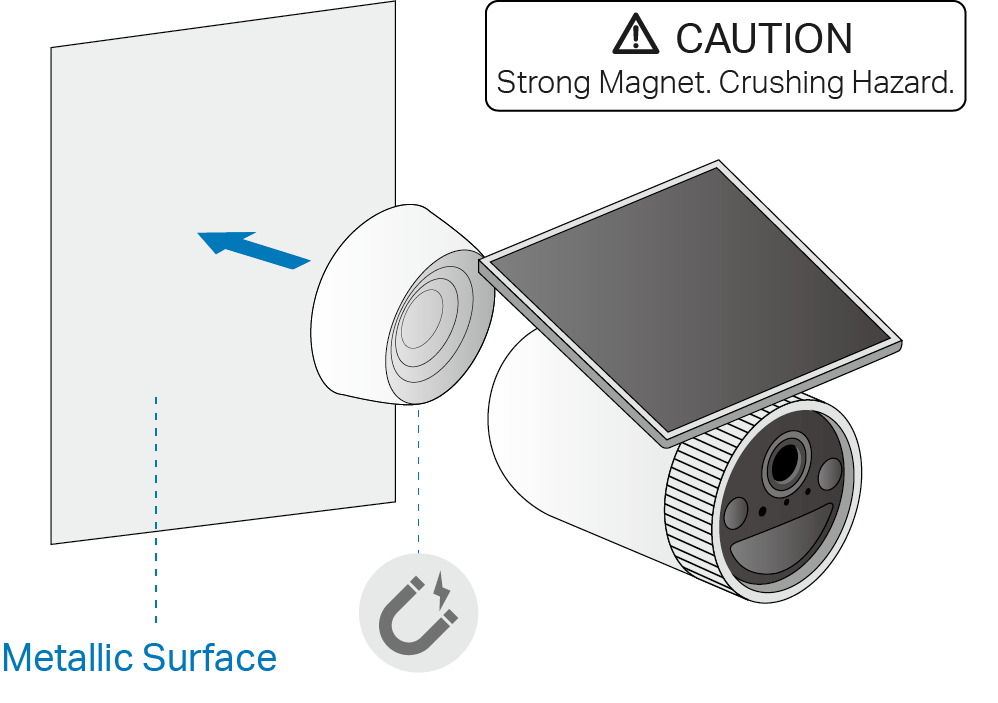
Option 1: Attach to Metallic Surfaces
The camera’s base contains a magnet, allowing it to attach to metallic surfaces.
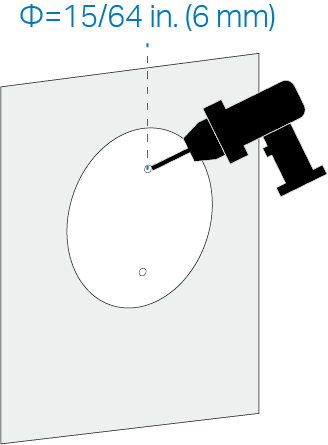
Option 2: Mount to Wall with Metal Plate
- Apply the mounting template sticker to a solid and level wall surface. Drill two holes according to the template.
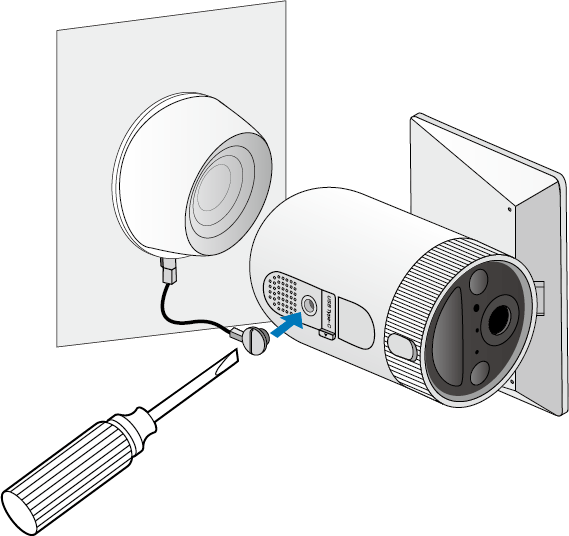
- Insert anchors into the holes. Place the cord over an anchor, then affix the metal plate on top using the screws.
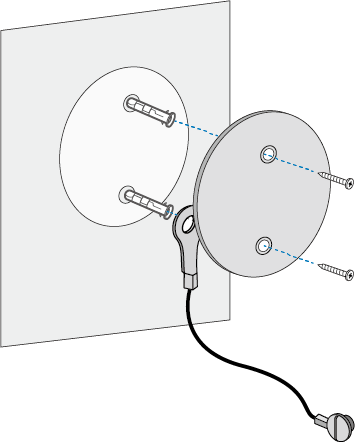
- Attach the magnet base to the metal plate.
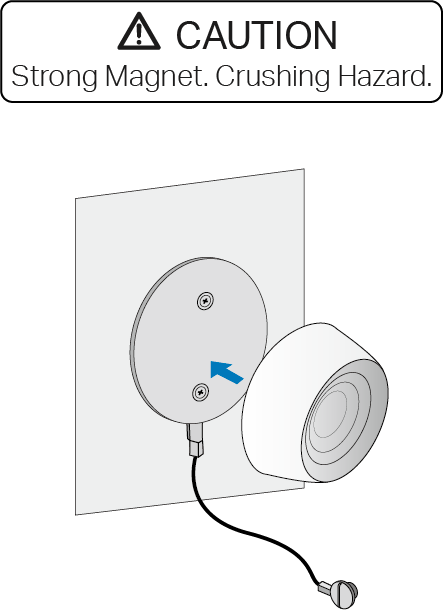
- Tighten the anti-theft cord onto the camera using a flathead screwdriver.
- Magnetically attach the camera to the base. Tilt the camera down to about 20°.
- Slide the Lock button up to loosen the solar panel, rotate the solar panel towards sunlight, then slide the button down.
Note: The recommended tilt angle between the panel and the horizontal ground is 35° ~ 45°.
(Optional) Expand Your CentralHubTM Local Storage
The smart CentralHubTM comes with 16 GB of built-in local storage, and you can also install an extra HDD/SSD drive (2.5’’) to expand the local storage.
Before You Start
- Back up all the data on your hard drive before installation as Tapo may need to format your hard drive.
- The CentralHubTM must be powered off when you install or remove a hard drive.
Install Your Hard Drive
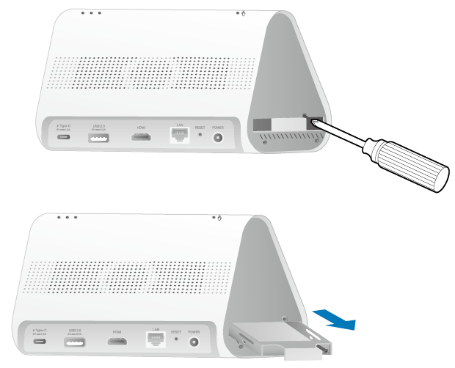
- Push down the lid to remove it. The
 symbol shows where you should press.

- Loosen the screw and pull out the hard drive bracket.
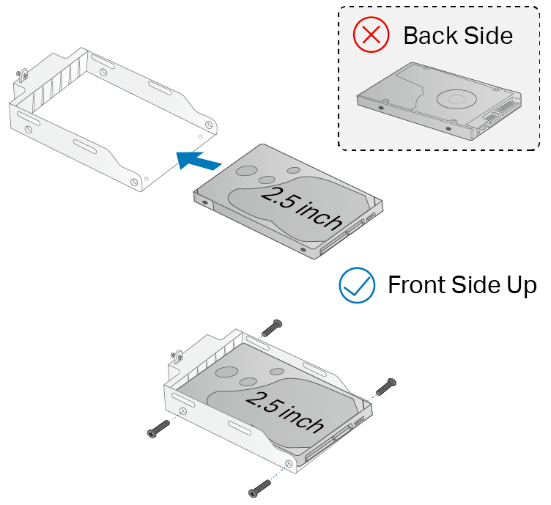
- Place the hard drive into the bracket with the front side up. Secure it in place with screws.
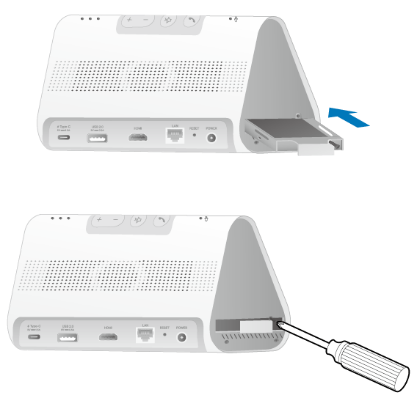
- Insert the bracket back into the CentralHubTM. Secure it with the screw, then replace the lid.
Note: Initialize the hard drive in the Tapo app.
Looking For More
Questa faq è utile?
Your feedback helps improve this site.

TP-Link Community
Still need help? Search for answers, ask questions, and get help from TP-Link experts and other users around the world.