How to mount and wire Tapo Smart Floodlight Camera
Introduction
This article provides step-by-step wiring and installation guidance for Tapo Smart Floodlight Camera.”
Requirements
• Do not install near combustible or flammable surfaces.
• Do not connect this light fixture to a dimmer switch or timer.WARNING: Risk of Electric Shocks
• Disconnect power at the fuse or circuit breaker before installing.
• Verify that the power supply voltage is correct. Connect fixture to a 100-240 VAC 50/60 Hz power source.
• Always follow code standards when installing wired connections.
• Install only on a UL-listed junction box or on a wall with a Neutral wire and a Line wire.
• An all-pole mains switch shall be incorporated in the electrical installation of the building. And the contact separation of the switch shall not be less than 3 mm.
• You can always find detailed wiring and mounting instructions in the Tapo app.

Note: If you are unfamiliar with basic electrical wiring, please consult a licensed electrician.
Installation
Part 1: Mounting Options
You can mount your Tapo floodlight camera vertically on a wall or overhang under an eave. Make sure the area has a strong Wi-Fi signal.
- Recommend Mounting Height: 2.5-3 m (8-10 ft) above the ground.
|
|
OR
|
|
|
Wall Mount |
Eave Mount |


|
|
For Wall Mount Ensure the UP arrow on the bracket points up. *To install horizontally, adjust the bracket to ensure the air bubble in the level is centered. |
|
For Eave Mount Point the UP arrow on the bracket towards your house. |

Part 2: Connect Wires and Install Floodlight Camera
Note:
- Wire colors vary by region. If you are unfamiliar with basic electrical wiring, please consult a licensed electrician.
- You can insert a microSD card for local recording before installation.

Option 1: Install on an existing junction box
The floodlight camera can be mounted on a junction box on a wall or under an eave.

|
1 Turn off the circuit breaker. Make sure the power is off by turning your light on and off a few times.
|
|
|
2 Remove the existing floodlight camera and disconnect wires from the junction box. |
|
|
3 Choose a pair of plate screws based on your junction box. Install the mounting plate to the junction box. |
|
|
4 Cover the Ground wire (usually green/green and yellow) with a wire nut or insulating tape. Route the Neutral wire (usually white/blue) and the Line wire (usually black/brown/red) through the bracket. Note: To identify wire colors, you can refer to Q1. |
|
|
5 Connect the Neutral and Line wires (recommended strip length: 10-15 mm [0.4-0.6 in.]) to the silicone holes in the bracket. Secure the wires with a slotted screwdriver. Note: Do not expose stripped wires outside the waterproof silicone holes. When the wires are too short, stiff, or soft to connect, you can refer to https://www.tp-link.com/support/faq/3883/ |
|
|
6 Hide the wires in the junction box. Attach the bracket to the mounting plate on the junction box with the bracket screw. |
|
|
7 Insert the camera screws into the screw holes. Align the mounting posts on the bracket with the holes on the floodlight camera. Tighten the camera screws in the screw holes to secure the floodlight camera to the bracket. Insert the screw caps into the screw holes. |
|
|
8 Apply waterproof glue between the Tapo device and the wall. Adjust the camera and light position to the desired angles. |
|
|
9 Turn on the circuit breaker. Wait until the System LED blinks red and green for setup. Note: Floodlights are auto-on in darkness upon power-up. Avoid direct eye contact at close range to prevent eye injury. |
|


Option 2: Install with existing electrical wires
Install where the Neutral wire and Line wire are available.

|
1 Turn off the circuit breaker. Make sure the power is off by turning your light on and off a few times.
|
|
|
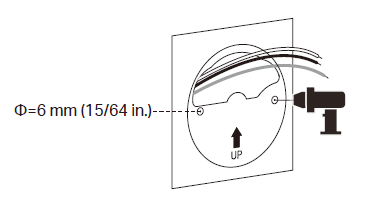
2 Route the wires through the mounting template and place the template. Drill two holes where indicated. |
|
|
3 Insert two wall anchors into the holes. Route the wires through the mounting bracket. Use the screws to affix the bracket over the anchors. |
|
|
4 Cover the Ground wire (usually green/green and yellow) with a wire nut or insulating tape. Note: To identify wire colors, you can refer to Q1. |
|
|
5 Connect the Neutral (usually white/blue) and the Line (usually black/brown/red) wires (recommended strip length: 10-15 mm [0.4-0.6 in.]) to the silicone holes in the bracket. Secure the wires with a slotted screwdriver. Note:
|
|
|
6 Hide the wires in the bracket. Insert the camera screws into the screw holes. Align the mounting posts on the bracket with the holes on the floodlight camera. Tighten the camera screws in the screw holes to secure the floodlight camera to the bracket. Insert the screw caps into the screw holes. |
|
|
7 Apply waterproof glue between the Tapo device and the wall. Adjust the camera and light position to the desired angles. |
|
|
8 Turn on the circuit breaker. Wait until the System LED blinks red and green for setup. Note: Floodlights are auto-on in darkness upon power-up. Avoid direct eye contact at close range to prevent eye injury. |
|


QA
Q1: How can I identify the wires?
A1: Wire colors vary by region. The Neutral wire is usually white/blue, while the Line wire is usually black/brown/red.
You can refer to the FAQ How to Identify Different Wires by Their Colors for detailed information.
If you are unfamiliar with basic electrical wiring, please consult a licensed electrician.
Q2: What can I do if my floodlight camera cannot power on after wiring?
A2:
- Make sure you have turned on the circuit breaker.
- Check if the System LED is on. If it is off, turn off the circuit breaker and check the wiring.
- Refer to the FAQ What to do if my floodlight camera cannot power on? for detailed instructions.
Q3: What if there is no existing junction box or electrical wires?
A3: Floodlight cameras require a high power supply and should be installed in a location with a weatherproof junction box or electrical wires.
If you do not have a current energy source or are uncomfortable dealing with electrical wiring, have an expert electrician do the job.
Ez a GY.I.K. hasznos volt?
Véleménye segíti az oldal fejlesztését
