How to configure system time of TP-Link Wireless Dual Band 4G LTE Router (new logo)

Archer MR200( V2 V3 V4 ) , Archer MR202 , Archer MR400( V1 V2 V3 ) , Archer MR402 , Archer MR600( V1 ) , Archer MR515
Recent updates may have expanded access to feature(s) discussed in this FAQ. Visit your product's support page, select the correct hardware version for your device, and check either the Datasheet or the firmware section for the latest improvements added to your product. Please note that product availability varies by region, and certain models may not be available in your region.
The system time you configure here will be used for other time-based functions like Parental Controls and Wireless Schedule. You can manually set how to get the system time.
Here takes Archer MR200 as demonstration.
Follow the steps below to set your system time.
1. Please refer to How to log into the web-based management interface of TP-Link Wireless Dual Band 4G LTE Router? (new logo)
2. Go to Advanced > System Tools > Time Settings page.
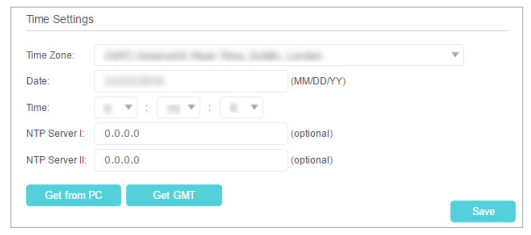
3. Configure the system time using the following methods:
Manually - Select your time zone and enter your local time.
Get from PC - Click this button if you want to use the current managing PC’s time.
Get GMT - Click this button if you want to get time from the internet. Make sure your router can access the internet before you select this way to get system time.
4. Click Save to make your settings effective.
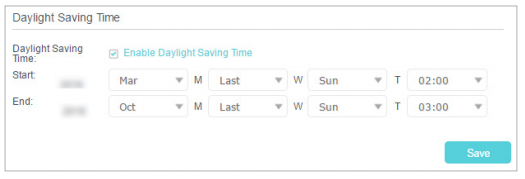
5. After setting the system time, you can set Daylight Saving time according to your needs. Tick the checkbox to enable Daylight Saving, set the start and end time and then click Save to make the settings effective.
Get to know more details of each function and configuration please go to Download Center to download the manual of your product.
Ez a GY.I.K. hasznos volt?
Véleménye segíti az oldal fejlesztését
What’s your concern with this article?
- Dissatisfied with product
- Too Complicated
- Confusing Title
- Does not apply to me
- Too Vague
- Other
Thank you
We appreciate your feedback.
Click here to contact TP-Link technical support.
Ez a weboldal cookie -kat használ a weboldal navigációjának javítása, az online tevékenységek elemzése és a felhasználók számára a legjobb élmény biztosítása érdekében. A cookie -k használata ellen bármikor tiltakozhat. További információt az adatvédelmi irányelveinkben talál.
Your Privacy Choices
Ez a weboldal cookie -kat használ a weboldal navigációjának javítása, az online tevékenységek elemzése és a felhasználók számára a legjobb élmény biztosítása érdekében. A cookie -k használata ellen bármikor tiltakozhat. További információt az adatvédelmi irányelveinkben talál.
Ezek a cookie -k a webhely működéséhez szükségesek, és nem tilthatók le a rendszereiben.
TP-Link
accepted_local_switcher, tp_privacy_banner, tp_privacy_base, tp_privacy_marketing, tp_top-banner, tp_popup-bottom, tp_popup-center, tp_popup-right-middle, tp_popup-right-bottom, tp_productCategoryType
Youtube
id, VISITOR_INFO1_LIVE, LOGIN_INFO, SIDCC, SAPISID, APISID, SSID, SID, YSC, __Secure-1PSID, __Secure-1PAPISID, __Secure-1PSIDCC, __Secure-3PSID, __Secure-3PAPISID, __Secure-3PSIDCC, 1P_JAR, AEC, NID, OTZ
Az elemző cookie -k lehetővé teszik számunkra, hogy elemezzük weboldalunkon végzett tevékenységeit, hogy javítsuk és módosítsuk webhelyünk működését.
Hirdetési partnereink a weboldalunkon keresztül marketing cookie -kat állíthatnak be annak érdekében, hogy érdeklődési körének profilját, és hogy releváns hirdetéseket jelenítsen meg más webhelyeken.
Google Analytics & Google Tag Manager
_gid, _ga_<container-id>, _ga, _gat_gtag_<container-id>
Google Ads & DoubleClick
test_cookie, _gcl_au
Meta Pixel
_fbp
Crazy Egg
cebsp_, _ce.s, _ce.clock_data, _ce.clock_event, cebs
lidc, AnalyticsSyncHistory, UserMatchHistory, bcookie, li_sugr, ln_or