How to set up Access Control for website blocking on TP-Link 11N Wireless Router (new logo)
This document will show how to set up website blocking on our wireless routers. We will use a TL-WR841N V13 as an example.
Step 1: Log in to your router's web management page.
Open the web browser and type the IP address of the router (default is 192.168.0.1) or http://tplinkwifi.net into the address bar and then Press Enter. When you are prompted, enter your login credentials. The default username and password is ’admin’.

Step 2:
Go to Access Control > Host, then click Add New…
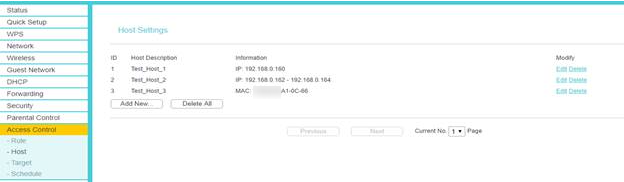
Select ‘IP Address’, then enter a short description for the host rule you want to define in the ‘Host Description’ box. Enter the IP address range on your network that you want to block access to.
In this example, the router TL-WR841N’s LAN IP address is 192.168.0.1, IP Range is 192.168.0.100~192.168.0.199.We are going to set up rules to allow all the devices in the network to access www.tp-link.com only, and restrict access to all other websites.

Click Save - the new Host rule will now show up on the "Host Settings" page
Step 3
Go to Access Control ->Target, then click Add New...

Step 4
Select Domain Name as the mode type. Create a unique description (e.g. target_1) for the target in the Target Description field and enter the domain name, either the full name or the keywords (for example TP-LINK) in the Domain Name field.

Step 5
Go to Access Control > Schedule and configure the schedule settings. Click ‘Add New’.

Step 6
Create a unique description (e.g. schedule_1) for the schedule in the Schedule Description field and set the day(s) and time period, and click Save.

Note: Make sure the time on the router is set the same as that on your computers. To check the router’s time, please go to System Tools->Time Settings.

Step 7
Go to Access Control ->Rule. On the page displayed, tick "Enable Internet Access Control", then select Allow the packets specified by any enabled access control policy to pass through the Router as the default filter, then click Save.

Click Add New, then enter a brief description of the rule in the "Rule Name:" box

In the "Host:" box, select the Host rule you defined in Step 2
In the "Target:" box, select the target rule you defined in Step 3
In the "Schedule:" box, select "Anytime" (this will make the rule always active)
In the "Action:" box, select "Deny"
In the "Status:" box, select "Enabled"

Click Save - the new Access Control rule will now show up on the "Access Control Rule Management" page.

Now specified host(s) can only visit the target(s) within the scheduled time period.
Get to know more details of each function and configuration please go to Download Center to download the manual of your product.
Ez a GY.I.K. hasznos volt?
Véleménye segíti az oldal fejlesztését


