How to Join an OneMesh Network with a Range Extender Already Set Up

Archer C1200 , Archer C5400 , RE715X , Archer C4 , Archer C5 , Archer AX10 , Archer C2 , RE205 , Archer AX96 , Archer C6U , Archer C80 , Archer AXE95 , Archer C8 , Archer AX10000 , Archer C9 , Archer C6 , Archer C7 , Archer AX90 , RE330 , RE450( V4 ) , RE315 , Archer A20 , RE1500X , Archer C60 , Archer A1200 , Archer C64 , RE500XD , RE200( V4 ) , Archer C59 , RE500 , Archer C58 , Archer AX4200 , Archer C3200 , Archer A2 , Archer AX75 , Archer AX73 , Archer A10 , Archer C50 , Archer C55 , Archer C54 , Archer AXE75 , RE190 , Archer A6 , Archer A7 , Archer AX72 , Archer A5 , Archer A8 , Archer A9 , RE230 , Archer AX68 , RE605X , Archer AX5300 , RE500X , Archer C4000 , RE580X , Archer AXE300 , Archer AX1500 , Archer AX60 , Archer AX3000 , RE220( V2 ) , Archer A2600 , Archer AX55 , RE505X , Archer C5200 , Archer AX53 , Archer AX51 , Archer A2200 , Archer C3150 , Archer AX50 , RE650 , Archer AX6000 , RE603X , Archer C25 , Archer C24 , RE700X , Archer A64 , Archer C2600 , RE1750X , Archer C21 , Archer C20 , RE780X , Archer AX1800 , Archer AX206 , RE300 , Archer C900 , Archer AX4400 , Archer C3000 , RE305 , RE600X , Archer C50
Recent updates may have expanded access to feature(s) discussed in this FAQ. Visit your product's support page, select the correct hardware version for your device, and check either the Datasheet or the firmware section for the latest improvements added to your product. Please note that product availability varies by region, and certain models may not be available in your region.
Once the extender is connected to a TP-Link OneMesh router via web browser or WPS button, the extender will automatically join the router’s OneMesh network and copy the router’s wireless settings. You can manually join an OneMesh network during the configuration via the TP-Link Tether app. For more information about setting up the extender with OneMesh network, refer to the following FAQs:
How to Configure OneMesh Range Extender via Tether App
How to Configure OneMesh Range Extender via Web Browser
How to Configure OneMesh Range Extender via WPS Button
If you have already set up the extender before without joining the OneMesh network, choose one of the methods below to set up an OneMesh network:
Note: Before setting up an OneMesh network, it is recommended to enable Smart Connect on your host router to enjoy a seamless connection between dual-band networks.
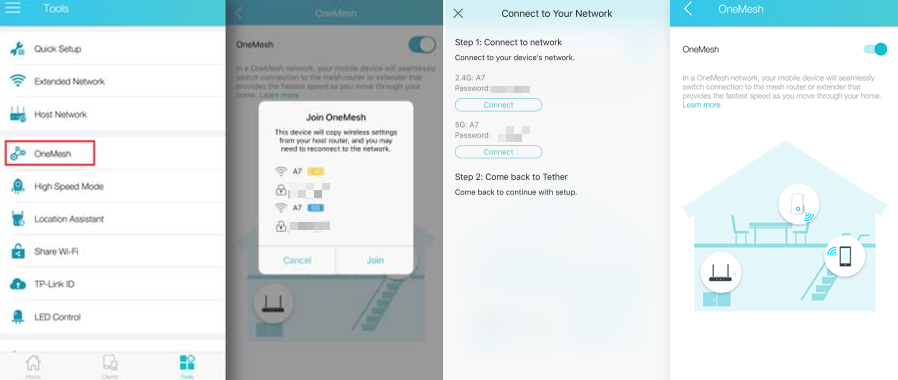
Method 1: Via the TP-Link Tether App
1. Plug the extender into an electrical outlet next to your router, and then wait until the Power LED turns solid on.
Note: For safety, only plug the extender in upright direction.
2. Launch Tether App and select the extender you want to join the OneMesh network.
3. Go to Tools > OneMesh and enable OneMesh.
Note: If your host router does not support OneMesh, you need to reselect a host network which supports OneMesh function first. Go to Tools > Host Network and click Reselect Host Network, and then follow the app instructions to complete the configuration.
Method 2: Via a Web Browser
1. Visit http://tplinkrepeater.net, and log in with the password you set for the extender. Please refer to How to log into the Web GUI of my Range Extender?
2. Go to Settings > OneMesh and enable Join OneMesh.
Note: If your host router does not support OneMesh, you need to reselect a host network which can support OneMesh function first. Go to Settings > Wireless > Connect to Network and follow the instructions to complete the configuration.
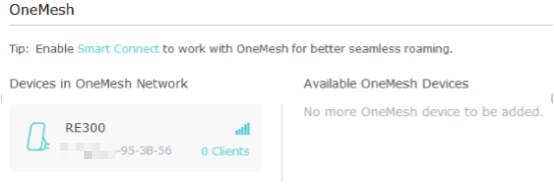
Test whether OneMesh network is built successfully or not:
Follow the above instructions to join the OneMesh network. After that, you can view all the devices in OneMesh network in Basic > OneMesh on the web management page of your host router.
Get to know more details of each function and configuration please go to Download Center to download the manual of your product.
Looking for More
Είναι χρήσιμο αυτό το FAQ;
Τα σχόλιά σας συμβάλλουν στη βελτίωση αυτού του ιστότοπου.
What’s your concern with this article?
- Dissatisfied with product
- Too Complicated
- Confusing Title
- Does not apply to me
- Too Vague
- Other
Σας Ευχαριστούμε
Εκτιμούμε τα σχόλιά σας.
Κάντε κλικεδώ για να επικοινωνήσετε με την τεχνική υποστήριξη TP-Link.
Αυτός ο ιστότοπος χρησιμοποιεί cookies. Συνεχίζοντας την περιήγηση στον ιστότοπο, αποδέχεστε τις χρήσεις των cookies από εμάς. Μάθε περισσότερα.
Βασικά Cookies
Αυτά τα cookie είναι απαραίτητα για τη λειτουργία του ιστότοπου και δεν μπορούν να απενεργοποιηθούν στα συστήματά σας.
TP-Link
accepted_local_switcher, tp_privacy_base, tp_privacy_marketing, tp_smb-select-product_scence, tp_smb-select-product_scenceSimple, tp_smb-select-product_userChoice, tp_smb-select-product_userChoiceSimple, tp_smb-select-product_userInfo, tp_smb-select-product_userInfoSimple, tp_top-banner, tp_popup-bottom, tp_popup-center, tp_popup-right-middle, tp_popup-right-bottom, tp_productCategoryType
Live Chat
__livechat, __lc2_cid, __lc2_cst, __lc_cid, __lc_cst, CASID
Youtube
id, VISITOR_INFO1_LIVE, LOGIN_INFO, SIDCC, SAPISID, APISID, SSID, SID, YSC, __Secure-1PSID, __Secure-1PAPISID, __Secure-1PSIDCC, __Secure-3PSID, __Secure-3PAPISID, __Secure-3PSIDCC, 1P_JAR, AEC, NID, OTZ
Cookies Ανάλυσης και Μάρκετινγκ
Τα cookie ανάλυσης μας δίνουν τη δυνατότητα να αναλύσουμε τις δραστηριότητές σας στον ιστότοπό μας για να βελτιώσουμε και να προσαρμόσουμε τη λειτουργικότητα του ιστότοπού μας.
Τα διαφημιστικά cookie μπορούν να ρυθμιστούν μέσω του ιστότοπού μας από τους διαφημιστικούς μας συνεργάτες, προκειμένου να δημιουργήσουν ένα προφίλ των ενδιαφερόντων σας και να σας εμφανίζει σχετικές διαφημίσεις σε άλλους ιστότοπους.
Google Analytics & Google Tag Manager
_gid, _ga_<container-id>, _ga, _gat_gtag_<container-id>
Google Ads & DoubleClick
test_cookie, _gcl_au
Meta Pixel
_fbp
Crazy Egg
cebsp_, _ce.s, _ce.clock_data, _ce.clock_event, cebs
lidc, AnalyticsSyncHistory, UserMatchHistory, bcookie, li_sugr, ln_or