How to connect to the WLAN-PS network of the TL-WPS510U on Windows 8.1
User Application Requirement
Actualizado11-25-2021 09:01:49 AM103866
Este artículo se aplica a:
TL-WPS510U
Recent updates may have expanded access to feature(s) discussed in this FAQ. Visit your product's support page, select the correct hardware version for your device, and check either the Datasheet or the firmware section for the latest improvements added to your product. Please note that product availability varies by region, and certain models may not be available in your region.
Compared with Windows 7 and Windows 8, Windows 8.1 no longer shows Ad-hoc networks in the Wi-Fi list. As TL-WPS510U works on Ad-hoc mode as default, you cannot find the SSID “WLAN-PS” of TL-WPS510U on Windows 8.1. For how to connect to the WLAN-PS network of the TL-WPS510U on Windows 8.1 please follow steps below.
View the Ad-hoc wireless network
Step 1: Run cmd as administrator
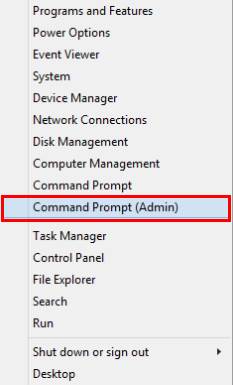
Right click on the Windows START icon at the left-hand corner in the task tray, left click on “Command Prompt (Admin) “
Step 2:View the name of wireless network(SSID)
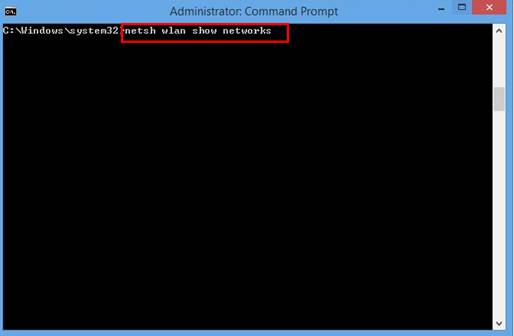
Run the following command as below to see all networks in range, including ad-hoc network:
>netsh wlan show networks
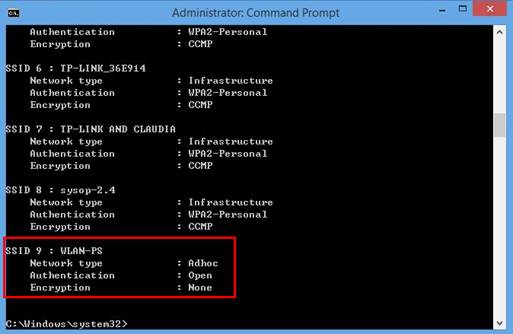
In this case, WLAN-PS is the ad-hoc wireless network name of the TL-WPS510U.Note down the detailed information of WLAN-PS.
Set up a visible ad-hoc wireless network and manually get it connected
Step1: Set up a new network
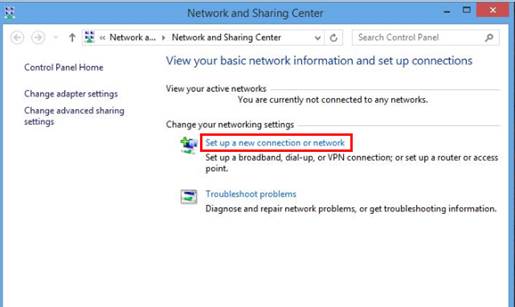
go to ‘control panel’→ ‘Network and Internet’→ ‘Network and Sharing Center’, click ‘Set up a new connection or network’
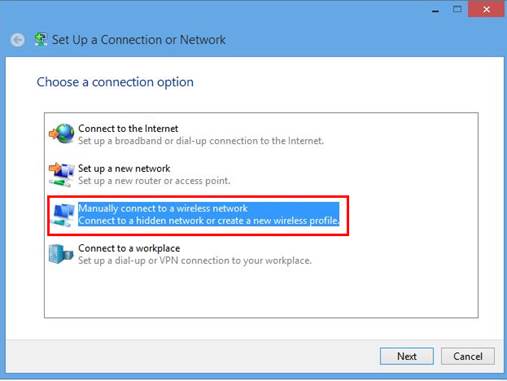
double click “Manually connect to a wireless network”
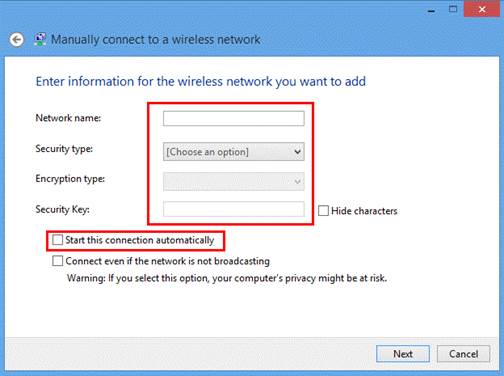
Enter the SSID, security settings of the ad-hoc network accordingly (you can find the detailed information in “view the ad-hoc wireless network”-setp2), uncheck “Start this connection automatically” (important)
click “Next”, then “close”
Note: The Network name of the TL-WPS510U is WLAN-PS, Security type of the TL-WPS510U is No authentication(open)
Step 2: Complete the parameter of the ad-hoc wireless network
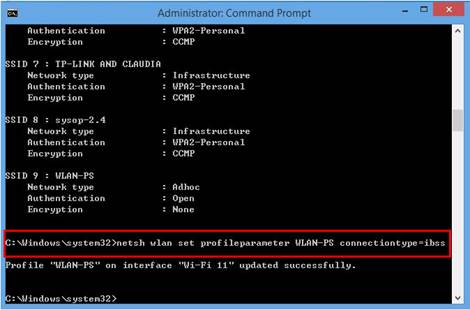
Run the command as below (important):
>netsh wlan set profileparameter WLAN-PS connectiontype=ibss
Step 3: Run cmd and connect the ad-hoc network
After setting up, run this command whenever you want to connect the ad-hoc network:
>netsh wlan connect WLAN-PS
Then you can see that you are currently connected to WLAN-PS in “Network and Sharing Center” window
Now you can connect your Windows 8.1 PC to WLAN-PS and continue to install and configure the TL-WPS510U.
¿Es útil este artículo?
Tus comentarios nos ayudan a mejorar esta web.
Selecciona qué describe mejor la información:
Insatisfech@ con el producto
El articulo es demasiado complicado
Título es confusa o errónea
No es la información que estaba buscando
El artículo es poco claro
Otro
Gracias
Agradecemos los comentarios. Pulsa aquí para contactar con el soporte técnico de TP-Link.
De United States?
Obtener productos, eventos y servicios para su región.
Este sitio web utiliza cookies para mejorar la navegación por el sitio web, analizar las actividades en línea y ofrecer la mejor experiencia de usuario posible en nuestro sitio web. Puedes oponerte al uso de cookies en cualquier momento. Encontrarás más información en nuestra política de privacidad .
Your Privacy Choices
Este sitio web utiliza cookies para mejorar la navegación por el sitio web, analizar las actividades en línea y ofrecer la mejor experiencia de usuario posible en nuestro sitio web. Puedes oponerte al uso de cookies en cualquier momento. Encontrarás más información en nuestra política de privacidad .
Estas cookies son necesarias para el funcionamiento del sitio web y no pueden desactivarse en tu sistema.
Las cookies de análisis nos permiten analizar tus actividades en nuestro sitio web con el fin de mejorar y adaptar la funcionalidad del mismo.
Las cookies de marketing pueden ser instaladas a través de nuestro sitio web por nuestros socios publicitarios con el fin de crear un perfil de tus intereses y mostrarte anuncios relevantes en otros sitios web.