How to Set Up IPv6 on TP-Link Wi-Fi Routers
This guide covers how to enable IPv6 on a router and configure the correct settings for your connection.
Key Takeaways
- To enable IPv6 on a TP-Link router, log in to the web management page, go to Advanced > IPv6, and turn on the IPv6 toggle. The configuration options that appear next depend on your IPv6 connection type.
- The IPv6 connection type, Dynamic IP, is often used with cable ISPs.
- If your IPv6 connection type is PPPoE, select PPPoE for the IPv6 internet connection type and leave "Share the same PPPoE session with IPv4" enabled unless your ISP provided separate credentials for IPv6.
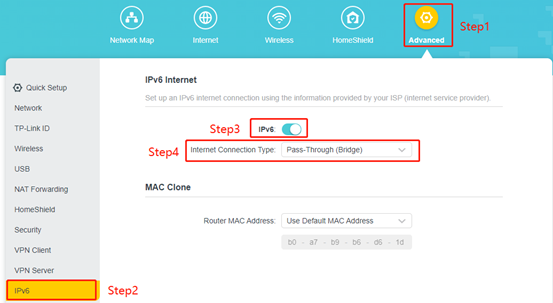
- If there is a main router in front of your TP-Link router (double NAT), select Pass-Through (Bridge) as the IPv6 connection type and click Save.
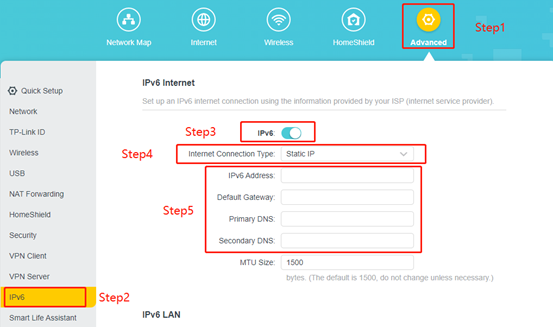
- If your ISP provided a static IPv6 address, select Static IP and manually enter the IPv6 address, default gateway, and Domain Name System (DNS) information provided by your ISP.
Before Getting Started:
To enable IPv6 on your TP-Link router, you will need to know your IPv6 connection type, which determines which of the four cases below applies to you.
- PPPoE
- Dynamic IP (SLAAC/DHCPv6)
- Pass-Through (Bridge)
- Static IP
Note: Your internet service provider (ISP) should have given you your connection type and any required login credentials. If you are unsure, contact your ISP first.
Set Up IPv6 on a TP-Link Router
1. Connect to your router either via Wi-Fi or with an Ethernet cable. Open a web browser and enter https://tplinkwifi.net/. Log in with your router’s password.
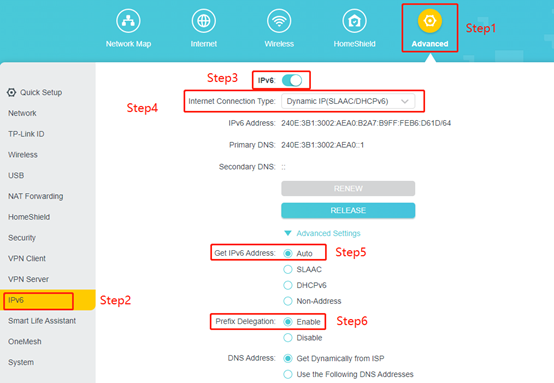
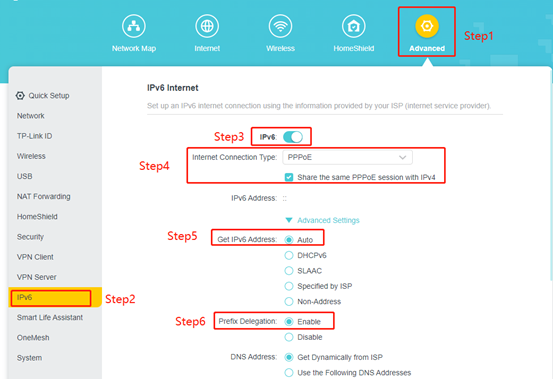
2. Go to Advanced > IPv6.
3. Enable IPv6.
Case 1: Dynamic IP (Cable ISP)
1. Select Dynamic IP(SLAAC/DHCPv6).
2. Expand the Advanced Settings, select Auto for Get IPv6 Connection, enable Prefix Delegation, and then click Save on the bottom right.
Case 2: PPPoE
1. Select PPPoE. The Share the same PPPoE session with IPV4 is ticked by default.
If your ISP provides separate accounts for IPv4 and IPv6, please uncheck it and manually enter the Username and Password You Were Given By Your ISP for the IPv6 Connection
2. Go to the Advanced Settings Tab, Select Auto under the option for “Get IPv6 Address”.
3. Select Enable in “Prefix Delegation”.
4. Click Save.
Case 3: Pass-Through (Bridge) — Main Router Present
1. Select Pass-Through (Bridge) for the Internet Connection Type
2. Click Save.
Case 4: Static IP
1. Select Static IP.
2. Manually Enter the Information Provided by Your ISP.
Note: If you do not know what your internet connection type is, contact your ISP or judge according to the already known information provided by your ISP.
3. Click Save.
To get to know more details about the configuration and features of your router, please go to Download Center to download the manual of your product.
Looking for More
Is this faq useful?
Your feedback helps improve this site.


TP-Link Community
Still need help? Search for answers, ask questions, and get help from TP-Link experts and other users around the world.