How to set up IPv6 service for Cable ISP on the wireless router
Note: Please make sure that you are provided IPv6 internet service by your internet provider, If not, please contact your IPv6 internet provider first.
Your ISP should have provided the following information:
PPPoE, Dynamic IP (SLAAC/DHCPv6), Pass-Through (Bridge), and Static IP.
1. Log in to the web-based interface of the router. If you don’t know how to do that, please refer to
How do I log into the web-based Utility (Management Page) of the TP-Link wireless router?
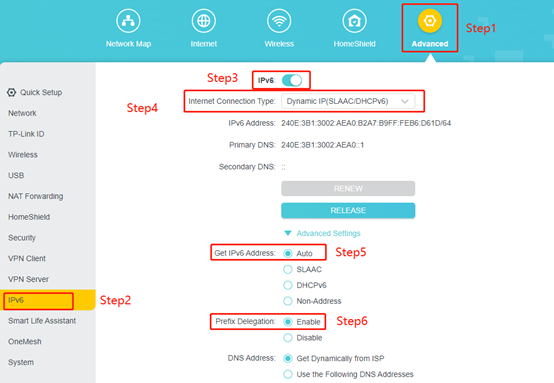
2. Go to Advanced > IPv6.
3. Enable IPv6.
4. Select Dynamic IP(SLAAC/DHCPv6).
5. Go to Advanced settings, Select Auto in “Get IPv6 Address”. Select Enable in “Prefix Delegation”.
6. Click Save.
To get to know more details of each function and configuration please go to Download Center to download the manual of your product.
Is this faq useful?
Your feedback helps improve this site.
TP-Link Community
Still need help? Search for answers, ask questions, and get help from TP-Link experts and other users around the world.