How to configure WDS function on Archer D5, Archer D7(b), TD-W8968, TD-W8970(B), TD-W9970, TD-W8980, TD-W9980(B)
This Article Applies to:
Note:This article applies to TD-W8968 V1/V2,not TD-W8968 V3.
We will take TD-W8968 V1 as example in this article.The steps are the same for TD-W8970&TD-W8970B,and similar for dual band modems TD-W8980,TD-W9980, TD-W9980B,Archer D5,Archer D7, Archer D7b.
A Wireless Distribution System(WDS)is a system that enables the wireless interconnection of access points in an IEEE 802.11. It allows a wireless network to be expanded using multiple access points without the need for a wired backbone to link them, as is traditionally required. For more information about WDS, please refer to Wikipedia. We often use the WDS as following:
.jpg)
Note:
1. LAN IP of TD-W8968 should be different but in the same subnet with the root AP.
2. Please make sure whether the root AP is encrypted before you start the configuration. If so, note down the encryption information of the root AP.
3. The DHCP Server on extended router should be disabled;
4. WDS bridging only requires the WDS setting on either the root router or the extended router, on either 2.4GHz or 5GHz; NO need to setup on both sides or both bands.
To setup WDS with TD-W8968, the following steps are required:
Step 1
Log into TD-W8969’s management page by typing 192.168.1.1 in browser. Then type in admin as the User Name and Password.
.jpg)
Step 2
Go to Wireless->Wireless Settings.(For dual band modems, go to Wireless 2.4GHz-Wireless Settings or Wireless 5GHz-Wireless Settings).
.png)
Step 3
Select Enable WDS. Then the page will show like below.
.png)
Step 4
Click on Scan. On the pop-up window, find the SSID of your root AP, and check up its Channel. Then click on Back.
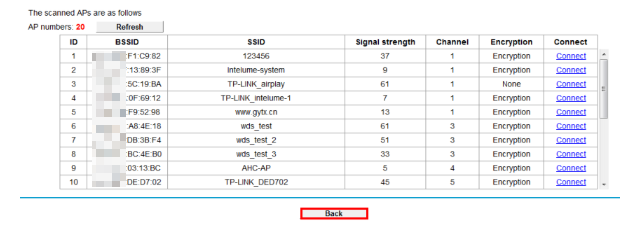
Step 5
On the previous page, change the channel to match with the one of your root AP.
.png)
Step 6
Click on Scan again, find the SSID of your root AP and click on Connect.

Step 7
After Step 6, you will come back to the previous page. The root AP’s SSID and MAC will be filled automatically.
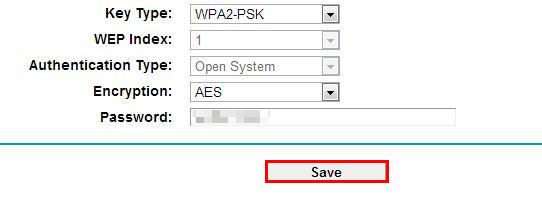
Step 8
If the root AP has been encrypted, please configure the security settings according to the root AP’s encryption information you have noted down. The root AP has been encrypted with WPA2-PSK in this example.
Step 9
Click on Save.
Step 10
Please consider whether there is a need to disable TD-W8969’s DHCP function. Only when the root AP has connected to the internet, you should disable TD-W8969’ DHCP function as following steps. If you use TD-W8968 to connect to the internet, you don’t need to do so, but the root AP’s DHCP should be disabled instead.
Step 11
Go to DHCP Settings and select disable.
.png)
Step 12
Click on Save.
.png)
Step 13
Untill now, the configuration of TD-W8968’s WDS function have been completed. You can make a simple check by the Ping utility. If the ping proceeds successfully (which means the WDS performs properly), you will see the similar screen as below:.png)
The IP address 192.168.1.101 is the address of PC connecting with the root AP.
Get to know more details of each function and configuration please go to Download Center to download the manual of your product.
Is this faq useful?
Your feedback helps improve this site.

TP-Link Community
Still need help? Search for answers, ask questions, and get help from TP-Link experts and other users around the world.