
How to Connect the Tapo Solar Panel to Compatible Tapo Devices with Proper Waterproof Gaskets
The Tapo Solar Panel is designed for continuous outdoor use, eliminating the need to recharge the battery manually.
Key Takeaways
- The Tapo Solar Panel is designed for Tapo battery-powered devices, providing nonstop power and eliminating the need to recharge the battery manually.
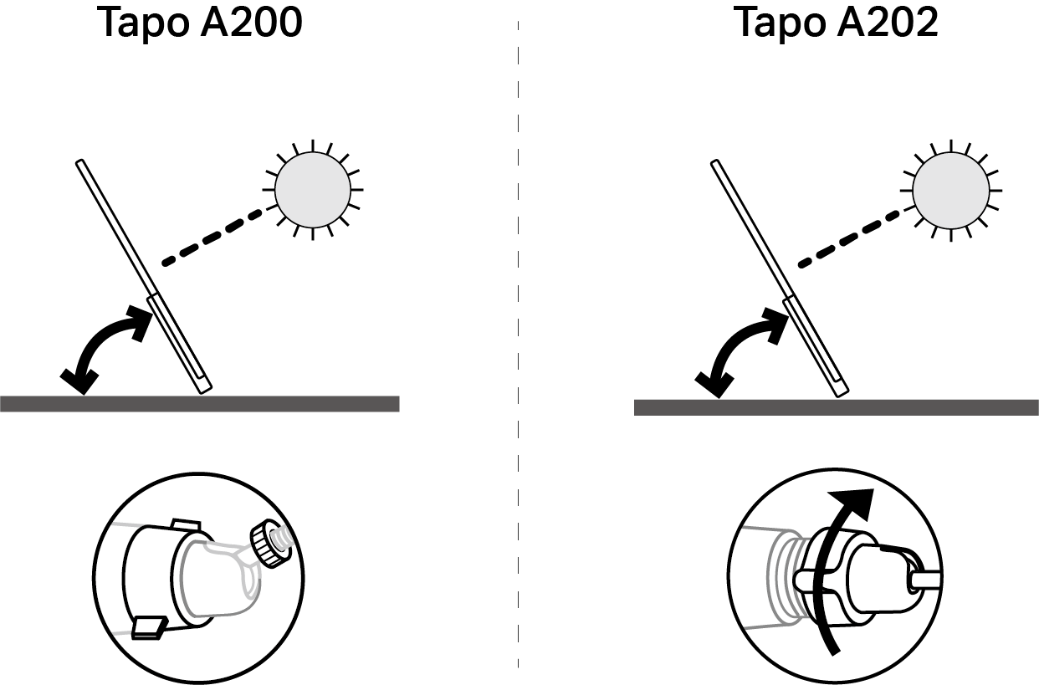
- Solar panel efficiency depends on panel position and tilt angle — south-facing placement in the Northern Hemisphere or north-facing in the Southern Hemisphere with a 35°–45° tilt angle is recommended.
- The connector type (Type-C or Micro USB) and whether you need a separate waterproof gasket depend on your specific camera model and solar panel hardware version.
- Certain solar panel and camera combinations—such as the Tapo A201 V2 or Tapo A202 V1—feature integrated waterproof gaskets built directly into the connector and extension cable, so no separate gasket installation is required.
- If you see a black O-ring on the connector, ensure it is properly installed before plugging the solar panel directly into the camera's charging port; remove it if connecting to a USB adapter cable or an extension cable.
Installation
Part 1: Position the Solar Panel
The solar panel's position and tilt angle significantly affect efficiency.
Step 1. Choose an unobstructed location where the solar panel receives the most sunlight year-round.
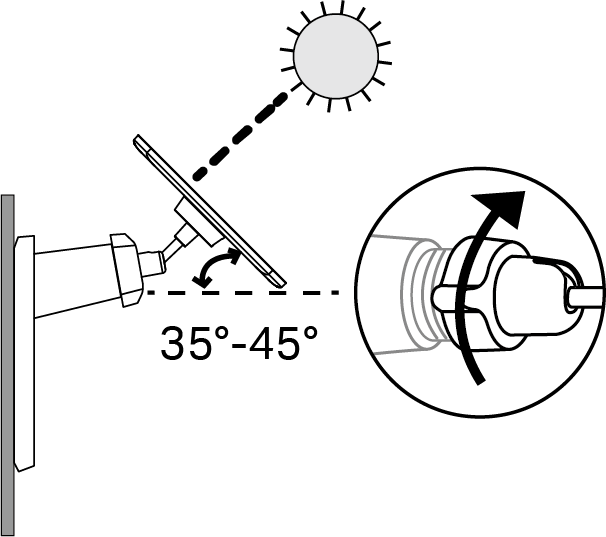
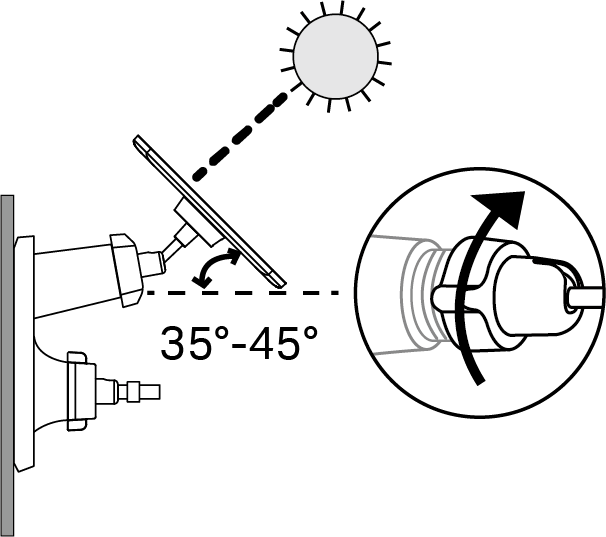
Step 2. Position the panel south-facing in the Northern Hemisphere or north-facing in the Southern Hemisphere. The recommended tilt angle between the panel and the horizontal ground is 35°-45°.
Step 3. Regularly wipe the panel to remove dust and debris.
Part 2: Mount the Solar Panel
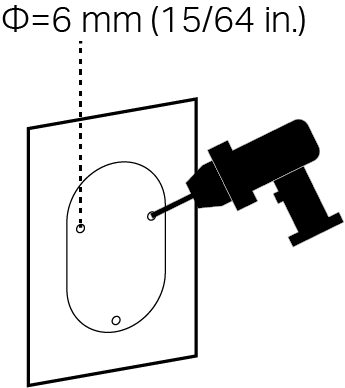
Step 1. Drill Holes
Apply the mounting template sticker to a solid and level wall surface. Drill three screw holes as shown on the template.
Step 2. Remove Base Cover
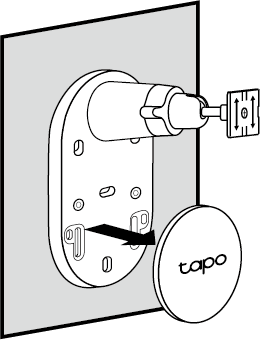
Remove the base cover from the bracket.
Note: Only applicable to version 2.2 and above. If not, skip this step and proceed directly to Step 3.
Step 3. Mount Bracket
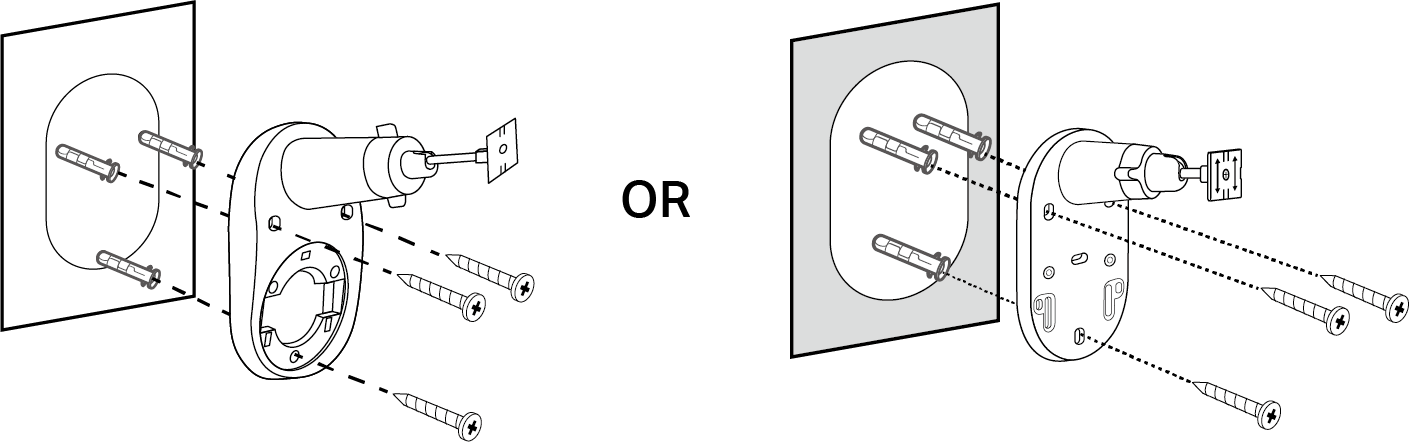
Insert three wall anchors into the holes, then use the mounting screws to secure the solar panel bracket to the anchors.
Step 4. Install Solar Panel
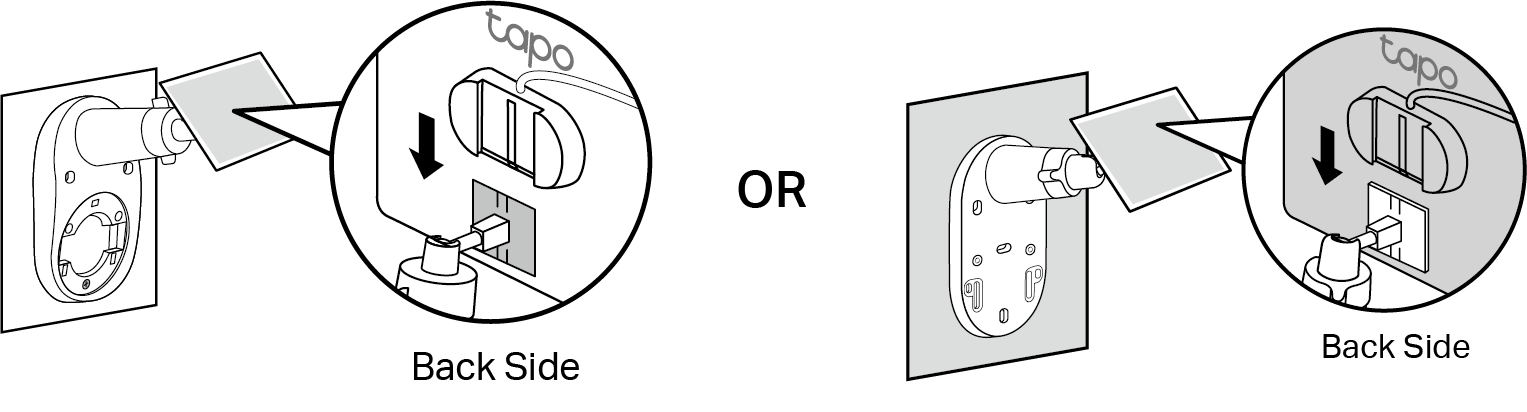
Slide the solar panel onto the mounting bracket until it clicks into place.
Step 5. Adjust Angle
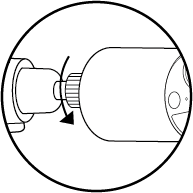
Loosen the adjustable screw, tilt the solar panel to adjust the angle, and then tighten the adjustable screw.
Note: The recommended tilt angle between the panel and the horizontal ground is 35°-45°.
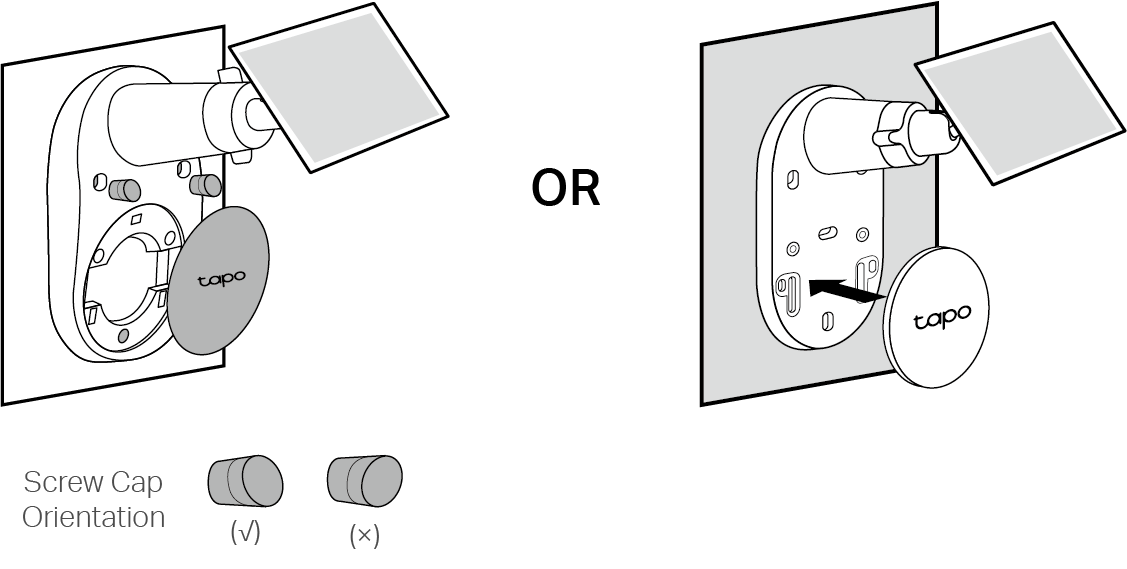
Step 6. Install Base Cover
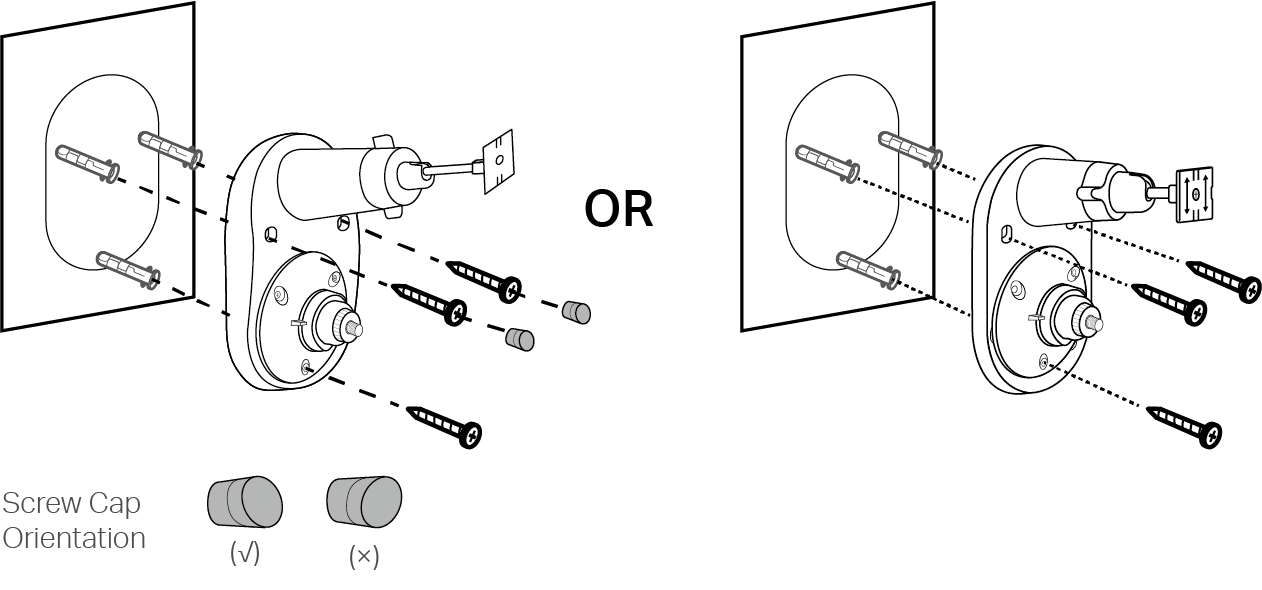
Install the base cover. If your solar panel comes with two screw caps, insert them into the upper screw holes until flush, as shown in the left image below.
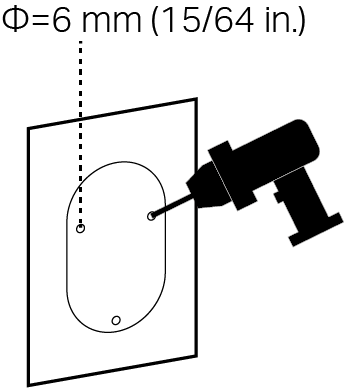
Step 1. Drill Holes
Apply the mounting template sticker to a solid and level wall surface. Drill three screw holes according to the template.
Step 2. Install Camera Bracket
Secure the camera bracket to the solar panel bracket using two screws. The third hole below secures the solar panel bracket.
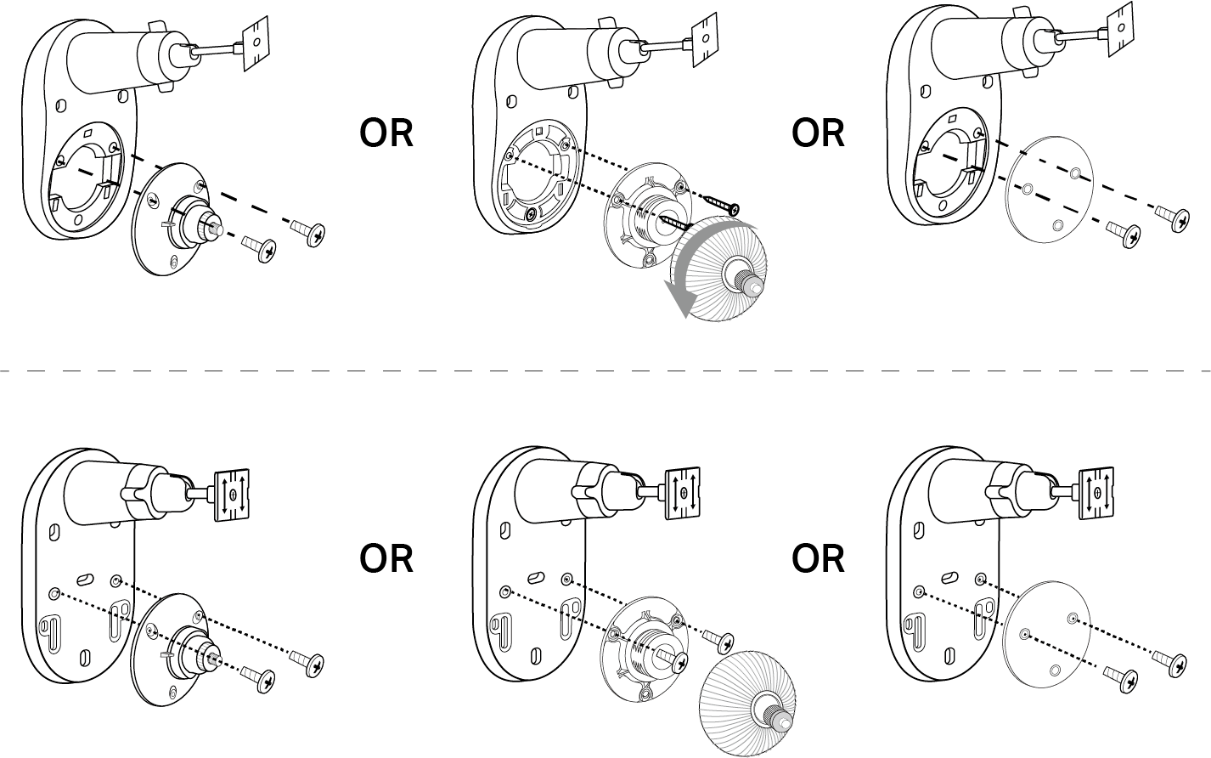
Step 3. Mount Solar Panel Bracket
Insert three wall anchors into the holes, then use the mounting screws to secure the solar panel bracket over the anchors.
If your solar panel comes with two screw caps, insert them into the upper screw holes until flush, as shown in the left image below.
Step 4. Install Solar Panel
Slide the solar panel onto the mounting bracket until it clicks into place.
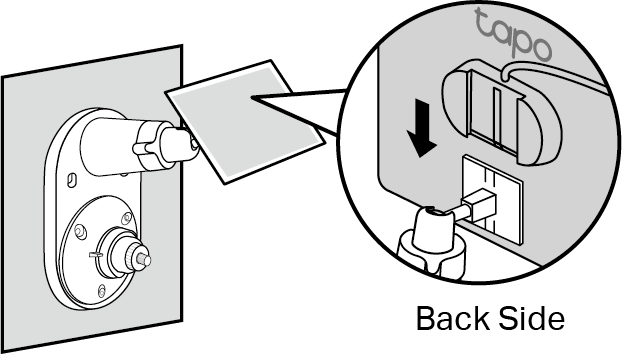
Step 5. Adjust Solar Panel Angle
Loosen the adjustable screw, tilt the solar panel to adjust the angle, and then tighten the adjustable screw.
Note: The recommended tilt angle between the panel and the horizontal ground is 35°-45°.
Step 6. Install Camera and Adjust Angle
Install the camera on the bracket and adjust the camera angle according to the camera's guide.
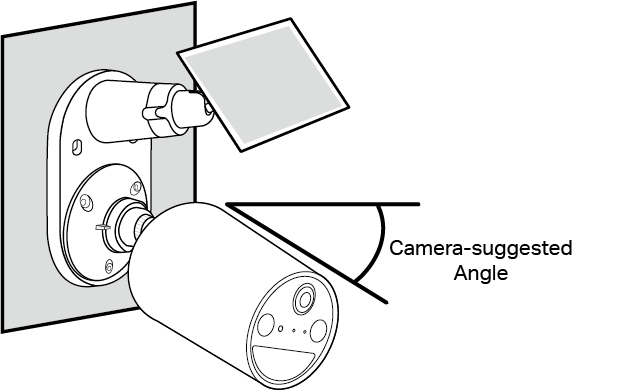
Note: Secure the camera to the bracket by tightening the bottom screw.
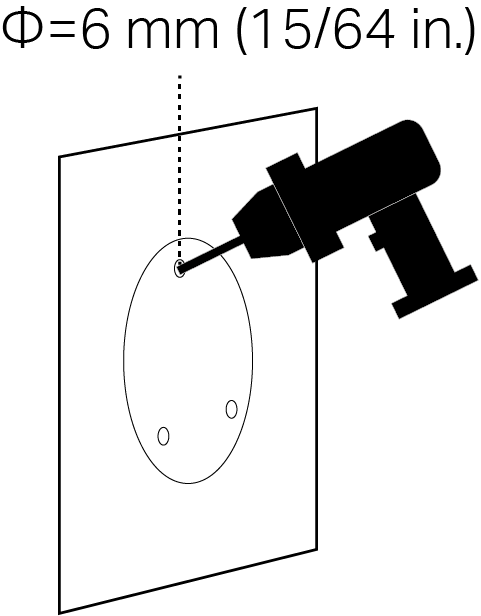
Step 1. Drill Holes
Apply the mounting template sticker to a solid and level wall surface. Drill three screw holes according to the template.
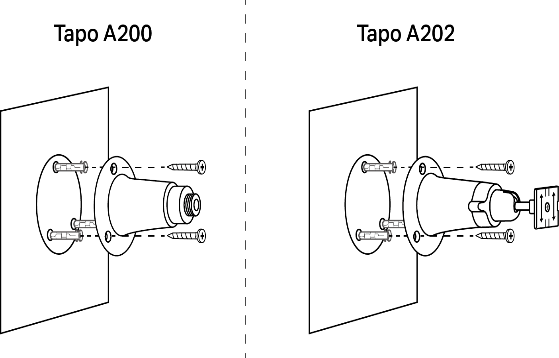
Step 2. Mount Bracket
Insert three mounting anchors into the holes, then use the mounting screws to secure the bracket to the anchors.
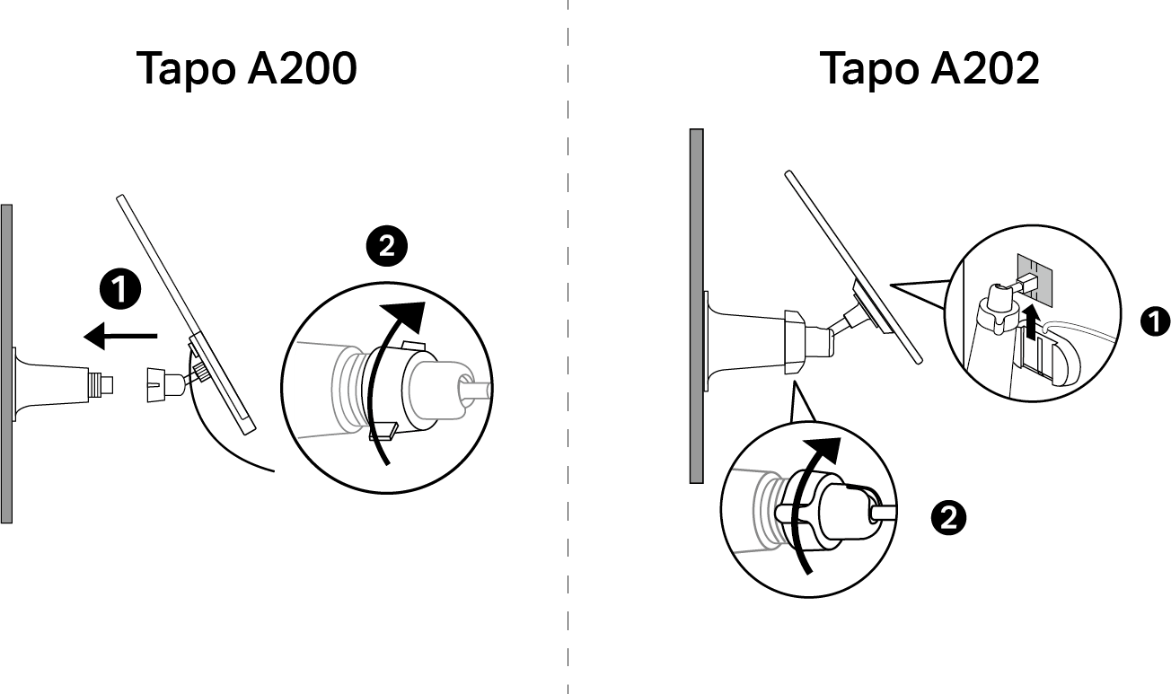
Step 3. Install Solar Panel
Install the solar panel onto the mounting bracket as shown below.
Step 4. Adjust Solar Panel Angle
Loosen the adjustable screw, tilt the solar panel to adjust the angle, and then tighten the adjustable screw.
Note: The recommended tilt angle between the panel and the horizontal ground is 35°-45°.
Part 3: Connect the Solar Panel to the Tapo Camera
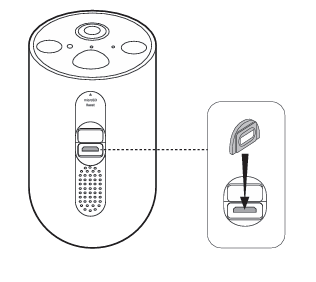
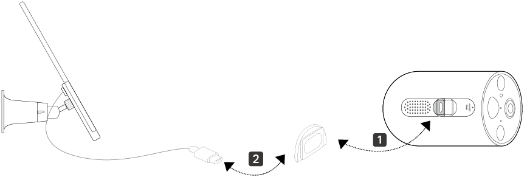
Step 1. Insert the waterproof gasket into the camera’s charging port. Ensure that the gasket is tightly sealed.
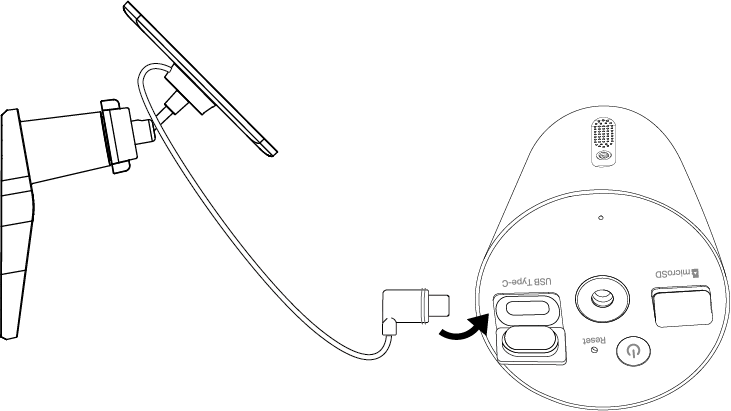
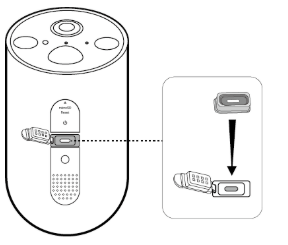
Step 2. Connect the solar panel by inserting the connector into the charging port until it fits snugly.
|
Model Number |
Connector |
Waterproof Gasket Installation |
Connect Solar Panel to Camera |
|
Tapo C400/TC80 V2 |
Type-C |
The Type-C connector and extension cable for Tapo A201 V2/A202 V1 solar panel include integrated waterproof gaskets.
You do not need to install a separate waterproof gasket before connecting them to the camera.
Note: Tapo A200 & A201 V1 are not compatible with these camera models. |
|
|
Tapo C410/C402/C403/TC82 V1/V1.2/V2 Tapo C411 V2 |
Type-C |
Note: Tapo A200 is not compatible with these camera models. |
|
|
Tapo C410/C411/C402/C403/TC82 V2.2 |
Type-C |
The Type-C connector and extension cable for Tapo A201 V2/A202 V1 solar panel include integrated waterproof gaskets.
You do not need to install a separate waterproof gasket before connecting them to the camera.
Note: Tapo A200 & A201 V1 are not compatible with these camera models. |
|
|
Tapo C400/C420 V1 |
Micro USB |
|
Tapo A200 + Camera with Micro USB Port + Micro USB Waterproof Gasket
Tapo A201 + Type-C to Micro USB adapter + Micro USB Waterproof Gasket
|
|
Tapo C425/TC85 V1.0/V1.2 |
Micro USB |
|
Tapo A200 + Camera with Micro USB Port + Micro USB Waterproof Gasket
Tapo A201 + Type-C to Micro USB adapter + Micro USB Waterproof Gasket
|
|
Tapo C425 V2 |
Type-C |
Note: Tapo A200 can’t work with Tapo C425 V2. |
|
|
Tapo C460 V1 |
Type-C |
Note: Tapo A200 can’t work with Tapo C460 V1. |
|
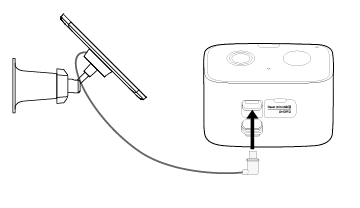
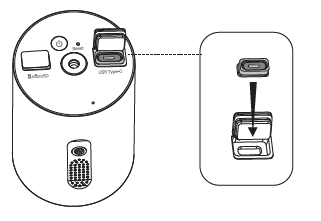
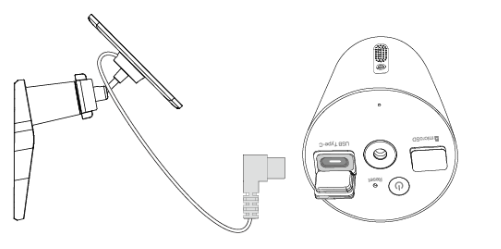
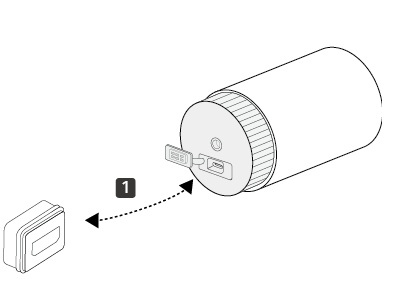
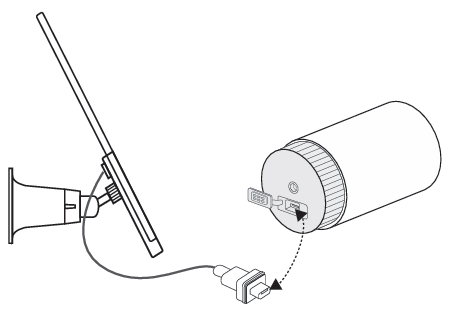
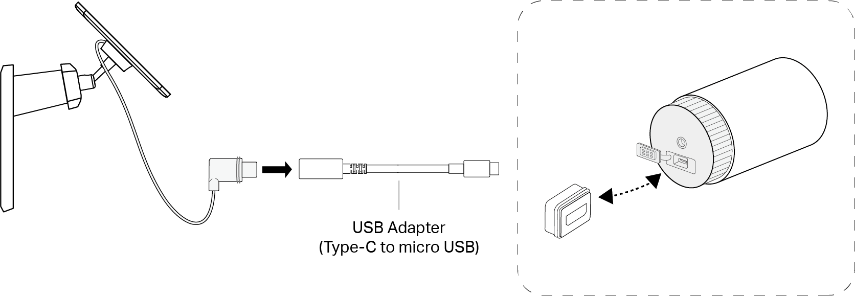
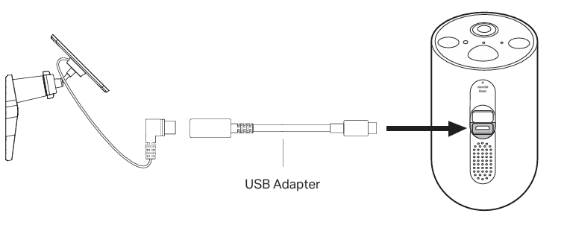
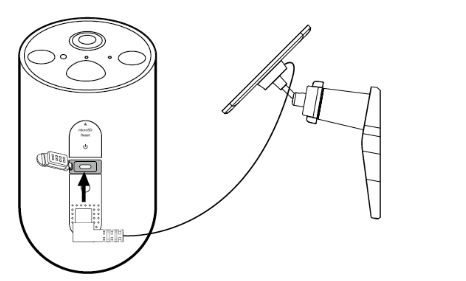
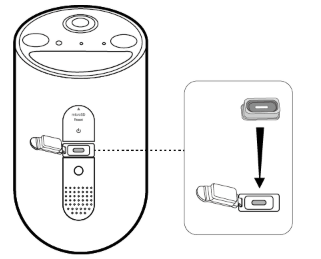
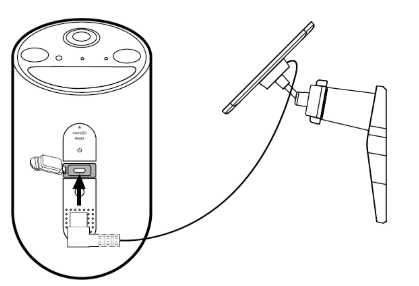
Step 3. If you connect a solar panel with a Type-C connector to Tapo C400 V1/C420 V1/C425 V1.0/V1.2, you need a Micro-USB adapter. Connect the solar panel connector to the USB adapter, and then connect it to the camera with the waterproof gasket.
For example, Connect Tapo A201 solar panel to Tapo C400 V1/C420V1/C425 V1.0/V1.2. (Tapo A201 + USB Adapter + Camera with Micro USB Port + Micro USB Waterproof Gasket)
- If you see a black O-ring on the connector, ensure it's properly installed before inserting the connector directly into the camera’s charging port.
- If you need to connect the solar panel connector to the USB adapter cable or extension wire, please remove the black O-ring first.
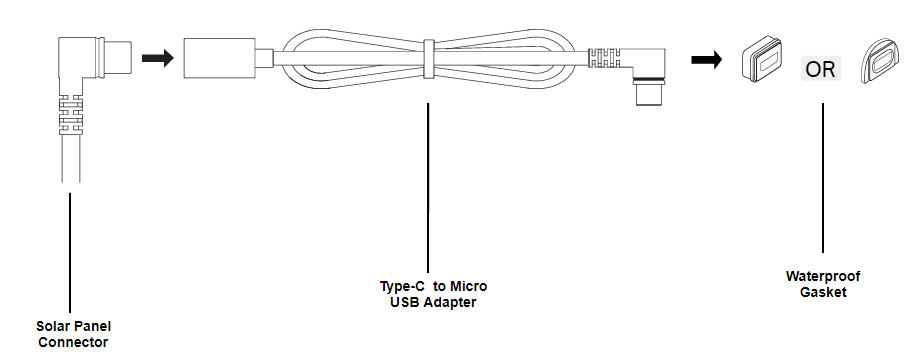
Note: In extreme weather or environments, such as intense sunlight or high-salt, alkaline areas, wrap extra tape around the extension cord's connection points. This will help keep them better waterproof and protected.
Common Questions
Q1: What should I do if Tapo Solar Panel fails to charge the Battery Cameras?
You may refer to this FAQ for troubleshooting suggestions: https://www.tapo.com/faq/632/
To learn more about each function and configuration, please visit the Download Center to download the manual for your product.
Looking For More
¿Es útil esta pregunta frecuente?
Sus comentarios nos ayudan a mejorar este sitio.



TP-Link Community
Still need help? Search for answers, ask questions, and get help from TP-Link experts and other users around the world.