How to Set Up Port Forwarding on the TP-Link Wi-Fi Router
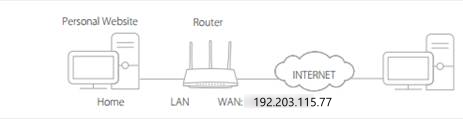
Port forwarding tells your router to direct incoming Internet traffic on a specific port to a device on your local network. It is commonly used for gaming, remote access, and hosting a server or website from home. Each device on your network gets its own local IP address, and each application on that device is assigned a port number. Port forwarding uses that combination to make sure the right data reaches the right place. This guide covers how to open ports on your TP-Link router across three different router interface versions.
Key Takeaways
- TP-Link port forwarding is configured through the router's web management page, under Forwarding > Virtual Servers or Advanced > NAT Forwarding > Virtual Servers or Port Forwarding, depending on your router.
- You need three pieces of information before you start: the local IP address of the device you are forwarding to, the port number your service requires, and the protocol (TCP, UDP, or ALL).
- The External Port and Internal Port are usually the same, unless you are forwarding the same port to multiple devices.
- To prevent your port forwarding rule from breaking, assign a static IP address to your device or use address reservation on your router.
- Port forwarding only works from the Internet if your router has a public WAN IP address. If your router shows a private WAN IP, contact your Internet service provider (ISP).
Before You Begin: Log In and Find Your Router's UI
To start, log in to your TP-Link router's web management page. Once you are logged in, find your router model in the three cases below to follow the correct steps for your interface.
Note: Before setting up port forwarding, make sure the device you are forwarding to has a stable IP address. You can assign a static IP or set up address reservation on your TP-Link router so the address does not change over time.
Case 1: Forwarding > Virtual Servers (TL-WR840N, TL-WR940N, Archer C20, Archer C50, and similar models)
Open the Virtual Servers Settings
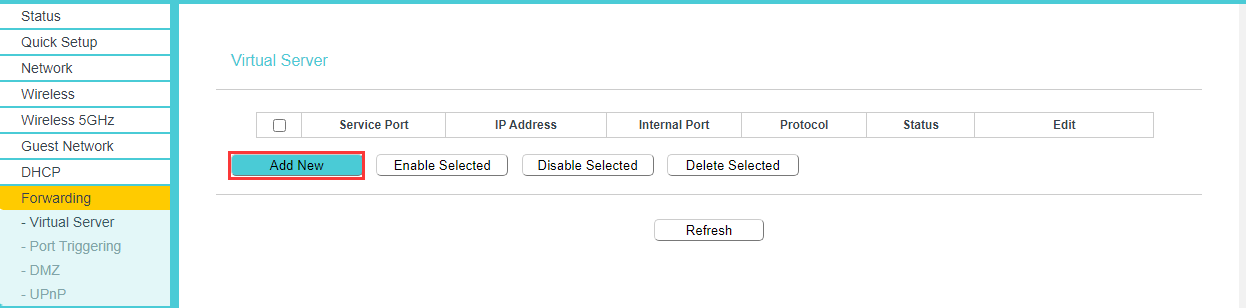
Go to Forwarding > Virtual Servers in the left-side menu, then click Add New.
Enter Your Port Forwarding Details
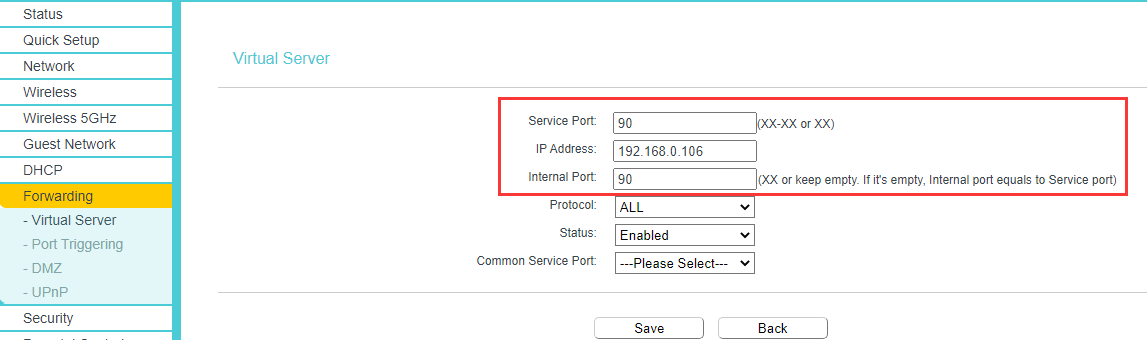
In the Service section, fill in the following fields:
Service Port: Select your service from the Common Service Port list. If your service is not listed, leave this field as default or enter it manually.
Service Port and Internal Port: If you select a service from the Common Service Port list, both fields fill in automatically. If your service is not listed, enter both the Service Port and Internal Port manually. Verify the port number with your service provider.
Note:
- If you need to enter a port range (for example, xx-xx), leave the Internal Port field empty.
- The Service Port and Internal Port are usually the same.
IP Address: Enter the local IP address of the device you are opening the port for.
Protocol: Choose the protocol from the drop-down list. If you are not sure, select ALL.
Status: Set the Status field to Enabled.
Save and Verify Your Settings
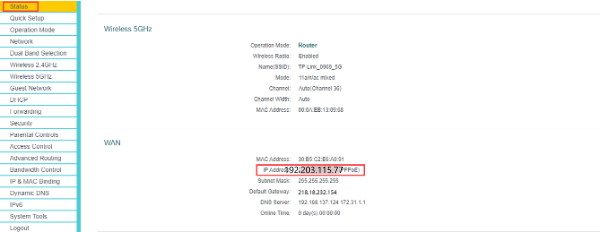
Click Save. Then go to the Status page and check the WAN IP Address. You can now access your device from the Internet using http://WAN IP:port number (for example, http://192.203.115.77:90).
Case 2: Advanced > NAT Forwarding > Virtual Servers (Archer A9, Archer C7, Archer AX10, Archer AX6000, and similar models)
Open the Virtual Servers Settings
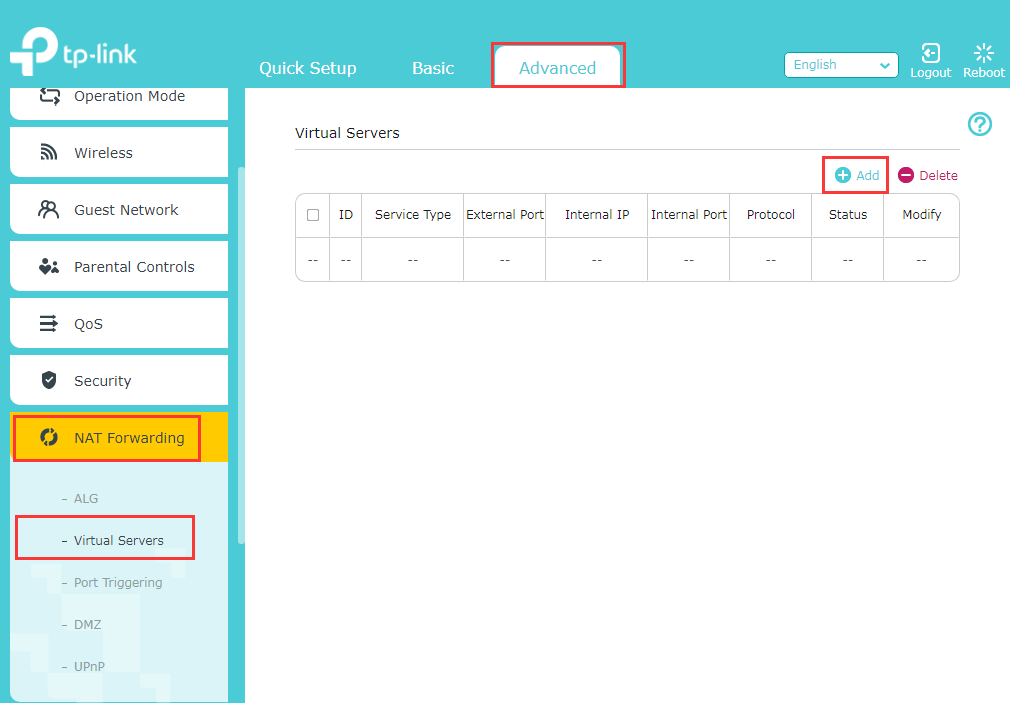
Go to Advanced > NAT Forwarding > Virtual Servers, then click Add.
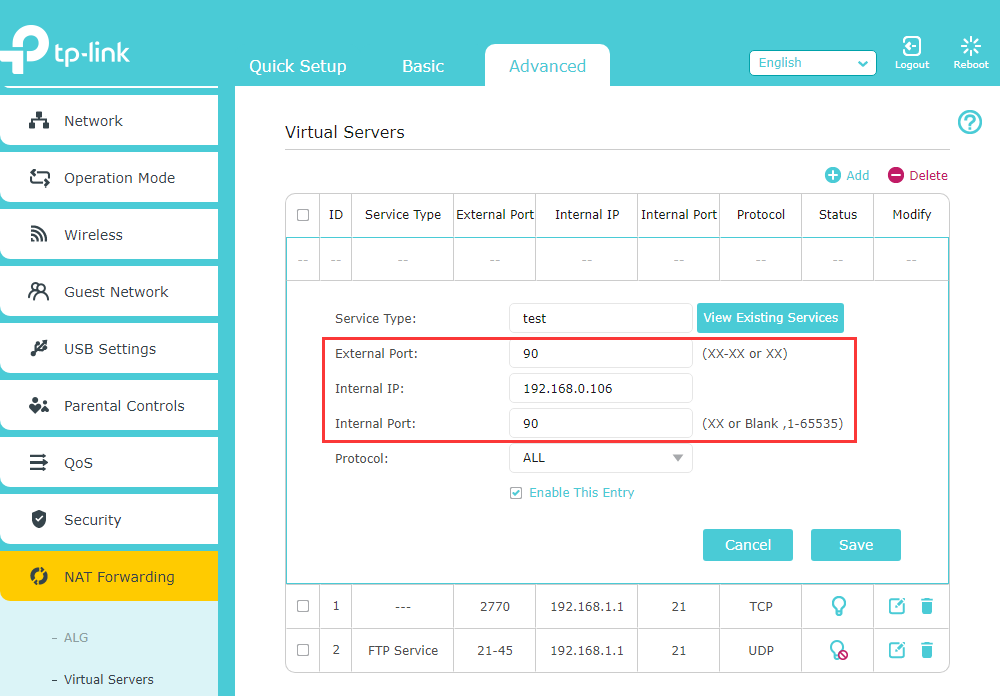
Enter Your Port Forwarding Details
Service Type: Select your service from the View Existing Services list. If your service is not listed, enter the Service Type manually.
External Port and Internal Port: Selecting a service from the View Existing Services list fills these in automatically. If your service is not listed, enter both ports manually and verify the port number with your service provider.
Note:
- If you need to enter a port range (for example, xx-xx), leave the Internal Port field empty.
- The External Port and Internal Port are usually the same.
Internal IP: Enter the IP address of the device you are opening the port for.
Protocol: Choose the protocol from the drop-down list. If you are not sure, select ALL.
Save and Verify Your Settings
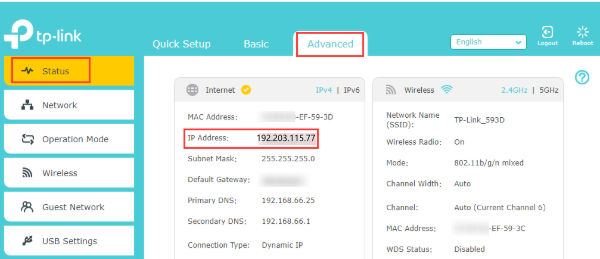
Click Save. Then go to Advanced > Status and check the WAN IP Address. Access your device from the Internet using http://WAN IP:port number (for example, http://192.203.115.77:90).
Case 3: Advanced > NAT Forwarding > Port Forwarding (Archer A8, Archer AX55, Archer AX90, Archer AX11000, and similar models)
Open the Port Forwarding Settings
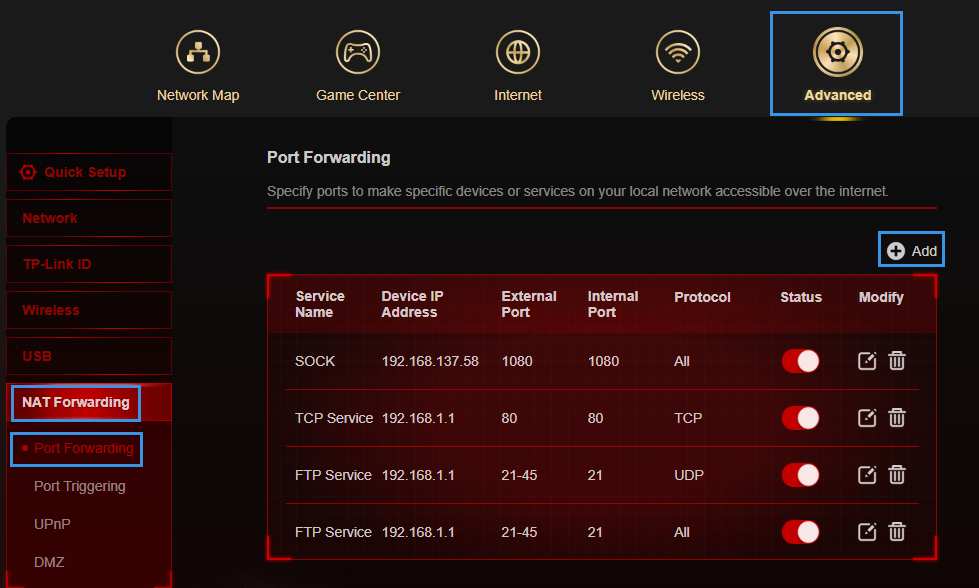
Go to Advanced > NAT Forwarding > Port Forwarding, then click Add.
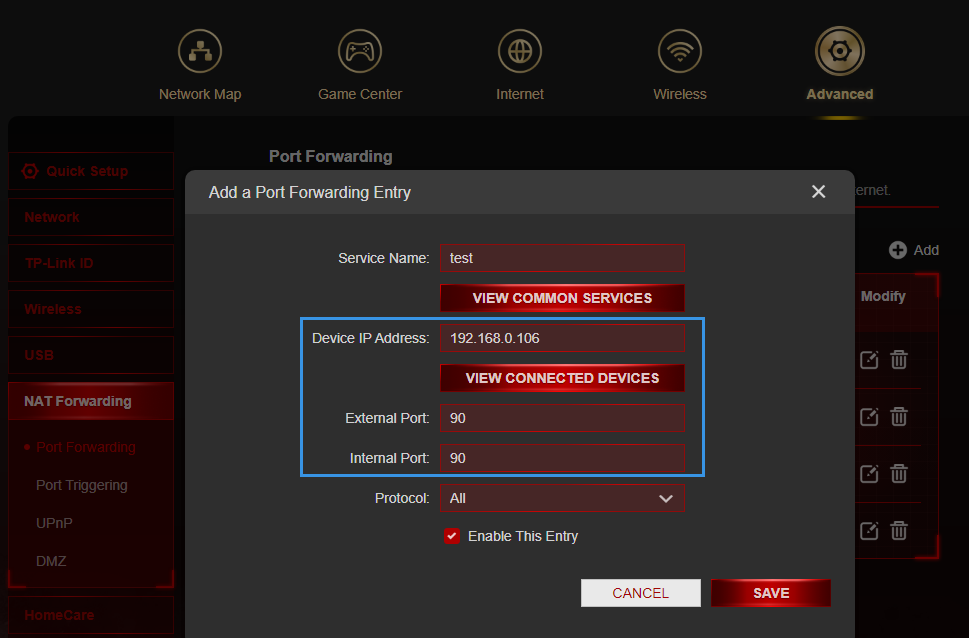
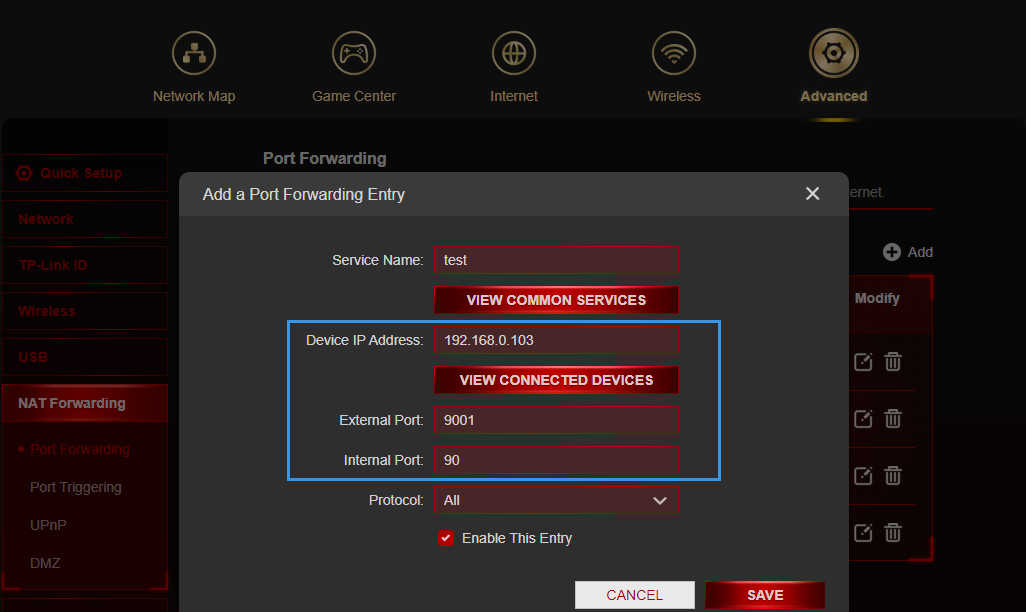
Enter Your Port Forwarding Details
Service Name: Select your service from the View Common Services list. If your service is not listed, enter the Service Name manually.
External Port and Internal Port: Selecting a service from the View Common Services list fills these in automatically. If your service is not listed, enter both ports manually and verify the port number with your service provider.
Note:
- If you need to enter a port range (for example, xx-xx), leave the Internal Port field empty.
- The External Port and Internal Port are usually the same.
Device IP Address: Select your device from the View Connected Devices menu, which fills in the IP address automatically. You can also enter the IP address manually.
Protocol: Choose the protocol from the drop-down list. If you are not sure, select ALL.
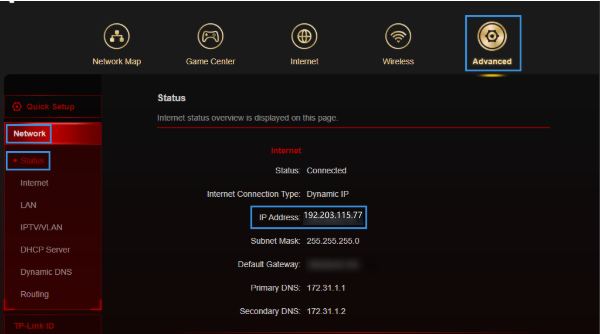
Save and Verify Your Settings
Click Save. Then go to Advanced > Network > Status and check the WAN IP Address. Access your device from the Internet using http://WAN IP:port number (for example, http://192.203.115.77:90).
Important Notes for All Models
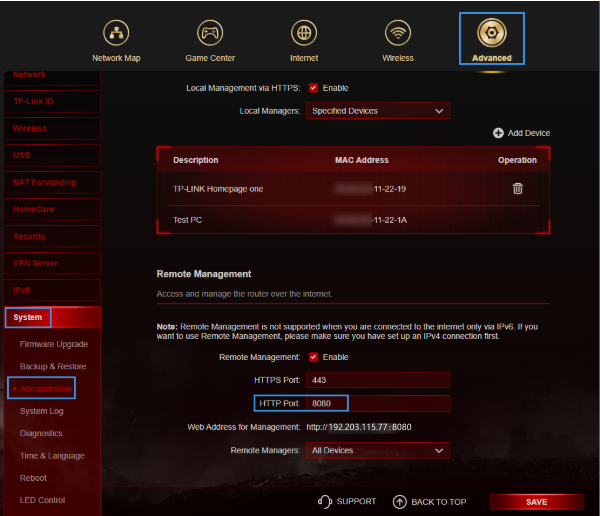
Port 80 conflict: If you want to open port 80 for a local device, you must first change the router's remote management port, because port 80 is the default. The internal port 80 is reserved for local management and cannot be changed even after you update the remote management port.
- For Case 1 models: Go to Security > Remote Management and change the Web Management Port to a different port, such as 8080, then click Save.
- For Case 2 and Case 3 models: Go to Advanced > System Tools > Administration and change the HTTP Port to a different port, such as 8080, then click Save.
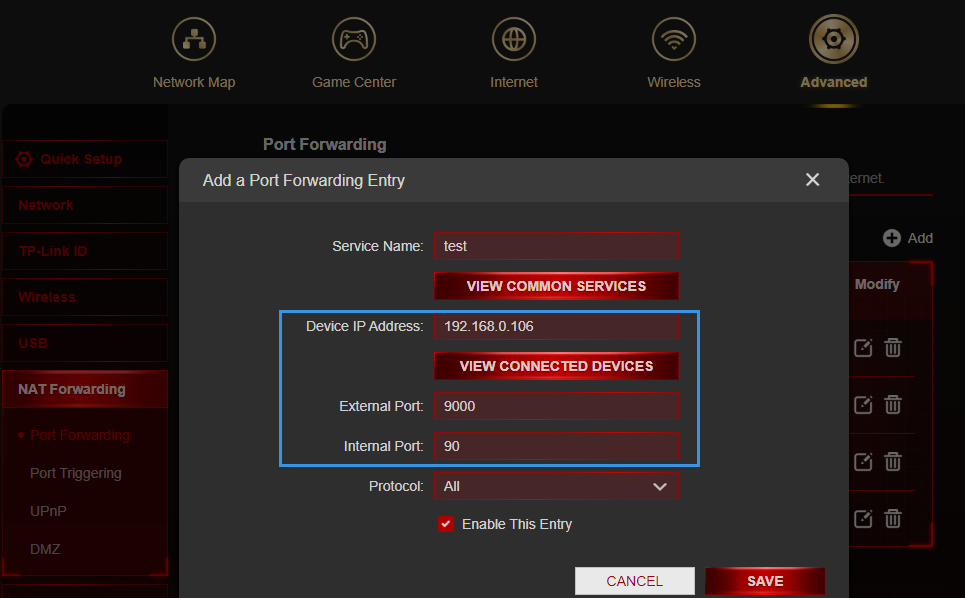
Forwarding the same port to multiple devices: Some models support different External Ports and Internal Ports. If you have two devices that need the same internal port open (for example, port 90 on both 192.168.0.106 and 192.168.0.103), create two separate rules using different External Ports (such as 9000 and 9001) and the same Internal Port (90). You can then reach each device from the Internet using its unique External Port: WAN IP:9000 for 192.168.0.106 and WAN IP:9001 for 192.168.0.103.
Private WAN IP address: If the WAN IP Address shown on your Status page is a private IP address, there is another network address translation (NAT) device between your router and the Internet. You will need to open the required ports on that device as well. Some ISPs (such as those using Carrier-Grade NAT, or CG-NAT) assign private IPs by default, which prevents port forwarding from working over the Internet. Contact your ISP and request a public static IP address if this applies to you. To learn how to tell whether your IP address is public or private, refer to the Wikipedia article on private networks.
If port forwarding is still not working after completing all the steps above, see why the port forwarding feature may not be working on your router for further troubleshooting.
If you are using a Deco mesh system, see how to set up port forwarding on the Deco.
¿Es útil esta pregunta frecuente?
Sus comentarios nos ayudan a mejorar este sitio.


