How to uninstall drivers from Windows Device Manager
Introduction
This article explains how to properly uninstall hardware drivers using the Windows Device Manager. This procedure is commonly used to troubleshoot hardware malfunctions, resolve driver conflicts, perform a clean installation of a new driver, or roll back to an older driver version if the latest one causes stability issues.
Requirements
- A computer running Windows 10 or Windows 11
- Administrator account privileges to make changes to system settings
- (Optional) The installation package for the new driver if you intend to reinstall it immediately
Troubleshooting
Step 1. Open Device Manager.
Right-click the Start button (or press Windows Logo Key + X) and select Device Manager from the menu. Alternatively, type "Device Manager" in the Windows Search bar and press Enter.
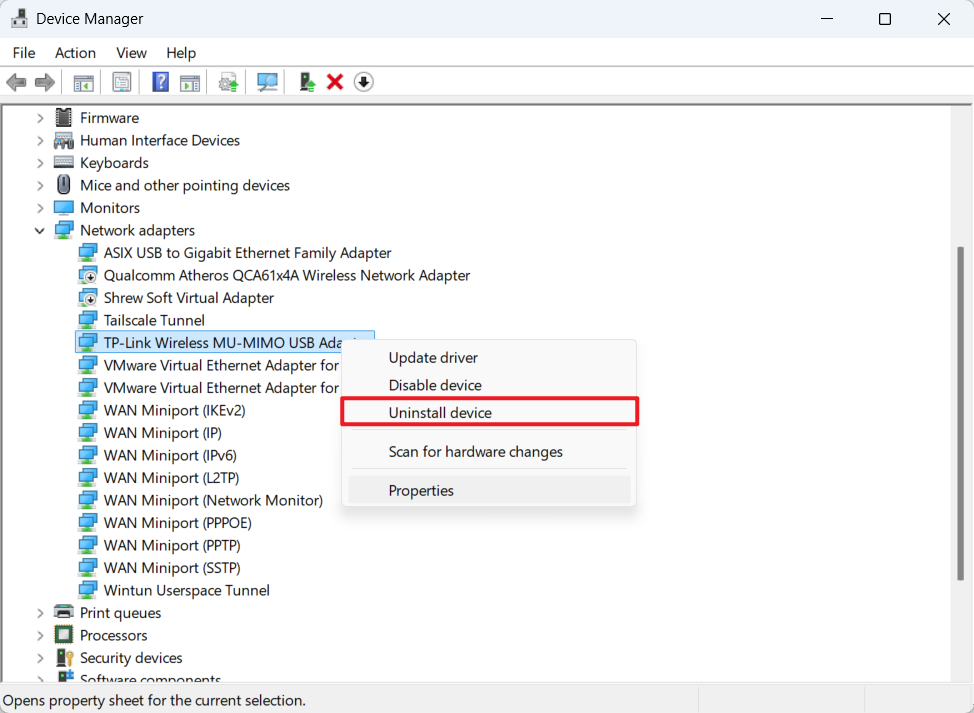
Step 2. Locate the target device.
In the Device Manager window, find the category for the hardware you want to uninstall, e.g., "Network adapters" or "Bluetooth". Click the arrow next to the category to expand the list and find your specific device name.
Step 3. Initiate the uninstallation.
Right-click on the specific device name and select Uninstall device from the context menu.
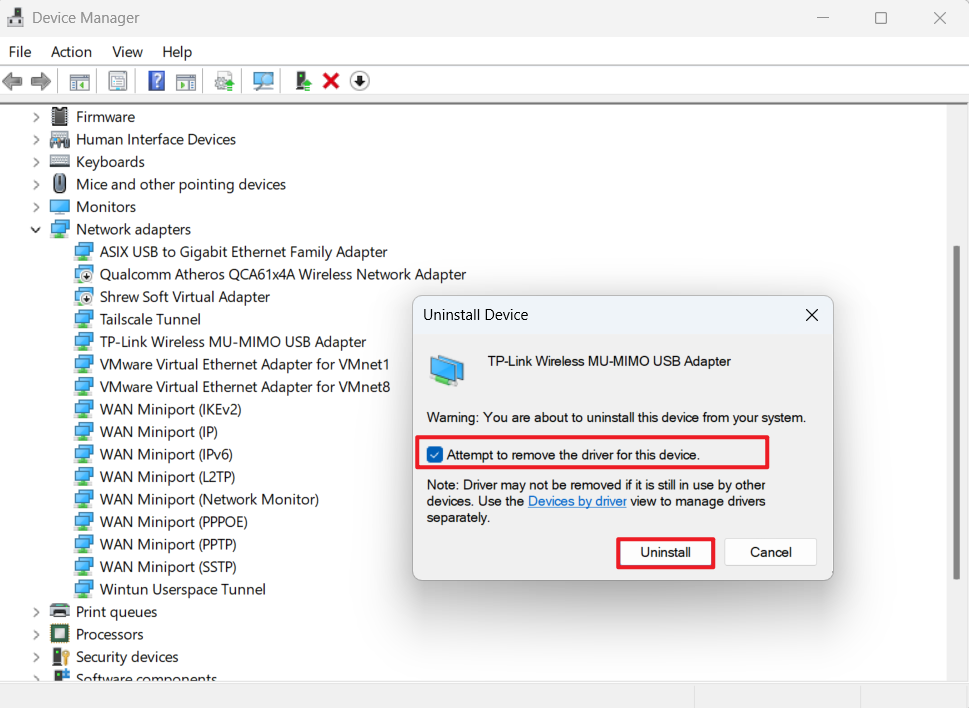
Step 4. Confirm and remove driver files.
A confirmation dialog will appear. Ensure that you check the box labeled "Attempt to remove the driver for this device" (or "Delete the driver software for this device"). This ensures the actual driver files are removed from the system store. Click Uninstall to proceed.
Step 5. Restart the computer.
Once the process is complete, restart your computer to finalize the changes.
QA
Q1: If I only want to uninstall the current driver to use an older version, will this operation remove the old driver as well?
A1: No, checking the box "Attempt to remove the driver for this device" will delete the current driver files from the system's driver store. However, Windows often retains older driver versions in its repository if they were previously installed. When you restart your computer after uninstalling the current driver, Windows may automatically attempt to install the next best available driver from its store, which could be the older version you want. If you want to ensure a specific older driver is used, it is best to completely uninstall the current one first, then manually run the installer for the particular older driver version you want to use.
Q2: How do I ensure the driver is completely removed before installing a new one?
A2: Sometimes, multiple versions of a driver are stored in the system. To perform a completely clean uninstall, you should repeat Steps 3 through 5 multiple times. Continue uninstalling the device until the checkbox "Attempt to remove the driver for this device" no longer appears in the confirmation window. This indicates that all third-party driver files have been removed, and Windows is now using the basic generic driver. At this point, you can proceed to install your new driver.
Is this faq useful?
Your feedback helps improve this site.


TP-Link Community
Still need help? Search for answers, ask questions, and get help from TP-Link experts and other users around the world.