How do I set up an ISP-Customized DSL modem router using the web-based interface?
DSL modem routers can connect to a phone/DSL cable or an Ethernet cable for Internet access. Before we begin, identify the cable type from the Internet source to determine the operation mode:
- For DSL cable (shown on the right, smaller in size, with 4 or 2 pins), use DSL Modem Router Mode
- For Ethernet cable (shown on the left, larger in size, with 8 pins), switch to Wireless Router mode

Guide for Setting up DSL Modem Router Mode
Here, VX220-G2v(FTTB)2.0 is used as a demonstration.
1. Connect your DSL line to TP-Link modem router’s DSL port.
2. Wait about 5 min till the DSL light  solid on the modem router. Please try to reset the modem or contact your ISP to check the line issue if the DSL light is not solid on.
3. Access the web management page: Connect your computer or phone to the modem using WiFi or Ethernet cable and visit http://tplinkmodem.net. To get some help, please refer to How to log into the web-based interface of the AC VDSL/ADSL Modem Router (new logo)?
4. Enter the password to manage your modem (the default password is "admin”). To get some help, please refer to What's the login/device password for TP-Link Customized Modem/Router?

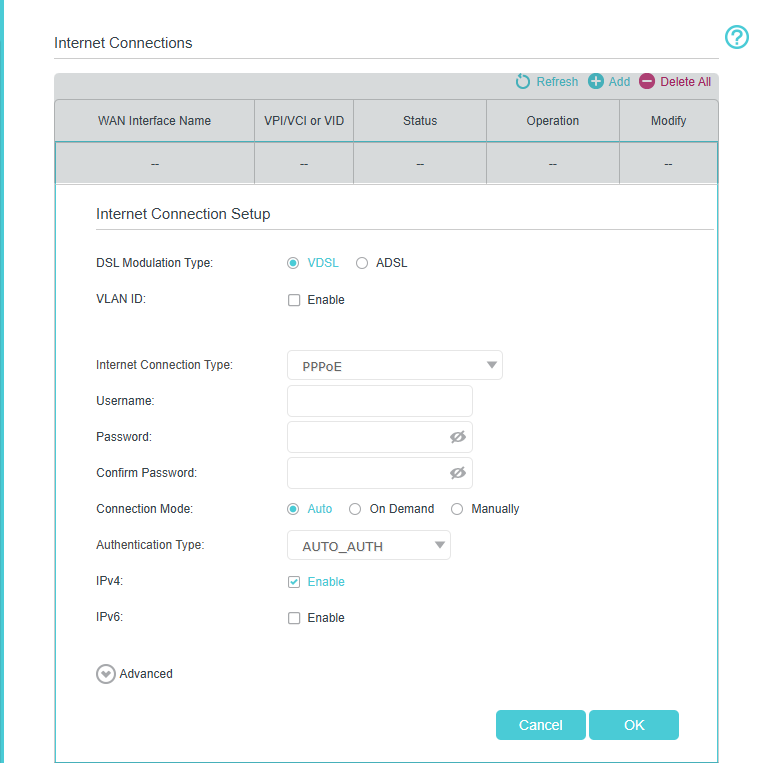
5. Go to Advanced->Network->DSL and click Delete All->Add.

Here, we are only considering internet connectivity. If you need other services, please contact your ISP to confirm the details of the following items.
6. Enter the Internet connection information needed, including DSL Modulation type and Internet Connection Type, and click OK. The Common connection types of regular ISPs we collected are for reference only. If you don’t have the information, contact your Internet service provider.
7. Wait about 1-3 minutes. Check the Internet light on the VX220v-G2v. Then check the internet connection.
Guide for Setting up the Wireless Router Mode
1. Power on your DSL modem router, and wire the Ethernet cable to the LAN4/WAN port of the modem router, from the existing modem, or NBN box, or the Ethernet jack on the wall.
- For connecting TP-Link modem to the existing modem

- For connecting TP-Link modem to the Ethernet port on the wall

2. Access the web management page
Connect your computer or phone to the modem using WiFi or Ethernet cable and visit http://tplinkmodem.net. To get some help, please refer to How to log into the web-based interface of the AC VDSL/ADSL Modem Router (new logo)?
Here, it takes VX420-G2h as a demonstration. The default password is “admin”. To get some help, please refer to What's the login/device password for TP-Link Customized Modem/Router?

3. Go to Advanced > Network > EWAN click on “Delete all” and then click on “add”.

4. Fill in Internet parameters, including connection type and VLAN ID if needed. Contact your Internet service provider if you don’t have the setup information.
The Common connection types of regular ISPs we collected are for reference only.
For connection type: You may choose Dynamic IP when the TP-Link modem is wired to a main router like Pic 1, or you are advised to confirm with ISP if your TP-Link Modem is wired to ISP directly like Pic 2.
Pic 1

Pic 2

If your connection type is Dynamic IP:

If your connection type is PPPoE, enter PPPoE Username and Password provided by Internet service provider: 
If you have a VLAN ID, enable the VLAN tag and enter the ID number:

5. Wait about 3-5 minutes till the Internet LED solid on the VX420-G2h, then check the internet connection.
To get to know more details of each function and configuration please go to Download Center to download the manual of your product.
Is this faq useful?
Your feedback helps improve this site.

TP-Link Community
Still need help? Search for answers, ask questions, and get help from TP-Link experts and other users around the world.