How to set up Deco X20-DSL,Deco X50-DSL and Deco X73-DSL
Deco X20-DSL, Deco X50-DSL or Deco X73-DSL is a combine machine of Modem and Wi-Fi router. They need to work on DSL Modem router mode if the internet service delivered to the TP-Link modem is through DSL line like Pic 1, or they need to work on wireless router mode if internet service delivered to the TP-Link DSL mode is through Ethernet cable like Pic 2.
|
Pic 1
|
Pic 2
|


Here we take Deco X73-DSL for example.
Note: Features available in Deco may vary by model and software version. All steps and images described here are only examples and may not reflect your actual Deco experience.
1. Go to Google Play or the App Store to download the Deco app. Install the Deco app on your Android or iOS smartphone or tablet.

2. Open Deco app. Log in or sign up to set up a TP-Link ID.
Note: If you already have a TP-Link Cloud account, you can log in with your account.

3. Tap Let’s begin.

4. Select your Deco model.

5. Select Use as a DSL Modem Router.

6. Unpack the contents of the box. Once you verify you have everything, go to the next step.

7. Connect your provider’s phone cable to the Deco’s DSL port and wait for the port LED to turn solid white.


8. Power on your Deco and wait until the LED pulses blue.

9. Connect the analog phone to the fxs port of your Deco.
Note: Fxs port is only supported on some Deco models.

10. Connect your phone to the Deco’s default SSID (Deco_XXXX) printed on the bottom label.
Note: Some phones may connect to the default SSID automatically. The Deco app will notify it found the Deco.

11. Assign your connected Deco to a room. The location will be also used as this Deco’s name.

12. Choose your current region and ISP (Internet Service Provider). If you cannot find your ISP in the list, select “Other”.

13. Select your DSL connection type.

14. Select the connection type such as PPPoE, Dynamic IP, and Static IP, and fill in VLAN ID if ISP required, which generally provided by ISP. The Common connection types of regular ISPs we collected is for reference only.

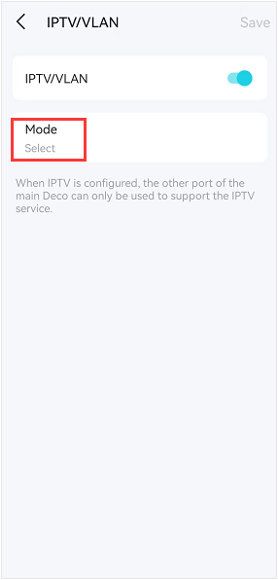
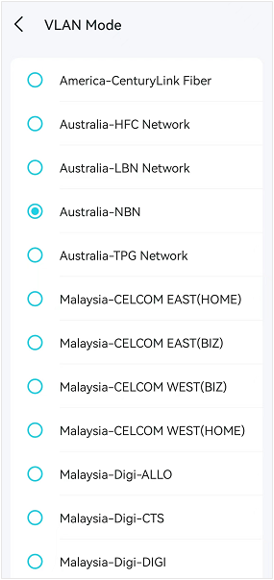
- Click on IPTV/VLAN Settings, enable IPTV/VLAN, and click on Mode, if your ISP is in the list, tap your ISP name and the VLAN ID will enter on the VLAN page automatically. Here we take "Australia-NBN" for example.
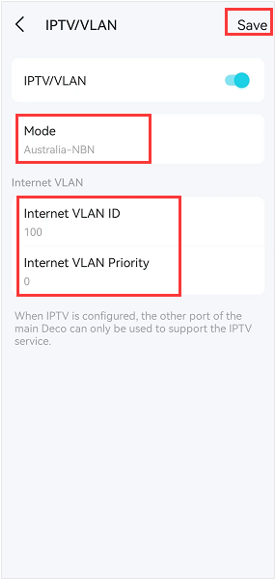
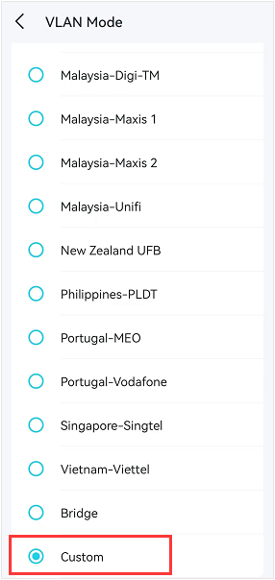
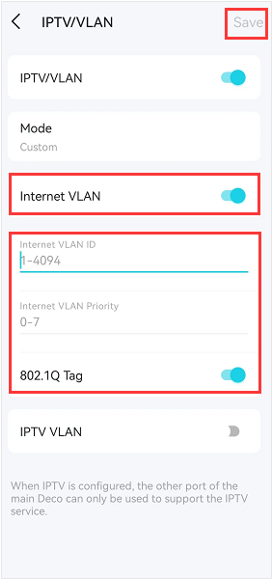
- If your ISP is not in the list, please select Custom, then enter the Internet VLAN ID and Internet VLAN Priority according to the information provided by your ISP, and click on Save to finish the setup process.
If your ISP does not provide Internet VLAN Priority, you can enter 0.
15. Create your Wi-Fi network name and password.

16. Connect your phone/tablet to the Deco’s Wi-Fi.

17. Set VoIP. Add your telephone accounts to the Deco and start making phone calls over the internet.
Note: VoIP feature is only supported for some Deco models.

18. Setup complete. Now you can connect all your devices to the Deco network. If you have other Deco units in the same package, just plug in these Decos and they will be added to the network within 2 minutes.

When working in Wireless Router mode, Deco connects to the internet via an Ethernet cable. If you already have a modem or your internet comes via an Ethernet cable from the wall, you can set the Deco as a regular wireless router to share the internet.
1. Go to Google Play or the App Store to download the Deco app. Install the Deco app on your Android or iOS smartphone or tablet.

2. Open Deco app. Log in or sign up to set up a TP-Link ID.
Note: If you already have a TP-Link Cloud account, you can log in with your account.

3. Tap Let’s begin.

4. Select your Deco model.

5. Select Use as a Wi-Fi Router.

Connect Ethernet cable to your Deco’s one of the 4 WAN/LAN ports from the modem/modem router like Pic 1 or the Ethernet port on the wall like Pic 2.
Pic 1

Pic 2

6. Unpack the contents of the box. Once you verify you have everything, go to the next step.

7. Connect your provider’s phone cable to the Deco’s DSL port and wait for the port LED to turn solid white.

8. Connect one of your Deco units to your modem via Ethernet cable and power on both devices.

9. Wait for the ‘Internet’ light to be stable on your modem.

10. Wait until Deco’s LED light pulses blue.
Note: If the LED is not pulsing blue, press the RESET on Deco for one second, the LED will turn to yellow. Just wait for about 2 minutes until the LED turn to pulsing blue and go on.

11. Connect the analog phone to the fxs port of your Deco.
Note: Fxs port is only supported on some Deco models.

12. Connect your phone to the Deco’s default SSID printed on the bottom label (such as Deco_XXXX).
Note: Some phones may connect to the default SSID automatically. The Deco app will notify it found the Deco.

13. Assign your connected Deco to a room. The location will be also used as this Deco’s name.

14. Select the connection type such as PPPoE, Dynamic IP, and Static IP, and fill in VLAN ID if ISP required, which generally provided by ISP. The Common connection types of regular ISPs we collected is for reference only.
For connection type: you may choose Dynamic IP when the Deco wired to a main router/Modem Router like Pic 1, or you are suggested to confirm with ISP if your TP-Link Modem is wired to ISP/ a bridge Modem directly like Pic 2
Pic 1

Pic 2


- Click on IPTV/VLAN Settings, enable IPTV/VLAN, and click on Mode, if your ISP is in the list, tap your ISP name and the VLAN ID will enter on the VLAN page automatically. Here we take "Australia-NBN" for example.
- If your ISP is not in the list, please select Custom, then enter the Internet VLAN ID and Internet VLAN Priority according to the information provided by your ISP, and click on Save to finish the setup process.
If your ISP does not provide Internet VLAN Priority, you can enter 0.
15. Create your Wi-Fi network name and password.

16. Connect your phone/tablet to the Deco’s Wi-Fi.

17. Set VoIP. Add your telephone accounts to the Deco and start making phone calls over the internet.
Note: VoIP feature is only supported for some Deco models.

18. Setup complete. Now you can connect all your devices to the Deco network. If you have other Deco units in the same package, just plug in these Decos and they will be added to the network within 2 minutes.

Looking For More
Is this faq useful?
Your feedback helps improve this site.


TP-Link Community
Still need help? Search for answers, ask questions, and get help from TP-Link experts and other users around the world.