How to Add Another Deco to Your Existing Network
A TP-Link Deco mesh Wi-Fi system works by connecting multiple Deco units together to blanket your home in seamless wireless coverage. Once your Deco network is up and running, you can add more Deco units at any time to extend that coverage, eliminate weak signal areas, and keep all your devices connected. The process is quick and easy to complete right in the Deco app.
Key Takeaways
- You can expand an existing Deco network by adding more Deco units at any time.
- Adding more Deco units to your network is a simple process managed through the Deco app.
- Each additional Deco unit helps optimize your network and extend Wi-Fi coverage throughout your home.
- Features available in Deco may vary by model and software version.
Note: For Deco X and XE series models, satellite Deco units from the same package will join the Deco network automatically within two minutes of being powered on, once the main Deco is already set up. No additional steps are required.
Steps to Add Another Deco to Your System
Follow these steps to add a new Deco unit to your existing Deco network using the Deco app.
Step 1: Power on the Deco unit and move it closer to the main Deco.
Make sure the unit is in the same room with the main Deco. Power on the unit and wait until the LED light is flashing blue.
Step 2: Open the Deco app and go to the Network tab.
Launch the Deco app on your mobile device. On the homepage, tap the Network tab. If you need a refresher on navigating the app, see getting to know your Deco app.
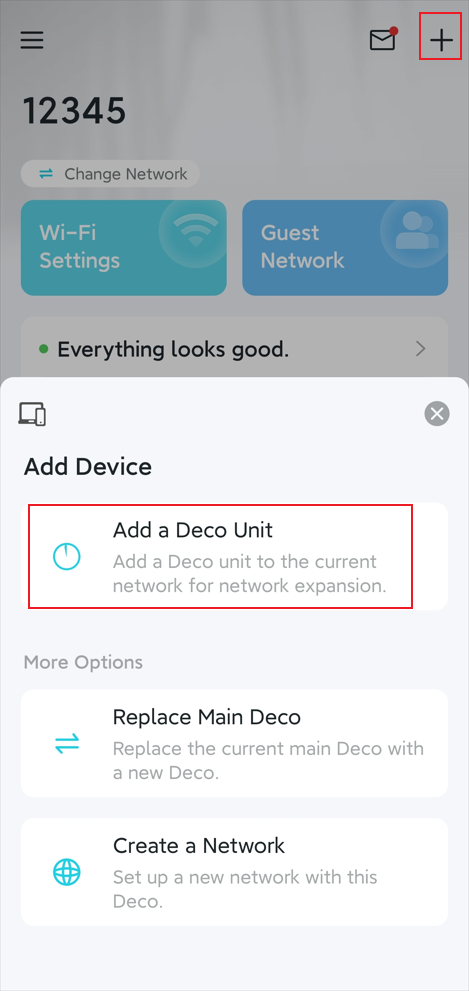
Step 3: Tap the + icon and select Add a Deco Unit.
In the upper corner of the Network tab, tap the + icon. From the menu that appears, select Add a Deco Unit.
Step 4: Follow the in-app instructions to complete the setup.
The Deco app will guide you through the remaining steps, which include powering on the new Deco unit, placing it, and confirming it has joined your network.
Optimizing Your Deco Network
Once you have added another Deco to your network, a few simple steps can help ensure everything runs smoothly.
Place units for the best coverage. Position each additional Deco unit within a reasonable range of the main Deco to maintain a strong connection between units. Placing them too far apart can reduce performance. You can always expand your Deco network further by adding more units as your coverage needs grow.
Keep firmware up to date. Keeping your Deco firmware current helps ensure your devices have the latest performance improvements. You can check for and apply updates through the Deco app. See how to upgrade the firmware of TP-Link Deco for detailed steps.
Confirm signal quality. After adding a new unit, check the Deco app to confirm the new unit is online and showing a good connection to your network.
Troubleshooting Common Issues
LED is not turning blue. Before adding a new Deco unit, confirm its status light is pulsing blue. If it is not, press and hold the reset pinhole for one second. Wait for the light to change from solid yellow to pulsing blue before proceeding.
Weak signal or connection drops. If the new unit is struggling to connect, try moving it closer to the main Deco. Distance and obstacles can interfere with the connection between units.
Failing to connect. If the app is not detecting the new Deco, make sure your phone is connected to your existing Deco network before starting the process. If you continue to experience issues, see troubleshooting errors when adding a Deco for more guidance.
Is this faq useful?
Your feedback helps improve this site.


TP-Link Community
Still need help? Search for answers, ask questions, and get help from TP-Link experts and other users around the world.