Table of Contents
Range Extender_Configuration and User Guide_Web
About This Guide
This guide is a complement to the Installation Guide. The Installation Guide instructs you on a quick installation, and this guide provides you detailed instructions for function configuration step by step.
When using this guide, please notice that features available of your range extender may vary by model and software version. It may also vary by region or ISP. All images, steps, and descriptions in this guide are only examples and may not reflect your actual experience.
Conventions
In this guide the following conventions are used:
|
Convention |
Description |
|---|---|
|
Underline |
Underlined words or phrases are hyperlinks. You can click to redirect to a website or a specific section. |
|
Bold |
Contents to be emphasized and texts on the web page are in bold, including the menus, items, buttons and so on. |
|
> |
The menu structures to show the path to load the corresponding page. For example, Settings > System Tools > Firmware Upgrade means the Firmware Upgrade page is under the System Tools menu that is located in the Settings tab. |
|
Note: |
Ignoring this type of note might result in a malfunction or damage to the device. |
|
Tip: |
Indicates important information that helps you make better use of your device. |
More Information
The latest software, management app and utility are available from Download Center at https://www.tp-link.com/support/.
The Quick Installation Guide can be found where you find this guide or inside the package of the extender.
Operating temperature, storage temperature, and other specifications can be found on the product page at https://www.tp-link.com.
Our Technical Support contact information can be found at the Contact Technical Support page at https://www.tp-link.com/support.
1. Set Up Your Extender
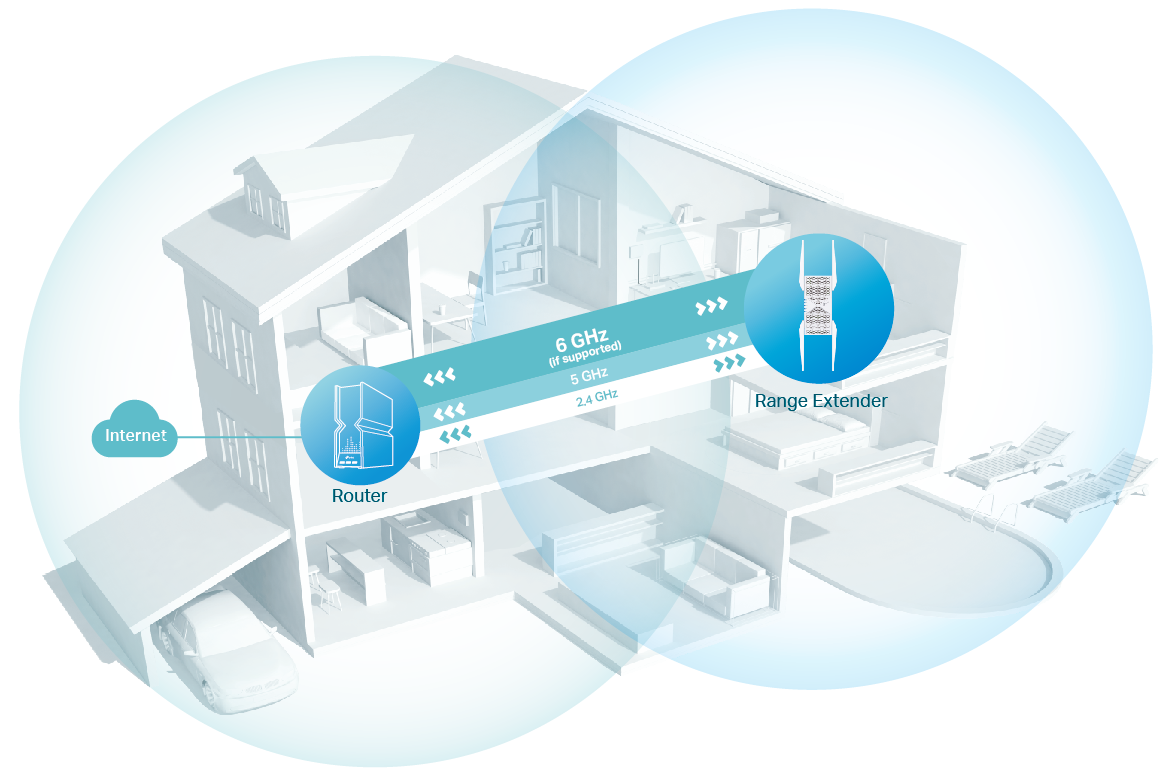
Wi-Fi extenders serve as intermediaries between your router and devices, effectively rebroadcasting your Wi-Fi signal to expand coverage. They work by receiving the existing signal, amplifying it, and extending it further.
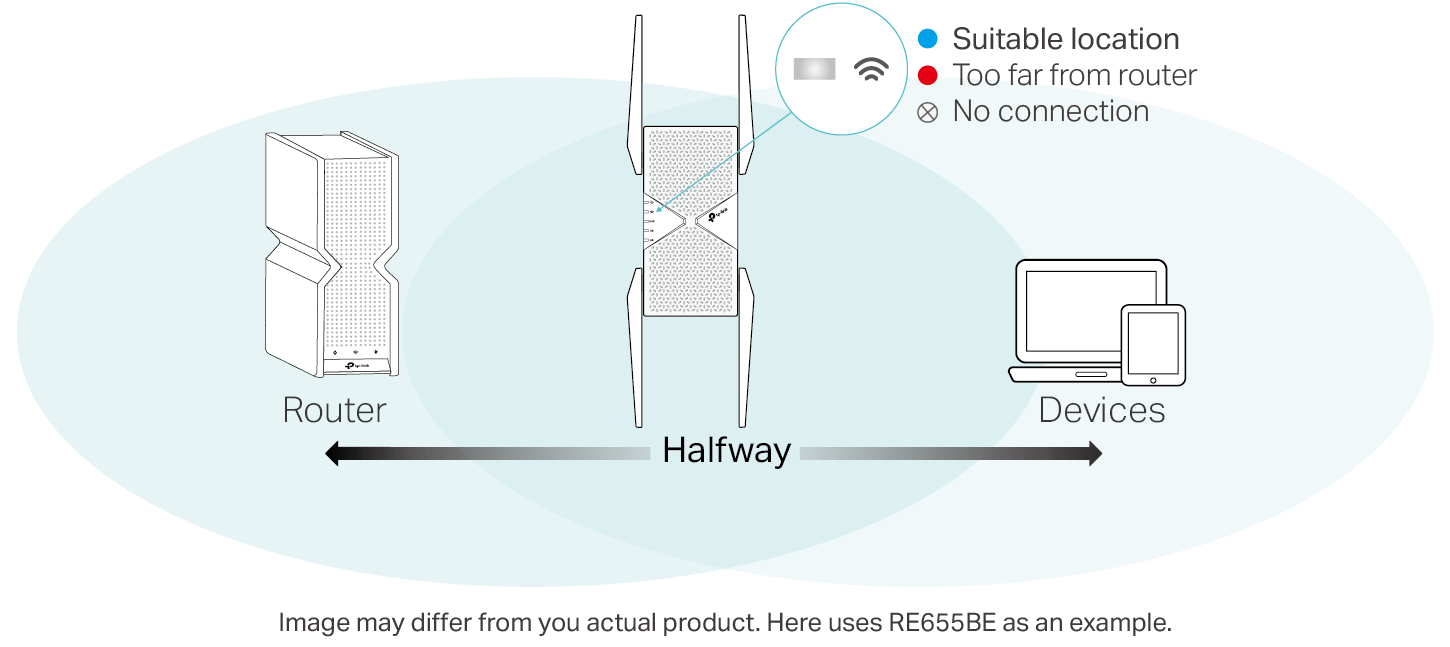
For optimal performance, place the Wi-Fi extender in a proper location—ideally midway between your router and the areas with weak signals. This setup can significantly enhance internet connectivity in larger homes, multi-floor spaces, or environments where walls and obstacles may disrupt the signal.
Upon powering on your extender, there are three ways to set it up:
Method 1: Via the TP-Link Tether App
1. Launch the Apple App Store or Google Play Store and search TP-Link Tether or simply scan the QR code to download and install the app.

2. Launch the Tether app and log in with your TP-Link ID.
Note: If you don’t have a TP-Link ID, create one first.
3. Tap the + icon on the upper-right corner and select Add a Range Extender.
4. Follow app instructions to set up your extender.
If the extender connects to a EasyMesh router, it will copy the router’s wireless settings for seamless roaming. For more information about EasyMesh, refer to EasyMesh with Seamless Roaming.
5. Follow app instructions to relocate your extender.
Tip: For more intuitive location assistance, access extender settings via Tether and go to Tools > Location Assistant. You can also manage your extender via Tether, such as controlling LEDs, sharing passwords of your networks and blocking devices.
6. Enjoy! Connect your devices to the extender wirelessly or via an Ethernet cable (for mdoels with Ethernet ports), then enjoy the internet.
Method 2: Via a Web Browser
1. Connect your computer to the extender wirelessly as follows:
For Windows Users:
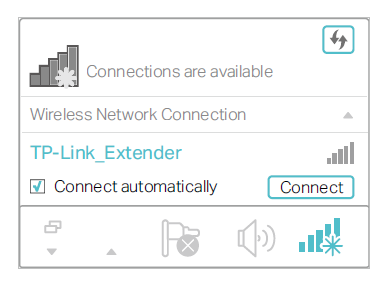
a. Unplug the Ethernet cable from your computer (if any).
b. Click the Wi-Fi icon on the taskbar and connect to the extender’s wireless network: TP-Link_Extender.
For Mac OS X Users:
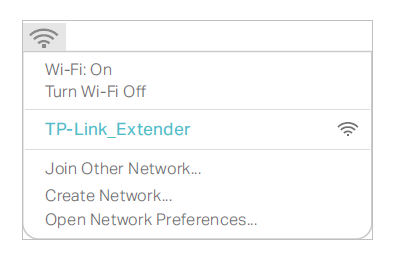
a. Unplug the Ethernet cable from your computer (if any).
b. Click the Wi-Fi icon in the top right corner of the screen, and connect to the extender’s network: TP-Link_Extender.
2. Follow the instructions of the Quick Setup Wizard to connect the extender to your host router.
a. Launch a web browser, enter http://www.tplinkrepeater.net or http://192.168.0.254 in the address bar, and then create a password to log in.
Note: If the login window does not appear, please refer to FAQ.
b. Select your host router’s 5GHz SSID (network name), enter its password (NOT the password you just created for management), and click Next.
Note: If your host router does not support 5GHz wireless network, please click Skip to continue.
c. Select your host router’s 6GHz SSID (network name), enter its password (NOT the password you just created for management), and click Next.
Note: If your host router does not support 6GHz wireless network, please click Skip to continue.
d. Select your host router’s 2.4GHz SSID (network name), enter its password (NOT the password you just created for management), and click Next.
f. Confirm your host network password.
g. Either keep the default SSIDs (network names) or customize them for the extended networks, and then click Next.
Tip: If you connect the extender to a TP-Link EasyMesh router, the extender will automatically join the router’s EasyMesh network and copy the router’s wireless settings. For more information, refer to Chapter 2 EasyMesh with Seamless Roaming.
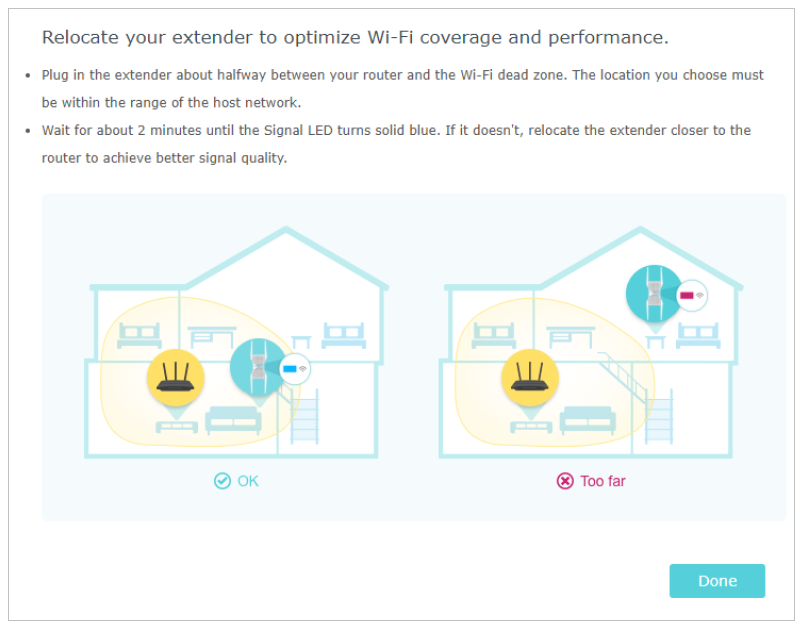
h. Follow web instructions to relocate your extender for optimal Wi-Fi coverage and performance, and then click Done.
i. Note down your extended network information and finish the setup.
j. Enjoy! Connect your devices to the extender wirelessly or via an Ethernet cable (for mdoels with Ethernet ports), then enjoy the internet.
Method 3: Via the WPS Button
Use this way if your router has a WPS button. The button might look like one of these:  .
.
1. Activate the WPS function on your router by pressing the WPS button.
Note: If you don’t know how to do it, refer to your router’s user manual, or you can use other methods to set it up.
2. Within 2 minutes, press the WPS button on the extender for 1 second, and the Signal LED starts blinking. Wait for the Signal LED, 2.4GHz, 5GHz and 6GHz (if any) LEDs to turn solid blue (some models may turn white or green), indicating a successful connection.
Note:
A solid blue/white/green Signal LED and band LEDs indicate a strong and successful connection between the extender and your main router. If any of the band LEDs remain off, you can repeat Steps 1 & 2 or try Method 1 or Method 2. If the Signal LED is red, try moving your extender closer to the main router.
If you want to customize the extended network name, refer to Chapter 4.1 Configure Wireless Network.
If you cannot find the network names with _EXT in your Wi-Fi network list, this means that the extender has been connected to a EasyMesh router and automatically copied its wireless settings. For more information, refer to Chapter 2 EasyMesh with Seamless Roaming.
3. Relocate your extender for optimal Wi-Fi coverage and performance.
a. Plug in the extender about halfway between your router and the Wi-Fi dead zone. The location you choose must be within the range of your router.
b. Wait for about 2 minutes until the Signal LED turns solid blue (some models may turn white or green). If it doesn’t, relocate the extender closer to the router to achieve better signal quality.
Tip: To minimize signal interference, please choose a location which is far away from Bluetooth devices and other household electronic devices, such as cordless phones, microwave ovens and baby monitors.
4. Enjoy! Connect your devices to the extender wirelessly or via an Ethernet cable (for mdoels with Ethernet ports), then enjoy the internet.
2. EasyMesh with Seamless Roaming
This chapter introduces the TP-Link EasyMesh feature. It contains the following sections:
• What‘s an EasyMesh Network
• How to Set Up an EasyMesh Network
• How to Manage an EasyMesh Network
Note: The availability of the EasyMesh feature varies depending on your extender's model and software version. To confirm if your model supports EasyMesh, please check TP-Link EasyMesh Compatibility List.
2.1 What‘s an EasyMesh Network
TP-Link EasyMesh router and TP-Link EasyMesh extenders work together to form one unified Wi-Fi network. Walk through your home and stay connected with the fastest possible speeds thanks to EasyMesh’s seamless coverage.
Note:
• Routers and range extenders must be compatible with EasyMesh or OneMesh™. Firmware upgrades may be required.
• TP-Link EasyMesh-compatible products can network with other devices that use EasyMesh. Failed connections may be due to firmware conflicts of different vendors.
• The EasyMesh-Compatible function is still being developed on some models and will be supported in subsequent software updates.
Flexible Scalability
Flexibly scale your home networking with different vendors,* different topologies, different Protocols and different product categories.
Seamless Roaming
Connects mobile devices to your routers or extenders that provide the best coverage. Devices compatible with EasyMesh also share a single Wi-Fi name so you stay connected in every room.
One-Click Settings
Press the WPS button on the main router and the satellite device within 2 minutes of each other, then the EasyMesh network will set up.
For more information, visit https://www.tp-link.com/easymesh/.
2.2 How to Set Up an EasyMesh Network
1. Make sure your router supports EasyMesh or OneMeshTM.
Note: To check full list of EasyMesh devices, visit https://www.tp-link.com/EasyMesh/compatibility. Firmware update may be required for some firmware versions.
2. Connect the extender to your router by referring to the provided Quick Installation Guide or Chapter 1 Set Up Your Extender of this guide. The extender will automatically join your router’s mesh network.
Note: Alternatively, some models can join the EasyMesh netowrk via a wired connection. For these models, you can add them to the EasyMesh network following the step below: first, restore your range extender to its default settings; then, use an Ethernet cable to connect it to your router's LAN port; Wait for your range extender's Signal LED to turn solid blue (some models may turn white or green), which indicates a successful connection.
2.3 How to Manage an EasyMesh Network
• To leave or join a EasyMesh network:
1. Visit http://www.tplinkrepeater.net, and log in with your TP-Link ID or the password you set for the extender.
2. Go to Advanced > EasyMesh.
3. Toggle off or on EasyMesh according to your needs.
Note: This function is available only when the extender is connected to a EasyMesh router.
• To change wireless settings:
Simply change wireless settings on your EasyMesh router, the extender will automatically copy the settings.
• To manage devices in the EasyMesh network:
1. Connect your computer or smartphone to the extender‘s or router’s network.
2. Log in to your router’s web management page (http://tplinkwifi.net).
3. Go to the EasyMesh page to view and manage all mesh devices and their clients.
3. TP-Link Cloud Service
TP-Link Cloud service provides a better way to manage your cloud devices. Log in to your cloud device with a TP-Link ID, and you can easily monitor and manage your home
network when you are out and about via the Tether app on your smartphone or tablet. To ensure that your cloud device stays new and gets better over time, the TP-Link Cloud will notify you when an important firmware upgrade is avaliable. Surely you can also manage multiple TP-Link Cloud devices with a single TP-Link ID.
This chapter introduces how to register a new TP-Link ID, bind or unbind TP-Link IDs to manage your cloud device, and the Tether app with which you can manage your home network no matter where you may find yourself. It contains the following sections:
• Register a TP-Link ID
• Change Your TP-Link ID Information
• Manage the User TP-Link IDs
• Manage the Extender via the TP-Link Tether App
When you log in after initial setup, the web page will ask whether you need TP-Link Cloud service. You can also access the TP-Link Cloud settings as follows:
1. Visit http://www.tplinkrepeater.net, and log in with your TP-Link ID or the password you set for the extender.
2. Go to Settings > TP-Link Cloud.
3. Click Register Now and follow the instructions to register a TP-Link ID.
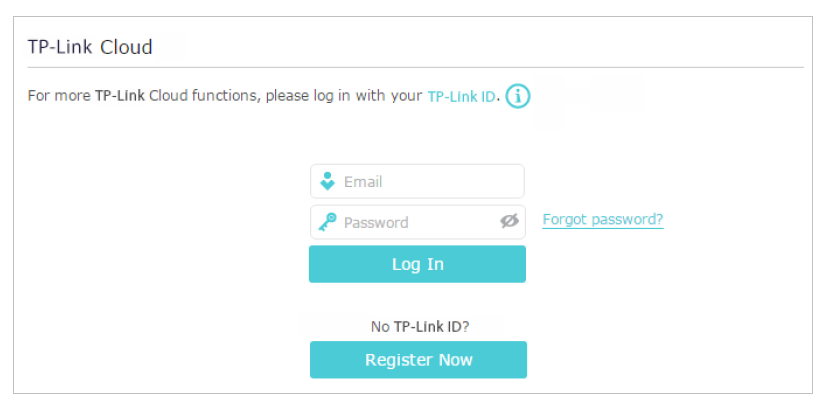
4. After activating your TP-Link ID, come back to the TP-Link Cloud page to log in. The TP-Link ID used to log in to the extender for the first time will be automatically bound as an Admin.
Note:
• To learn more about the Admin and User TP-Link ID, refer to Chapter 3.3 Manage the User TP-Link IDs.
• Once you have registered a TP-Link ID on the web management page, you can only register another TP-Link ID via the Tether APP. Please refer to Chapter 3.4 Manage the Extender via the TP-Link Tether App to install the app and register a new one.
• If you want to unbind the admin TP-Link ID from your extender, please go to Settings > TP-Link Cloud, an click Unbind in the Device Information section.
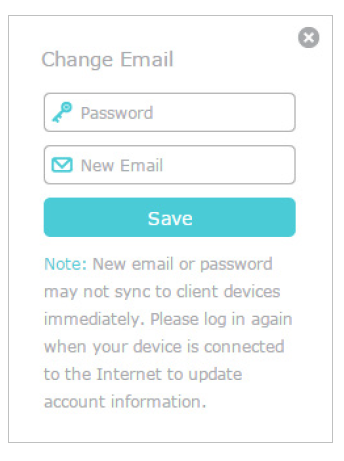
3. 2 Change Your TP-Link ID Information
Follow the steps below to change your email address and password of your TP-Link ID as needed.
1. Visit http://www.tplinkrepeater.net, and log in with your TP-Link ID.
2. Go to Advanced > TP-Link Cloud, and focus on the Account Information section.
• To change your email address:
1. Click behind the Email.
2. Enter the password of your TP-Link ID, then a new email address. And click Save.
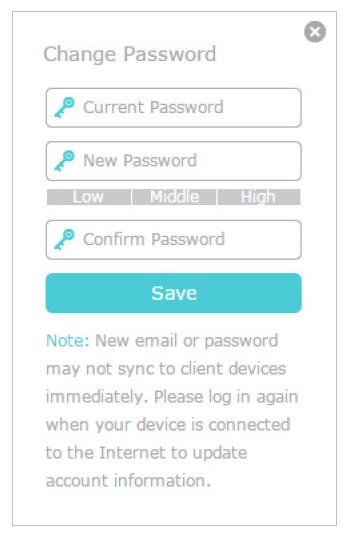
• To change your password:
1. Click  behind the Password.
2. Enter the current password, then a new password twice. And click Save.
3. 3 Manage the User TP-Link IDs
The TP-Link ID used to log in to the extender for the first time will be automatically bound as the Admin account. An admin account can add or remove other TP-Link IDs to or from the same extender as Users. All accounts can monitor and manage the extender locally or remotely, but user accounts cannot:
- Reset the extender to its factory default settings either on the web management page or in the Tether app.
- Add/remove other TP-Link IDs to/from the extender.
3. 3. 1. Add TP-Link ID to Manage the Extender
1. Visit http://www.tplinkrepeater.net, and log in with your TP-Link ID.
2. Go to Settings > TP-Link Cloud, and focus on the Bound Accounts section.
3. Click  , enter another TP-Link ID as needed and click Save.
Note:
If you need another TP-Link ID, please register a new one via the Tether app. Please refer to Chapter 3.4 Manage the Extender via the TP-Link Tether App to install the app and register a new TP-Link ID.
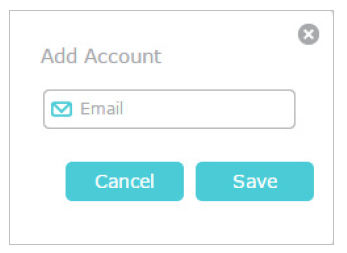
4. The new TP-Link ID will be displayed in the Bound Accounts table as a User.
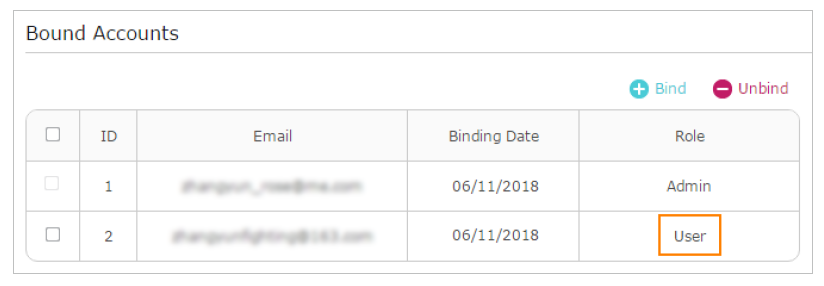
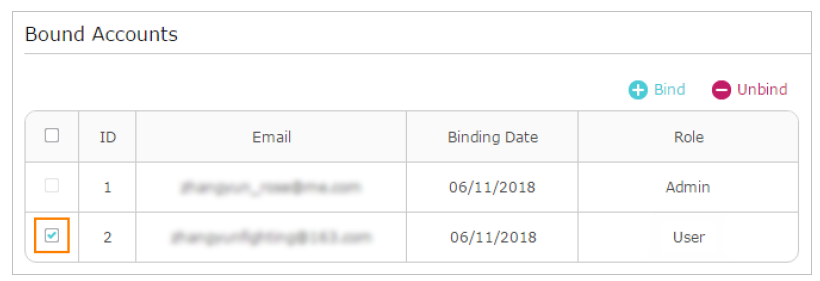
3. 3. 2. Remove TP-Link ID(s) from Managing the Extender
1. Visit http://www.tplinkrepeater.net, and log in with your TP-Link ID.
2. Go to Settings > TP-Link Cloud, and focus on the Bound Accounts section.
3. Tick the checkbox(es) of the TP-Link ID(s) you want to remove and click Unbind.
3. 4 Manage the Extender via the TP-Link Tether App
The Tether app runs on iOS and Android devices, such as smartphones and tablets.
1. Launch the Apple App Store or Google Play store and search “TP-Link Tether” or simply scan the QR code to download and install the app.

2. Launch the Tether app and log in with your TP-Link ID.
Note: If you don’t have a TP-Link ID, create one first.
3. Connect your device to the extender’s or host router’s wireless network.
4. Go back to the Tether app, select the model of your extender and log in with the password your set for the extender.
5. Manage your extender as needed.
Note: If you need to remotely access your extender from your smart devices, you need to:
• Log in with your TP-Link ID. If you don’t have one, refer to Chapter 3.1 Register a TP-Link ID.
• Make sure your smartphone or tablet can access the internet with cellular data or a Wi-Fi network.
4. Customize Your Network
This chapter guides you on how to configure network settings that are available for this extender. It contains the following sections:
- Configure Wireless Network
- Change LAN Settings
- Specify DHCP Server Settings
- Adjust Wi-Fi Coverage
- Set Up Access Control
4. 1 Configure Wireless Network
If you want to extend another host network after Quick Setup, you can refer to this section. Moreover, you can change the wireless settings for your extended networks.
Tip:
If the extender is in your router’s EasyMesh network, it will automatically copy wireless settings from your router. No wireless settings is needed for the extender.
Visit http://www.tplinkrepeater.net, and log in with your TP-Link ID or the password you set for the extender.
Note:
Here we take the configuration of the 2.4GHz network as an example. If the 6GHz and 5GHz network is available on your extender, please refer to the instructions to set them up.
• To extend another host network:
1. Go to Wireless > Connect to Host Network.
2. Enable Connect to 2.4GHz Network and click Wireless Scanner to find all available networks.

3. Select the 2.4GHz host network you want to extend from the list.
Note:
If the network you want to extend is on but not listed, please try the following steps.
· Move the extender closer to your router, and rescan for networks.
· You can manually enter the SSID (network name) and password of the network you want to extend, and click Save.
4. Once a host network is selected, the SSID and security type will be automatically filled in. If the selected network is encrypted, enter the password in the Password field.
5. Click Save.
• To enable or disable the extended network:
1. Go to Wireless > Extended Network.
2. Extended networks are enabled by default. If you want to disable the wireless function of a certain band, just clear the Enabled checkbox. In this case, all the wireless settings of this band will be invalid.
3. Click Save.
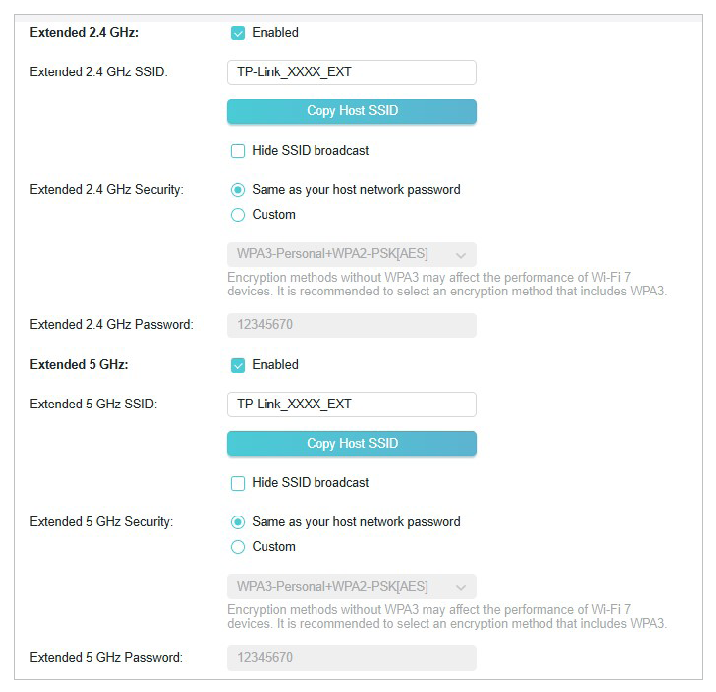
• To change the wireless network name (SSID):
1. Go to Wireless > Extended Network.
2. Create a new SSID in Extended 2.4GHz SSID and click Copy Host SSID. The value is case-sensitive.
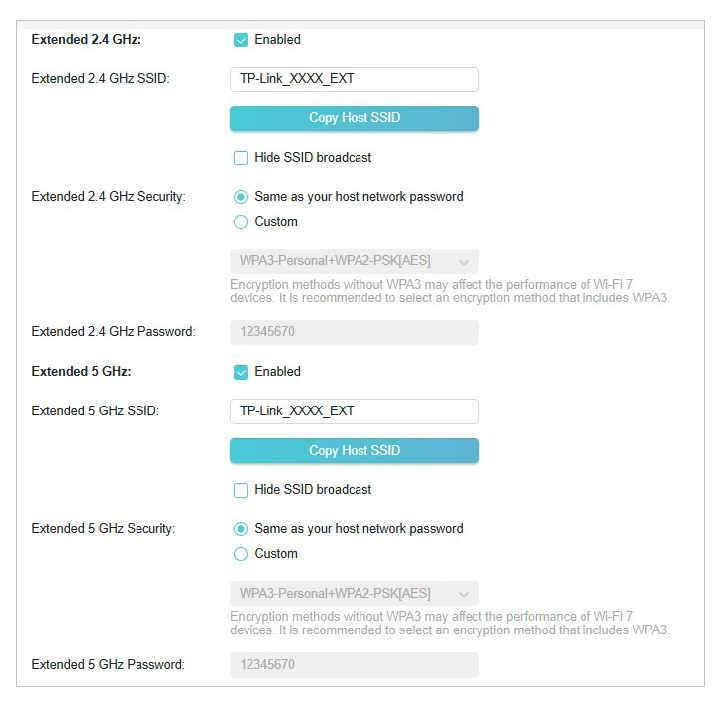
3. Click Save.
Note:
If you have changed the wireless settings via a wireless device, you will be disconnected after the settings are applied. Please write down the new SSID for future use.
• To change the security of the extended network:
1. Go to Wireless > Extended Network.
2. Set the Security mode of your extended network. Here uses 2.4 GHz as an example:
You can simply select Same as your host network password.
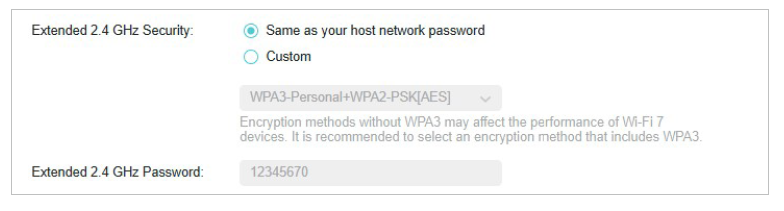
Or select Custom, specify the extended network’s security mode and password (case-sensitive). If you select No Security, no password is required.
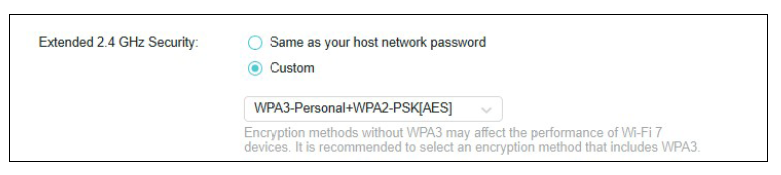
3. Click Save.
• To hide the SSID of the extended network:
1. Go to Wireless > Extended Network.
2. Select Hide SSID broadcast, and the corresponding SSID will not be displayed when wireless devices scan for local wireless networks. You need to manually enter the SSID to join the network.
3. Click Save.
• To configure wireless settings:
1. Go to Wireless > Wireless Settings.
2. Configure the functions according to your needs, and click Save.
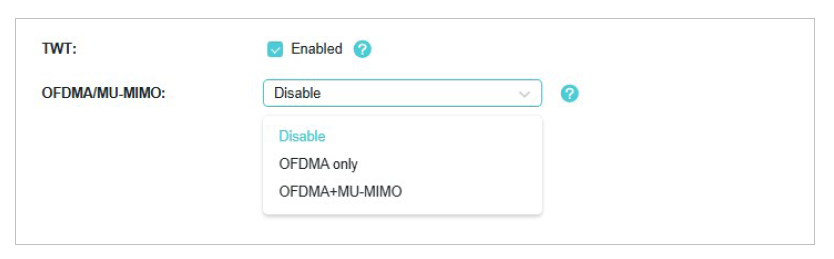
• TWT (Target Wake Time): allows 802.11ax devices and clients to negotiate their periods to transmit and receive data packets. Clients only wake up at TWT sessions and remain in sleep mode for the rest of the time, which significantly extend their battery life. It is disabled by default.
• OFDMA/MU-MIMO: OFDMA enables multiple users to transmit data simultaneously, and thus greatly improves speed and efficiency. Noted that only when your clients also support OFDMA, can you fully enjoy the benefits. MU-MIMO (Multi-User Multiple-Input Multiple-Output) enables the device to simultaneously send data to multiple clients, significantly enhancing network efficiency.
• To create an MLO network*
Note:
This feature is supported exclusively by Wi-Fi 7 extenders. To verify your model's specifications, please check the product label on your extender for its product name (e.g., BE3600 Dual-Band Wi-Fi 7 Range Extender).
1. Go to Wireless > Extended Network.
2. Locate the MLO Network section and enable MLO Network and select at least 2 enabled bands to create an MLO network.
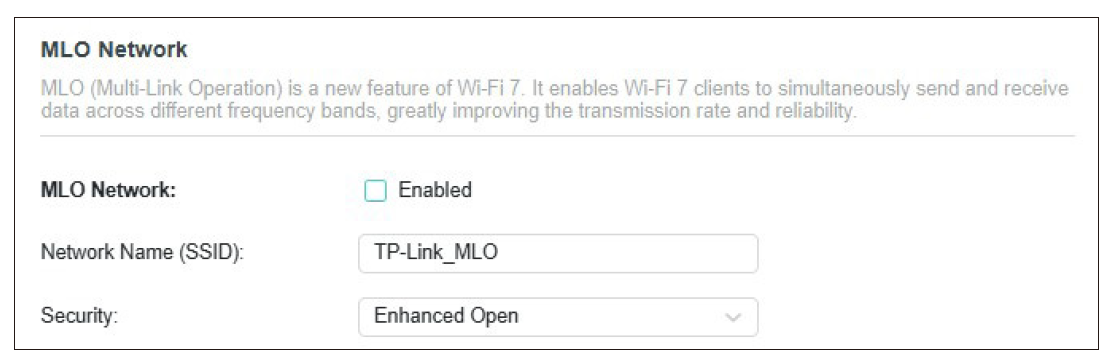
Note:
Only client devices that support Wi-Fi 7 can connect to the MLO network. Some devices may not fully implement the MLO feature. If you are experiencing connection issues, it is recommended to disable MLO Network.
The extender is preset with a default LAN IP 192.168.0.254, with which you can log in to the web management page. The LAN IP address, together with the Subnet Mask, also defines the subnet that the connected devices are on. After connected to the front-end router, the range extender will automatically obtain an IP address from the router. If the IP address conflicts with another device on your local network or your network requires a specific IP subnet, you can change it by following the steps below:
1. Visit http://www.tplinkrepeater.net, and log in with your TP-Link ID or the password you set for the extender.
2. Go to Adavanced > Network > LAN Settings.
3. Select Use the following IP address.
4. Enter a new IP Address as needed and leave the Subnet Mask as the default settings .
5. Enter the gateway that is in the same subnet as the IP address. The gateway is usually the LAN IP address of your router.
6. Enter the DNS IP address provided by your ISP.
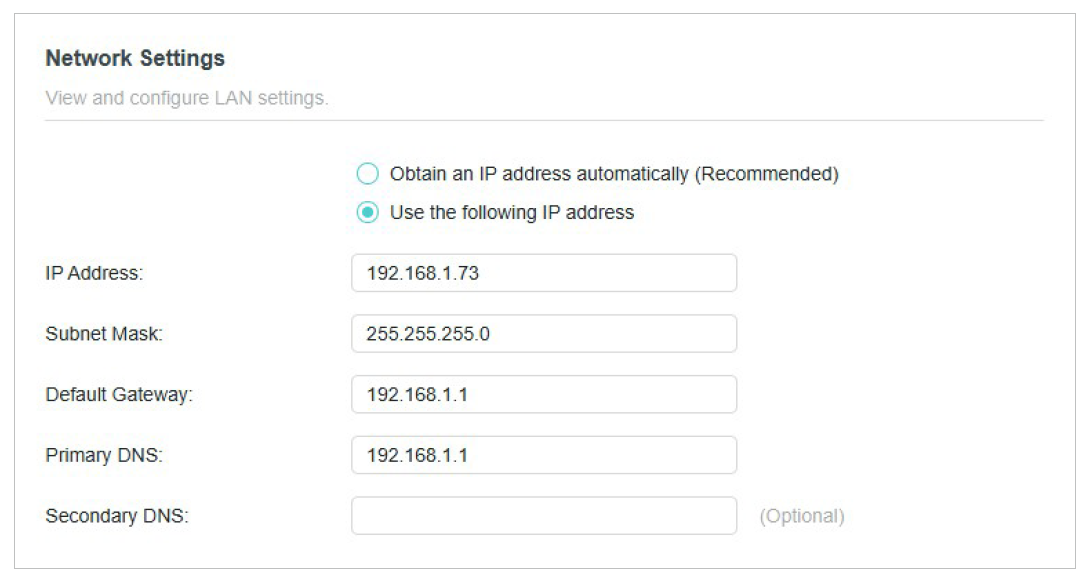
7. Click Save.
4.3 Specify DHCP Server Settings
By default, the DHCP (Dynamic Host Configuration Protocol) Server is auto and the extender acts as a DHCP server and dynamically assigns TCP/IP parameters to client devices from the IP Address Pool when the router’s DHCP server is disabled. You can change the settings of the DHCP Server if necessary.
1. Visit http://www.tplinkrepeater.net, and log in with your TP-Link ID or the password you set for the extender.
2. Go to Advanced > Network > DHCP Server.
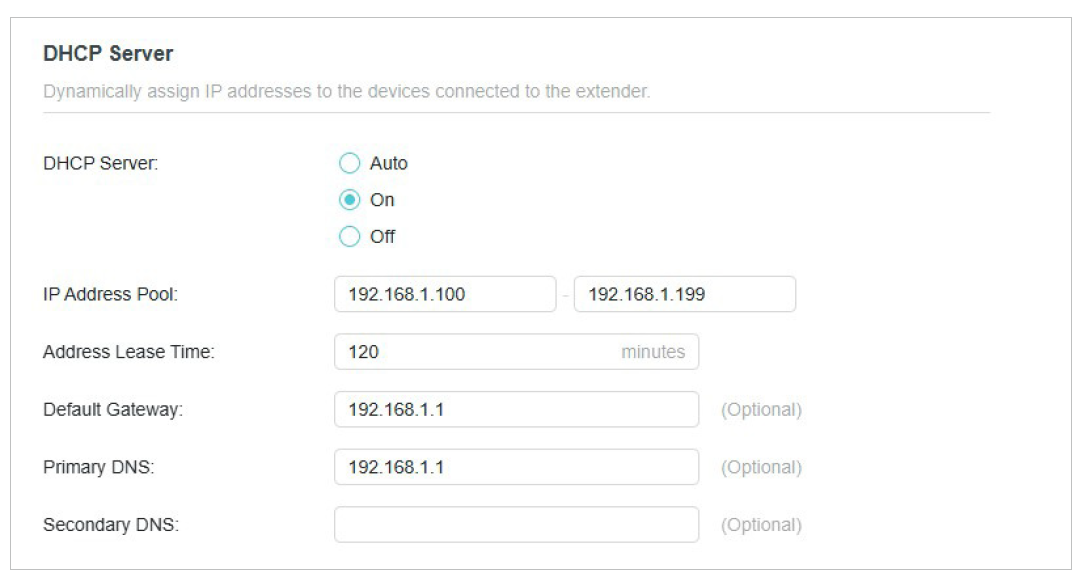
3. Select On to enable the DHCP Server of the extender.
4. Enter the starting and ending IP addresses in the IP Address Pool.
5. Enter other parameters if the ISP offers. The Default Gateway is automatically filled in and is the same as the LAN IP address of the router.
4. Click SAVE.
You can set the extender’s Wi-Fi coverage depending on how large you want your Wi-Fi area to be.
1. Visit http://www.tplinkrepeater.net and log in with your TP-Link ID or the password you set for the extender.
2. Go to Advanced > Advanced Settings > Wi-Fi Coverage.
3. Select your desired Wi-Fi coverage level for the extender.
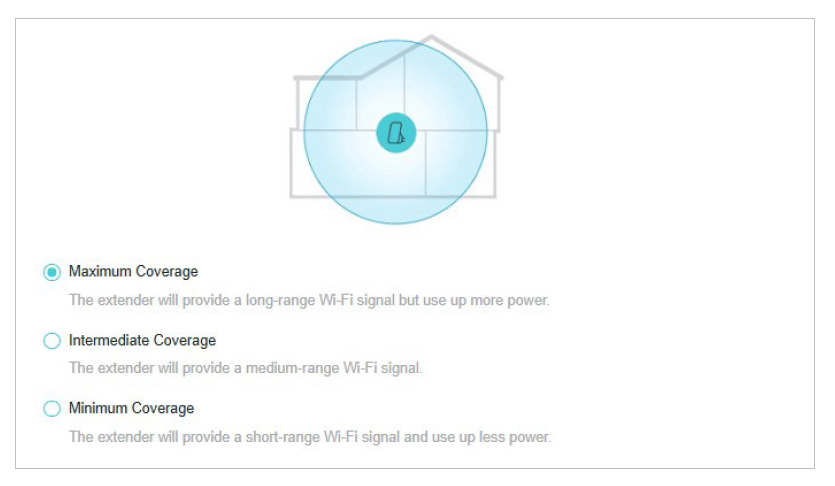
4. Click Save.
Access Control allows you to permit or block specific devices from accessing the internet for a specific period.
Tip:
If the extender is in your router’s EasyMesh network, it will automatically copy access control settings from your router. There is no need to set up access control for the extender again.
1. Visit http://www.tplinkrepeater.net and log in with your TP-Link ID or the password you set for the extender.
2. Go to Advanced > Advanced Settings > Access Control.
3. Enable Access Control.
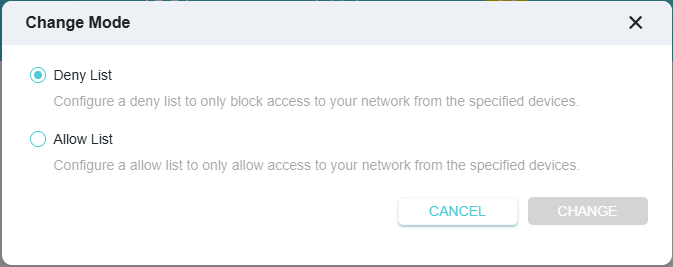
• To block specific device(s):
1. Ensure that Current Mode is Deny List. Click  to creat a block rule.
2. Add devices you are planning to block.
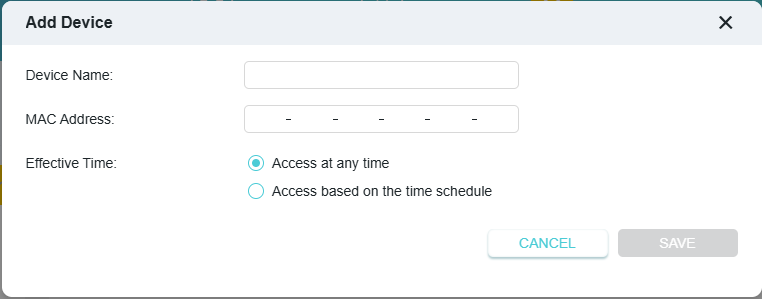
Option 1. Add manually
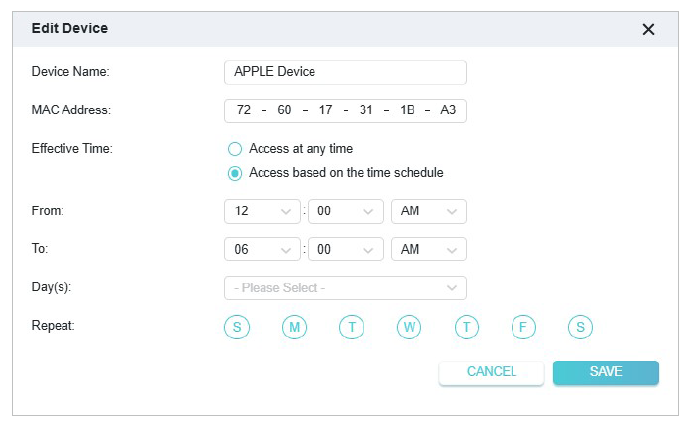
Enter the device's name and MAC address and set the Effective Time for this entry.
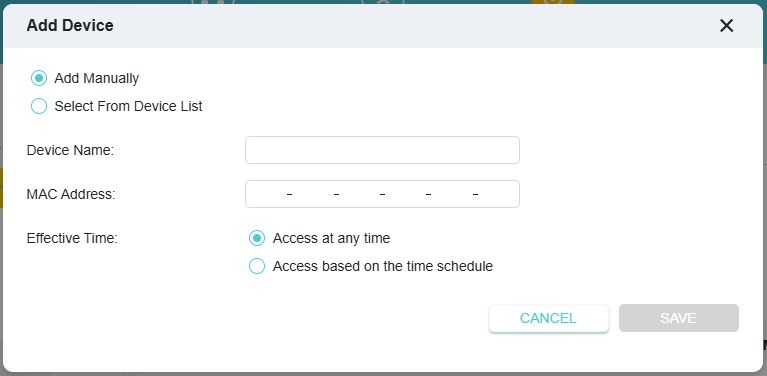
Option 2. Add from device list
Select the device to be blocked in the Online Devices table by ticking the corresponding checkbox and set the Effective Time for the selected devices.
3. Click Save and the device(s) will be added to the Devices in Deny List table.
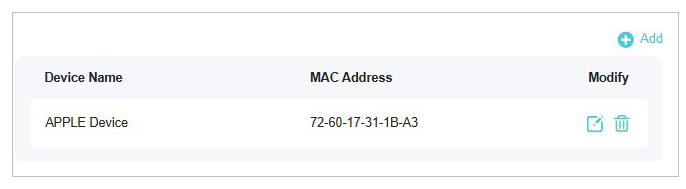
4. Click  in the Devices in deny list table to set the Effective Time for a certain entry as needed.
5. Click Save.
• To permit specific device(s) to join your network:
1. Click Change Mode, select Allow List, and click Change.
2. Click Add in the Devices in Whitelist table. Enter the Device Name and MAC Address. And you can set the Effective Time for a certain entry as needed.
3. Click Save.
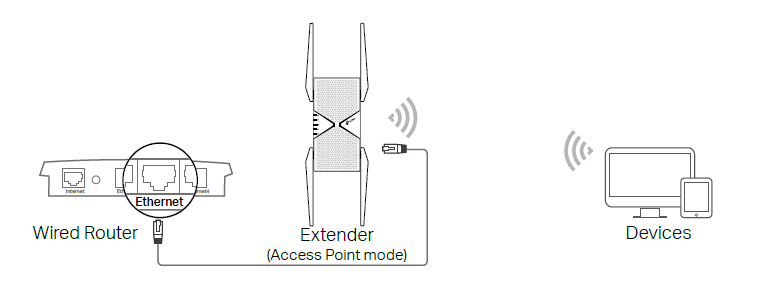
5. Use Your Extender as an Access Point
The extender can work as an access point, transforming your existing wired network to a wireless one. This chapter explains how to use the extender as an access point. It contains the following sections:
5.1 Set Up the Extender as an Access Point
1. Visit http://www.tplinkrepeater.net, and log in with your TP-Link ID or the password you set for the extender.
2. Click Mode in the top right corner of the page. Select Access Point, select and clone your settings in the Repeater mode to the new mode (if needed). Click Save and the extender will reboot and switch to Access Point mode.

3. Visit http://www.tplinkrepeater.net, and log in with your TP-Link ID or the password you set for the extender.
4. Go to Advanced > Quick Setup to configure your extender.
5. Follow the on-screen instruction to set up your extender and you can enjoy the further extended Wi-Fi.
5.2 Connect Wireless Devices to the Extender
Method 1: Connect to the extender manually
You can connect your wireless devices to the extender by using the extender’s wireless network names and passwords.
Method 2: Connect to the extender via WPS
Wi-Fi Protected Setup (WPS) provides an easier way to set up a secure Wi-Fi connection. Wireless devices that support WPS, including Android phones, tablets and most USB network cards, can be connected to your extender through this method (not supported by iOS devices).
1. Visit http://www.tplinkrepeater.net, and log in with your TP-Link ID or the password you set for the extender.
2. Go to Wireless > WPS.
3. Follow the instructions to set up WPS connection.

6. Manage Your Extender
This chapter presents how to manage and maintain your extender. It includes the following sections:
• Set System Time
• Control LEDs
• Set Power Schedule
• Upgrade the Firmware
• Backup and Restore Configuration Settings
• Change Login Password
• Check System Log
• Change Power Mode
• Configure Accessibility Settings
6.1 Set System Time
The System Time of the extender will be used for time-based function such as the Power Schedule function. If you have enabled Daylight Saving Time feature, the system time will be sychronized with the daylight saving time you configure.
1. Visit http://www.tplinkrepeater.net, and log in with your TP-Link ID or the password you set for the extender.
2. Go to Advanced > System Tools > Time Settings.
• To get system time:
a. Select your local Time Zone from the drop-down list.
b. Click Save.
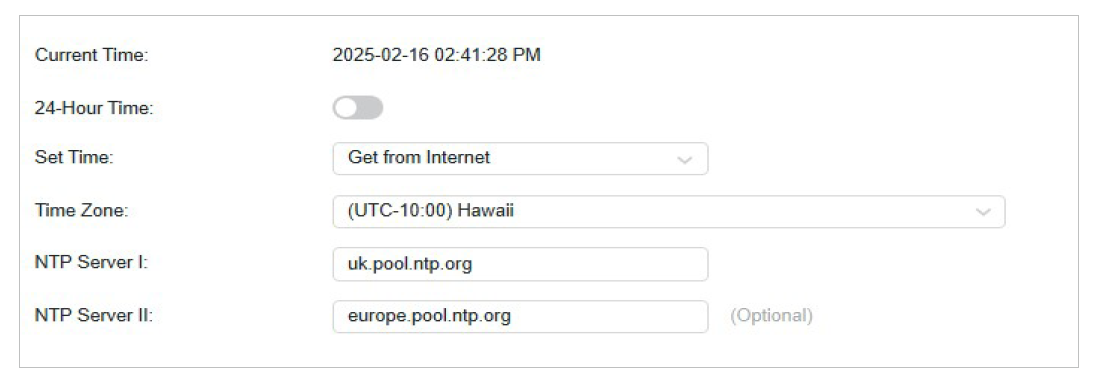
Note: If your device is in an easyMesh network, it will automatically synchronizes time settings from your main router.
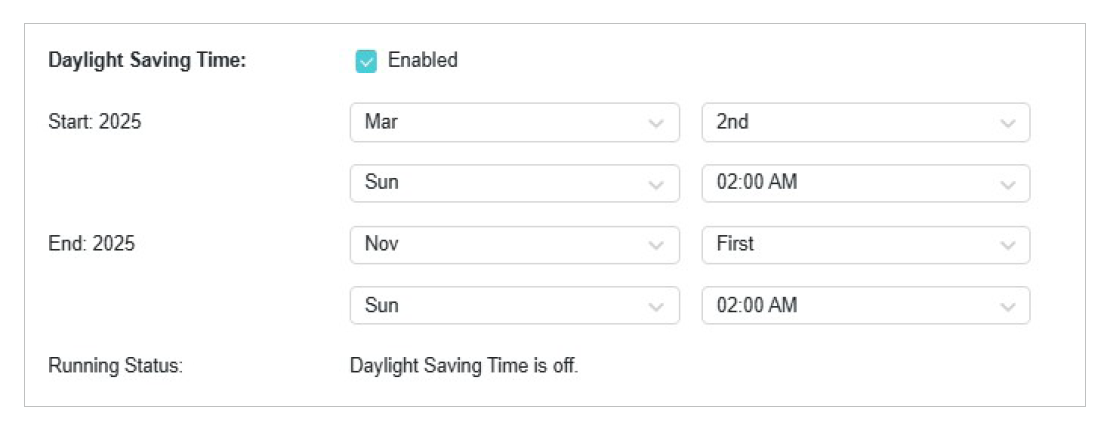
• To set up Daylight Saving Time:
a. Enable Daylight Saving Time.
b. Select the Start and End date and time of the daylight saving time at your local time zone.
c. Click Save.
The LEDs of the extender indicate its activities and status. You can turn off LEDs when you don’t need them.
1. Visit http://www.tplinkrepeater.net, and log in with your TP-Link ID or the password you set for the extender.
2. Go to Advanced > System Tools > LED Control.
• To turn off the LEDs:
Locate the LED Status toggle and turn it off.

Note: The LED Status will turn back on after restarting the extender. If you want to keep the LED off after restarting, it is recommended to set Night Mode.
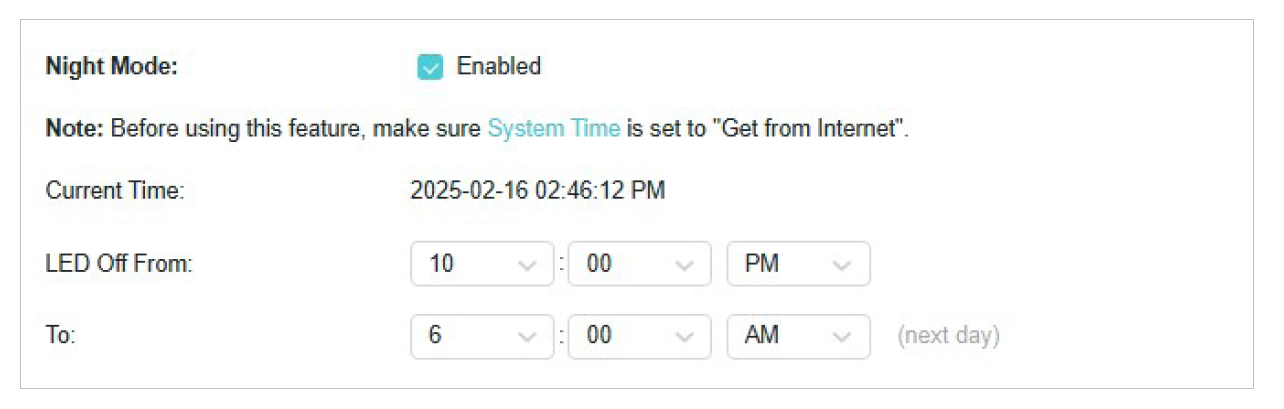
• To specify a time period when LEDs are off:
1. Enable Night Mode.
2. Specify the LED off time period.
Note: The effective time schedule for Night Mode is based on the system time of the extender. Refer to 6.1 Set System Time to get the correct system time.
3. Click Save.
Set specific times for your extender to power down automatically. This is useful for saving energy during periods when the internet is not needed
1. Visit http://www.tplinkrepeater.net, and log in with your TP-Link ID or the password you set for the extender.
2. Go to Advanced > Advanced Settings > Power Schedule.
3. Click and set up the schedule. Then click Save.
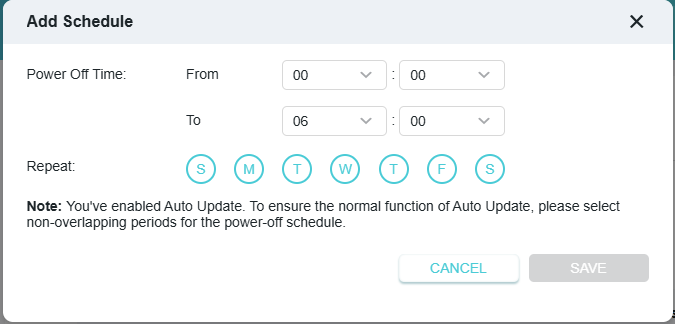
4. You can edit or delete these schedule entries on the Power Off Time table.

TP-Link is committed to improving product features, giving you a better network experience. We will inform you through the web management page if there’s any update firmware available for your extender. Also, the latest firmware will be released at the TPLink official website www.tp-link.com, and you can download it from the Support page for free.
Note:
- Make sure the latest firmware file is matched with the hardware version (as shown in the download section of the Support page).
- Ensure that you have a stable connection between the extender and your computer.
- It is recommended to back up your extender configuration before the upgrade.
- DO NOT power off the extender during the firmware upgrade.
• To auto-upgrade the firmware:
1. Visit http://www.tplinkrepeater.net, and log in with your TP-Link ID or the password you set for the extender.
2. Go to Advanced > System Tools > Firmware Upgrade.
3. Locate the Auto Upgrade section and turn on Auto Upgrade.
4. Specify the Update Time and save the settings.
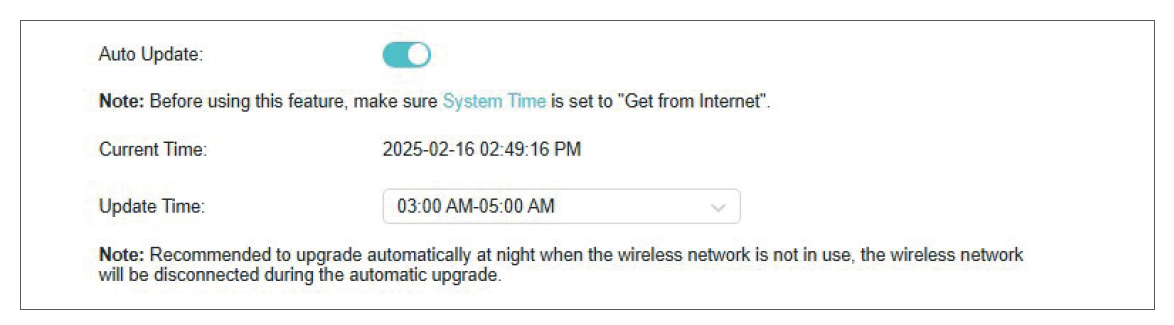
Done! The range extender will update firmware automatically at the specified time when new version is available.
• To upgrade the firmware online:
1. Visit http://www.tplinkrepeater.net, and log in with your TP-Link ID or the password you set for the extender.
2. When the latest firmware is available for your extender, the update icon will display in the top-right corner of the page. Click the  icon to go to the Firmware Upgrade page.
Alternatively, you can go to Settings > System Tools > Firmware Upgrade, and click Check for upgrade to see whether a new firmware is released.
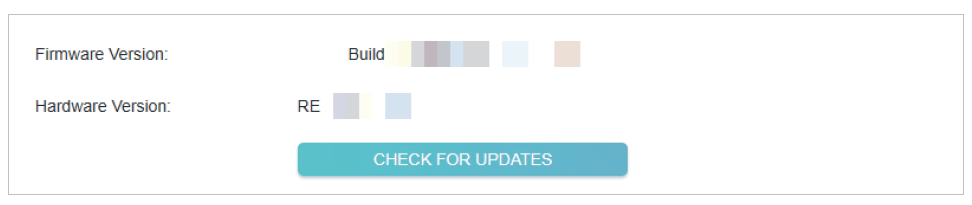
3. Focus on the Online Upgrade section, and click Upgrade.
4. Wait a few minutes for the upgrade and reboot to complete.
• To upgrade the firmware locally:
1. Download the latest firmware file for the extender from our website www.tp-link.com.
2. Visit http://www.tplinkrepeater.net, and log in with your TP-Link ID or the password you set for the extender.
3. Go to Settings > System Tools > Firmware Upgrade.
4. Click Browse to locate the downloaded new firmware file, and then click Upgrade.

5. Wait a few minutes for the firmware upgrade to complete and the extender to reboot.
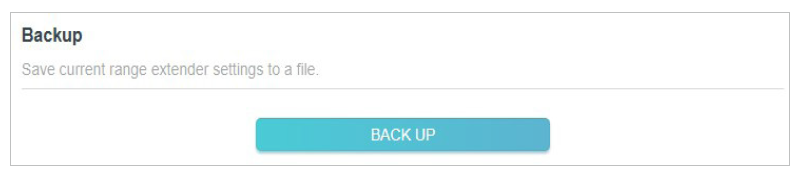
6.5 Backup and Restore Configuration Settings
The configuration settings are stored as a configuration file in the extender. You can backup the configuration file and restore the extender to the previous settings from the backup file when needed. Moreover, if necessary, you can erase the current settings and reset the extender to the default factory settings.
1. Visit http://www.tplinkrepeater.net, and log in with your TP-Link ID or the password you set for the extender.
2. Go to Settings > System Tools > Backup & Restore.
• To backup configuration settings:
Click Backup to save a copy of the current settings to your local computer. A ‘.bin’ file of the current settings will be stored on your computer.
• To restore configuration settings:
1. Click Browse to locate the backup configuration file stored on your computer, and click Restore.
2. Wait a few minutes for the restore and reboot.
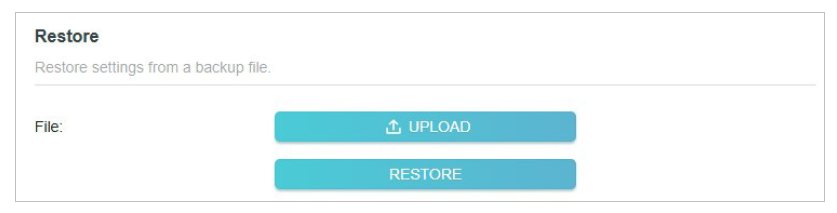
Note: During the restore process, do not power off or reset the extender.
• To reset the extender to factory default settings:
1. Click Factory Restore to restore all configuration settings to default values, or click Restore if you want to keep you login and cloud account information.
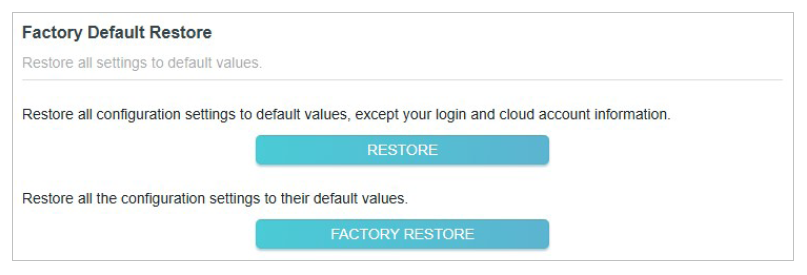
2. Wait a few minutes for the reset and reboot.
Notes:
• During the reset process, do not power off the extender.
• We strongly recommend you backup the current configuration settings before resetting the extender.
The account management feature allows you to change your login username and password of the web management webpage.
1. Visit http://www.tplinkrepeater.net, and log in with your TP-Link ID or the password you set for the extender.
2. Go to Advanced > System Tools > Administration.
3. Enter the old password. Then enter the new password twice (case-sensitive) and click Save.
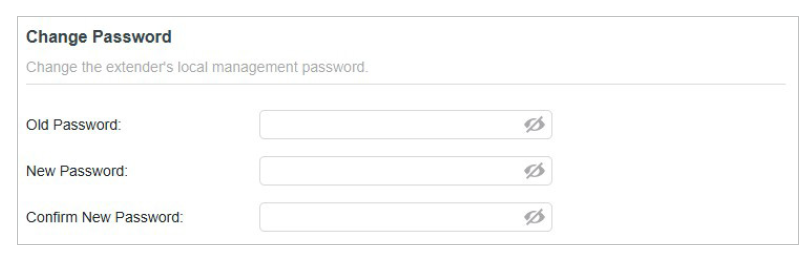
4. Use the new password for future logins.
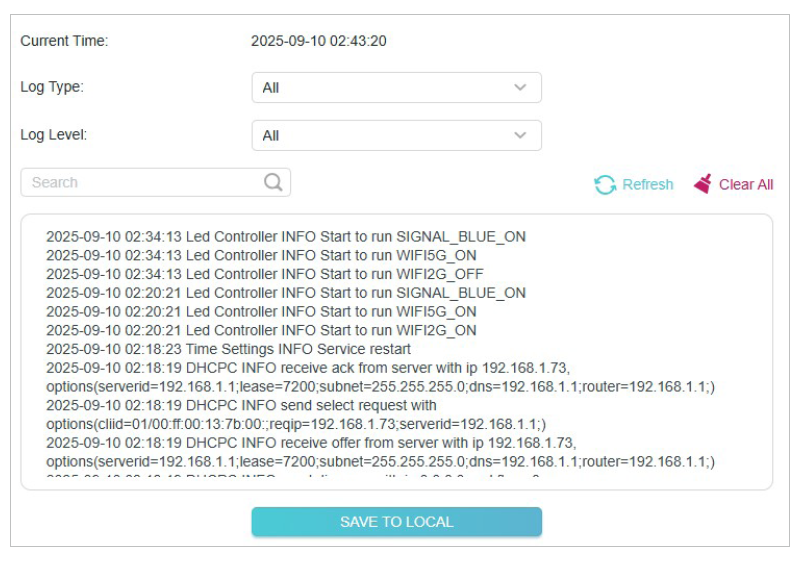
If the extender is not working properly, you can save the system log and send it to our technical support team.
1. Visit http://www.tplinkrepeater.net, and log in with your TP-Link ID or the password you set for the extender.
2. Go to Settings > System Tools > System Log.
• To save the system log locally:
1. Choose the type and level of the system log as needed.
2. Click Save Log to save the system logs to a local disk.
Eco Mode is a power-saving feature designed to reduce your extender’s energy consumption. By lowering the power output, Eco Mode can minimize energy
use, which not only helps decrease your electricity bills but also contributes to environmental sustainability.
1. Visit http://www.tplinkrepeater.net, and log in with your TP-Link ID or the password you set for the extender.
2. Go to Settings > System Tools > ECO Mode.
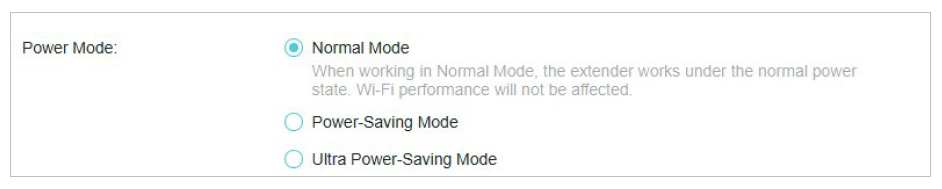
3.Select Power-Saving Mode or Ultra Power-Saving Mode as you need and set its effective time.
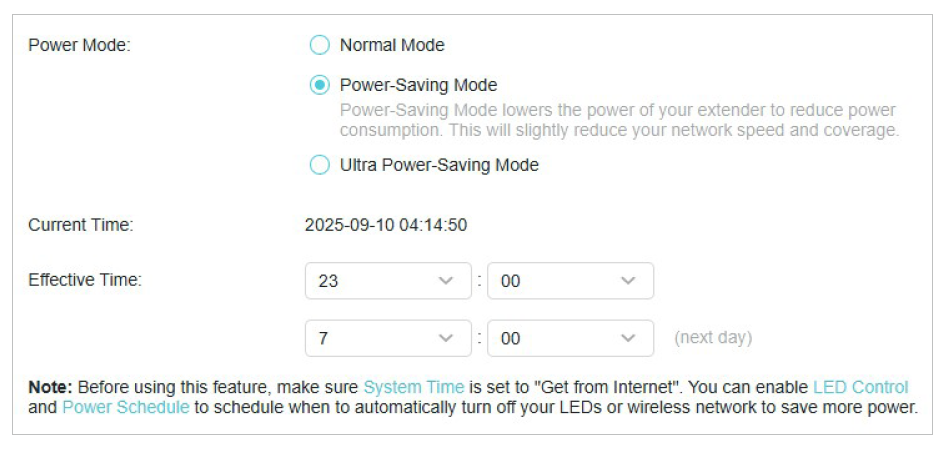
4. If you want to save more power, click on the hyperlinks in the Note below to customize LED Control and Power Schedule.
5. Click SAVE.
6.9 Configure Accessibility Settings
Our web management page include accessibility features like increasing page contrast and hiding animation. Give them a try and make it much easier to set up your device and adjust settings!
1. Visit http://www.tplinkrepeater.net, and log in with your TP-Link ID or the password you set for the extender.
2. Go to Settings > System Tools > Accessibility.
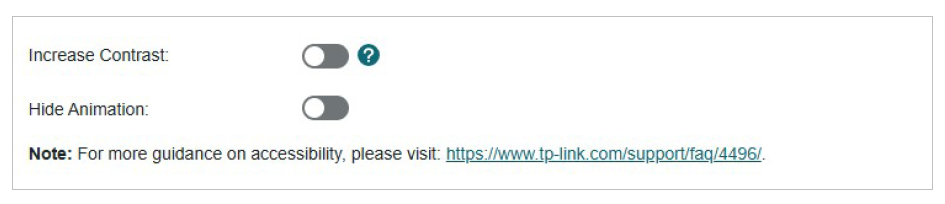
- Increase Contrast: When enabled, the page will display content in high contrast between text and backgrounds for better readability.
- Hide Animation: When enabled, all animations on the site will be hidden, providing a quick and universal way to remove moving elements from the page.
7. FAQ
Q1. I have enabled wireless MAC filter, wireless access control, or access control list (ACL) on my router. What should I do before configuring the extender?
When a device connects through the extender to your router, the MAC address of the device shown on the router is translated to another MAC address. If your router’s MAC filter, wireless access control, or ACL is enabled, the devices connected to the extender cannot get an IP address from the extender and cannot access the Internet.
To solve this problem, please follow the steps below:
- Log in to your router and disable the MAC filter, wireless access control or ACL.Note: For more information about how to disable your router’s MAC filter, wireless access control or ACL, please refer to your router’s user guide.
- Power on your extender, and run the Quick Setup to configure your extender.
- Connect all of your devices to the extended network.
- On your router, add all the Online Devices’ MAC addresses to your router’s MAC filter table.
- Enable the router’s MAC filter, wireless access control, or ACL to complete the configuration.
Q2. What can I do if I forget the password of my cloud account bound to the range extender?
A TP-Link account is bound to the TP-Link devices so that the customer can manage their devices remotely. If you forget the password of your TP-Link Cloud account, please follow the steps below to reset your password.
Method 1. Via the web management page
- Connect your computer to the range extender either via Ethernet or wirelessly. Launch a web browser, enter http://www.tplinkrepeater.net in the address bar.
- On the web management page of the range extender, click Forgot password?.
- Enter the email address you bound to your TP-Link cloud account, then click Next.
- A request email will be sent to your mailbox. Follow the instructions to reset your password.
- Click Back to Login and log in with your newly set password.
Method 2. Via the Tether App
- Launch the Tether app. Go to the Login page.
- Tap Forgot Password.
- Enter the email used for your TP-Link cloud account in the Email box, and tap Submit.
- A reset request email will be sent to your mailbox. Follow the instructions to reset your password.