¿Cómo configurar los Routers Wifi de enlace IP y MAC / IP&MAC Binding (nuevo logotipo)?
La vinculación IP y MAC, es decir, la vinculación ARP (Protocolo de resolución de direcciones), se utiliza para vincular la dirección IP del dispositivo de red a su dirección MAC. Esto evitará la suplantación de ARP y otros ataques ARP al denegar el acceso a la red a un dispositivo con una dirección IP coincidente en la lista de enlaces, pero una dirección MAC no reconocida.
Se quiere: Evitar la suplantación de ARP y los ataques ARP/ Prevent ARP spoofing and ARP attacks.
1. Inicie sesión en la interfaz basada en web del router. Si no sabe cómo hacerlo, consulte ¿Cómo inicio sesión en la utilidad basada en web (página de administración) del router inalámbrico TP-Link?
2. Vaya a Avanzado/ Advanced> Seguridad/ Security> Vinculación IP y MAC/ IP & MAC Binding.
3. Habilite el enlace ARP/ ARP Binding.

4. Vincula tu (s) dispositivo (s) según tus necesidades.
Para vincular los dispositivos conectados:
Haga clic  para agregar el dispositivo correspondiente a la Lista de enlaces.
Para vincular el dispositivo desconectado
1) Haga clic en Agregar / Add en la sección Lista de enlaces / Binding List section.
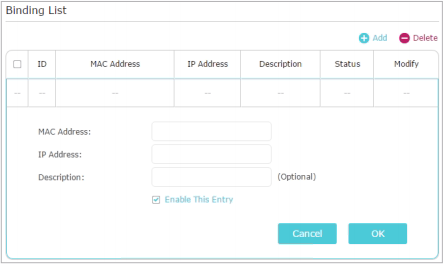
2) Ingrese la dirección MAC y la dirección IP que desea vincular. Ingrese una Descripción para esta entrada vinculante.
3) Marque la casilla de verificación Habilitar esta entrada y haga clic en Aceptar/OK.
¡Hecho! ¡Ahora no necesita preocuparse por la suplantación de ARP y los ataques ARP!
Para conocer más detalles de cada función y configuración, vaya al Centro de descargas para descargar el manual de su producto.
¿Es útil esta pregunta frecuente?
Sus comentarios nos ayudan a mejorar este sitio.


3.0_A_RGB_normal_1584493572647x.png)