Tapo C420S1/C420S2 Setup Guide
Smart Wire-Free Security Camera System
Welcome to the setup guide.
To ensure equal access for all users, we offer this accessible setup guide. This guide is designed to meet accessibility needs, enabling a successful setup. It will introduce the appearance of your camera and hub, including its ports, buttons and labels, and then guide you through connecting the setup process.
Step 1. Know about your camera
In this section, we will describe the camera's appearance, including its ports, buttons, and labels.
1. You can find your camera in the package.
2. Next, place your camera on a horizontal surface, such as on a shelf or desktop. To ensure the camera is placed correctly, you should position the camera lens facing forward, with the mounting holes on the camera side resting against the horizontal surface.
3. After positioning your camera correctly, we will introduce the ports, buttons and labels on your device in a certain order.
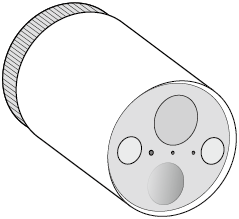
Front

Lens: Located at the top front center for capturing things within its view.
Status LED: Directly below the lens. It shows your camera status. You can check the camera status in the Tapo app.
Light Sensor: It is on the left of the Status LED. For detecting if the environment is dark or bright.
Microphone: It is on the right of the Status LED. For capturing your voice.
Spotlights: On the far left and far right below the lens. Turns on in darkness for night vision to offer color images.
Motion Sensor: Located just below the status LED. Features a semicircular design for detecting motion.
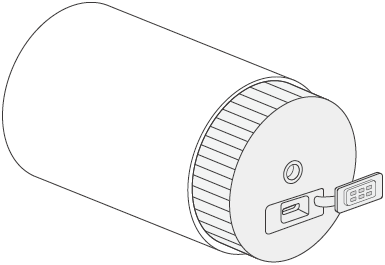
Back
With the lens facing forward, rotate it 180 degrees horizontallly so that the rear end of the camera faces you.


Mounting Hole: Located on the top for securing your camera onto the mounting bracket.
USB Charging Port: Below the mounting hole. Open the silicone cover for USB charging.
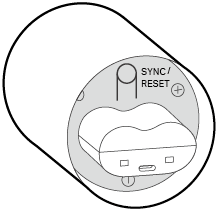
Twist anti-clockwise and then pull to remove the cover of the camera.
SYNC/RESET Button: Located on the top center. Press for 1 second to pair with the hub; press and hold for at least 5 seconds to reset the camera.
Battery Component: Below the SYNC/RESET button for installing the battery.
Step 2. Know about your hub
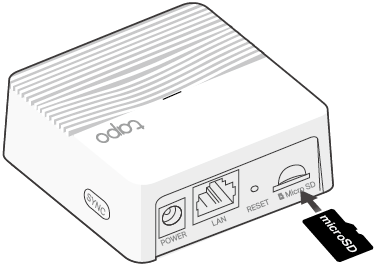
Put your hub on a horizontal surface, such as on a shelf or desktop. To ensure the hub is positioned correctly, make sure the Ethernet port on the back is facing you. We'll explain the ports and buttons in a specific order.

On the back side of thue hub, from left to right:
Power Port: For connecting the power cable.
LAN Port: For connecting the Ethernet cable.
Reset: Use a pin to press and hold the hole for at least 5 seconds until the hub LED quickly blinks red to reset the hub.
microSD Card Slot: Insert a microSD card to record camera videos locally. Initialize the microSD card within the Tapo app first.
SYNC Button: Located on the left side of the hub. Press to pair with the camera, or silence the hub when it rings.
LED: Located in the top center of the hub, at the intersection of the groove and the flat surface. You can check the status in the Tapo app.
Step 3. Set up
1. Get the Tapo app from the App Store or Google Play, then log in.

2. Tap the + button in the app and select your hub and camera model. Follow app instructions to complete setup.
If you need help, please visit https://www.tapo.com/support/ for technical support, the user guide, FAQs, warranty & more.
For details on Tapo app accessibility, please check Accessibility Support.
Safety Information
• Do not use damaged charger or USB cable to charge the device.
• Do not use any other chargers than those recommended.
• Do not use the device where wireless devices are not allowed.
• Adapter shall be easily accessible.
• Keep the device away from fire or hot environments. DO NOT immerse in water or any other liquid.
• Do not disassemble, repair or modify the product.
• Do not place near automatically controlled devices such as fire alarms. Radio waves emitted from this product may cause such devices to malfunction resulting in an accident.
• Observe restrictions on using wireless products in fuel depots, chemical plants or when blasting operations are in progress.
• Do not use liquid to clean the product. Only use a dry cloth.
• Never put metal objects inside the product. If a metal object enters the product turn off the circuit breaker and contact an authorised electrician.
• This product is not intended to be used when providing medical care. Consult the manufacturer of any personal medical devices, such as pacemakers or hearing aids to determine if they are adequality shielded from external RF (radio frequency) energy.
• Do not use this product in health care facilities. Hospitals or health care facilities may be using equipment that could be sensitive to external RF energy.
• Do not place heavy objects on top of the product.
• When you leave the product unused for a long time unplug the product from the power outlet.
• This product may interfere with other electronic products such as TV, radios, personal computers, phones or other wireless devices.
• Camera Operating Temperature: -20 °C ~ 45 °C (-4 °F ~ 113 °F)
Camera Operating Humidity: 10%~90%RH, Non-condensing
Hub Operating Temperature: 0 °C ~ 40 °C (32 °F ~ 104 °F)
Hub Operating Humidity: 10%~90%RH, Non-condensing
• Adapter should be used indoors where the ambient temperature is lower than or equal to 40°C.
• This equipment can be powered only by equipments that comply with Power Source Class 2 ( PS2) or Limited Power Source(LPS) defined in the standard of IEC 62368-1.
| CAUTION! Risk of fire or explosion if the battery is replaced by an incorrect type |
| CAUTION! Avoid replacement of a battery with an incorrect type that can defeat a safeguard. Avoid disposal of a battery into fire or a hot oven, or mechanically crushing or cutting of a battery, that can result in an explosion. Do not leave a battery in an extremely high temperature surrounding environment that can result in an explosion or the leakage of flammable liquid or gas; Do not leave a battery subjected to extremely low air pressure that may result in an explosion or the leakage of flammable liquid or gas. |
Please read and follow the above safety information when operating the device. We cannot guarantee that no accidents or damage will occur due to improper use of the device. Please use this product with care and operate at your own risk.