How to Configure VIGI Cameras and NVRs for Sentinel ARC Integration
Contents
Configure network connectivity
Supported models and firmware versions
Supported functions and event types
Introduction
An Alarm Receiving Centre (ARC) is a centralized facility where operators receive, verify, and respond to security alarms. Sentinel is a comprehensive and highly configurable alarm monitoring platform designed for centralized alarm and video monitoring across remote sites.
Through the integration of supported VIGI cameras and NVRs with Sentinel, alarm notifications and event snapshots can be sent to Sentinel for centralized monitoring and handling.
This article explains the integration topology, network requirements, and VIGI device settings for connecting supported VIGI cameras and NVRs to Sentinel ARC.
Requirements
- Deploy and configure Sentinel ARC, Line Handler, and Video Server.
- Ensure configuration access to Sentinel ARC and VIGI devices.
- Allow communication between Sentinel and the VIGI device through the required SMTP, HTTPS/OpenAPI, and RTSP ports.
- Use supported VIGI camera and NVR models running compatible firmware versions.
- Refer to Supported models and firmware versions.
Configuration
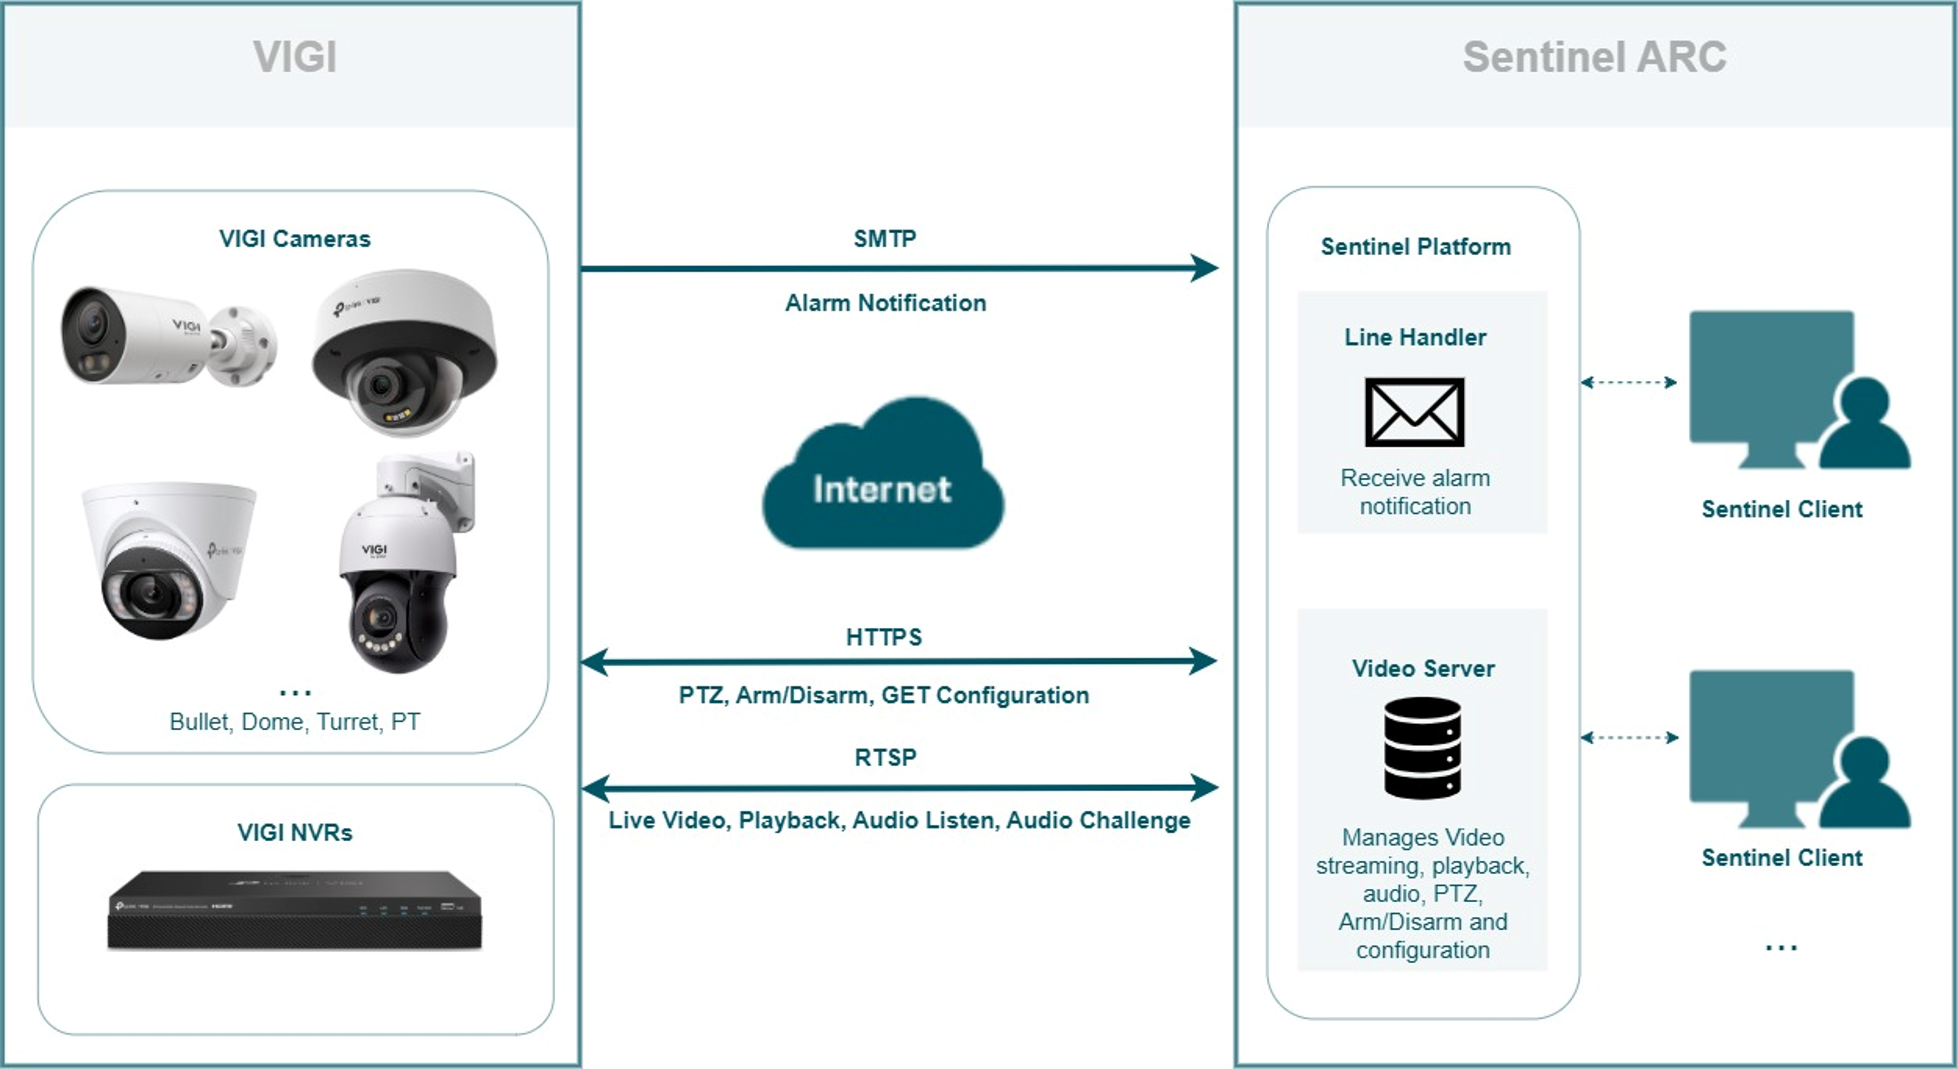
The following topology shows how VIGI cameras and NVRs communicate with Sentinel ARC through Line Handler and Video Server.
Configure network connectivity
Ensure that Sentinel ARC and the VIGI device can communicate through the required services.
- The Sentinel Video Server must be able to reach the VIGI device through the configured HTTPS/OpenAPI and RTSP ports.
- The VIGI device must also be able to reach the SMTP server used by the Sentinel Line Handler.
Before configuring Sentinel ARC, confirm the service ports used by the VIGI Cameras and NVRs:
- OpenAPI: TCP 20443 by default
- RTSP: TCP 554 by default
Use a VPN, public IP address, or domain name to make the VIGI cameras and NVRs reachable from the Sentinel Video Server.
If the VIGI cameras or NVRs are behind a NAT router and no VPN is used, configure port forwarding for the required HTTPS/OpenAPI and RTSP services. In Sentinel, enter the external ports configured on the router for the corresponding HTTPS Port and RTSP Port.
The SMTP server address and port are provided by the ARC and may vary between Sentinel deployments.
Configure Sentinel ARC
This section outlines the main Sentinel ARC configuration items used for the integration.
Step 1. Open Sentinel Operations Centre and create a site record for the VIGI integration. Select TP-Link Camera or TP-Link NVR as the transmitter type, assign an available Signalling ID, and commission the site.
Note: For more information about Sentinel, refer to the Monitor Computer Systems Sentinel product page.
Step 2. For each VIGI camera or NVR, configure a Transmitter with the device login credentials, reachable IP address or domain name, and the corresponding HTTPS/OpenAPI and RTSP ports. Use Get Configuration to retrieve the available camera channels and media resources.
Step 3. Record the numeric Panel ID assigned to each transmitter. This ID is required when configuring the Sender Email on the corresponding VIGI camera or NVR.
Step 4. Add additional transmitters as needed when multiple VIGI devices are monitored under the same site.
Note: For detailed Sentinel configuration instructions, refer to the TP-Link Camera | Sentinel Administrator Guide or TP-Link NVR | Sentinel Administrator Guide
Configure the VIGI camera
Step 1. Log in to the web management page of the VIGI camera.
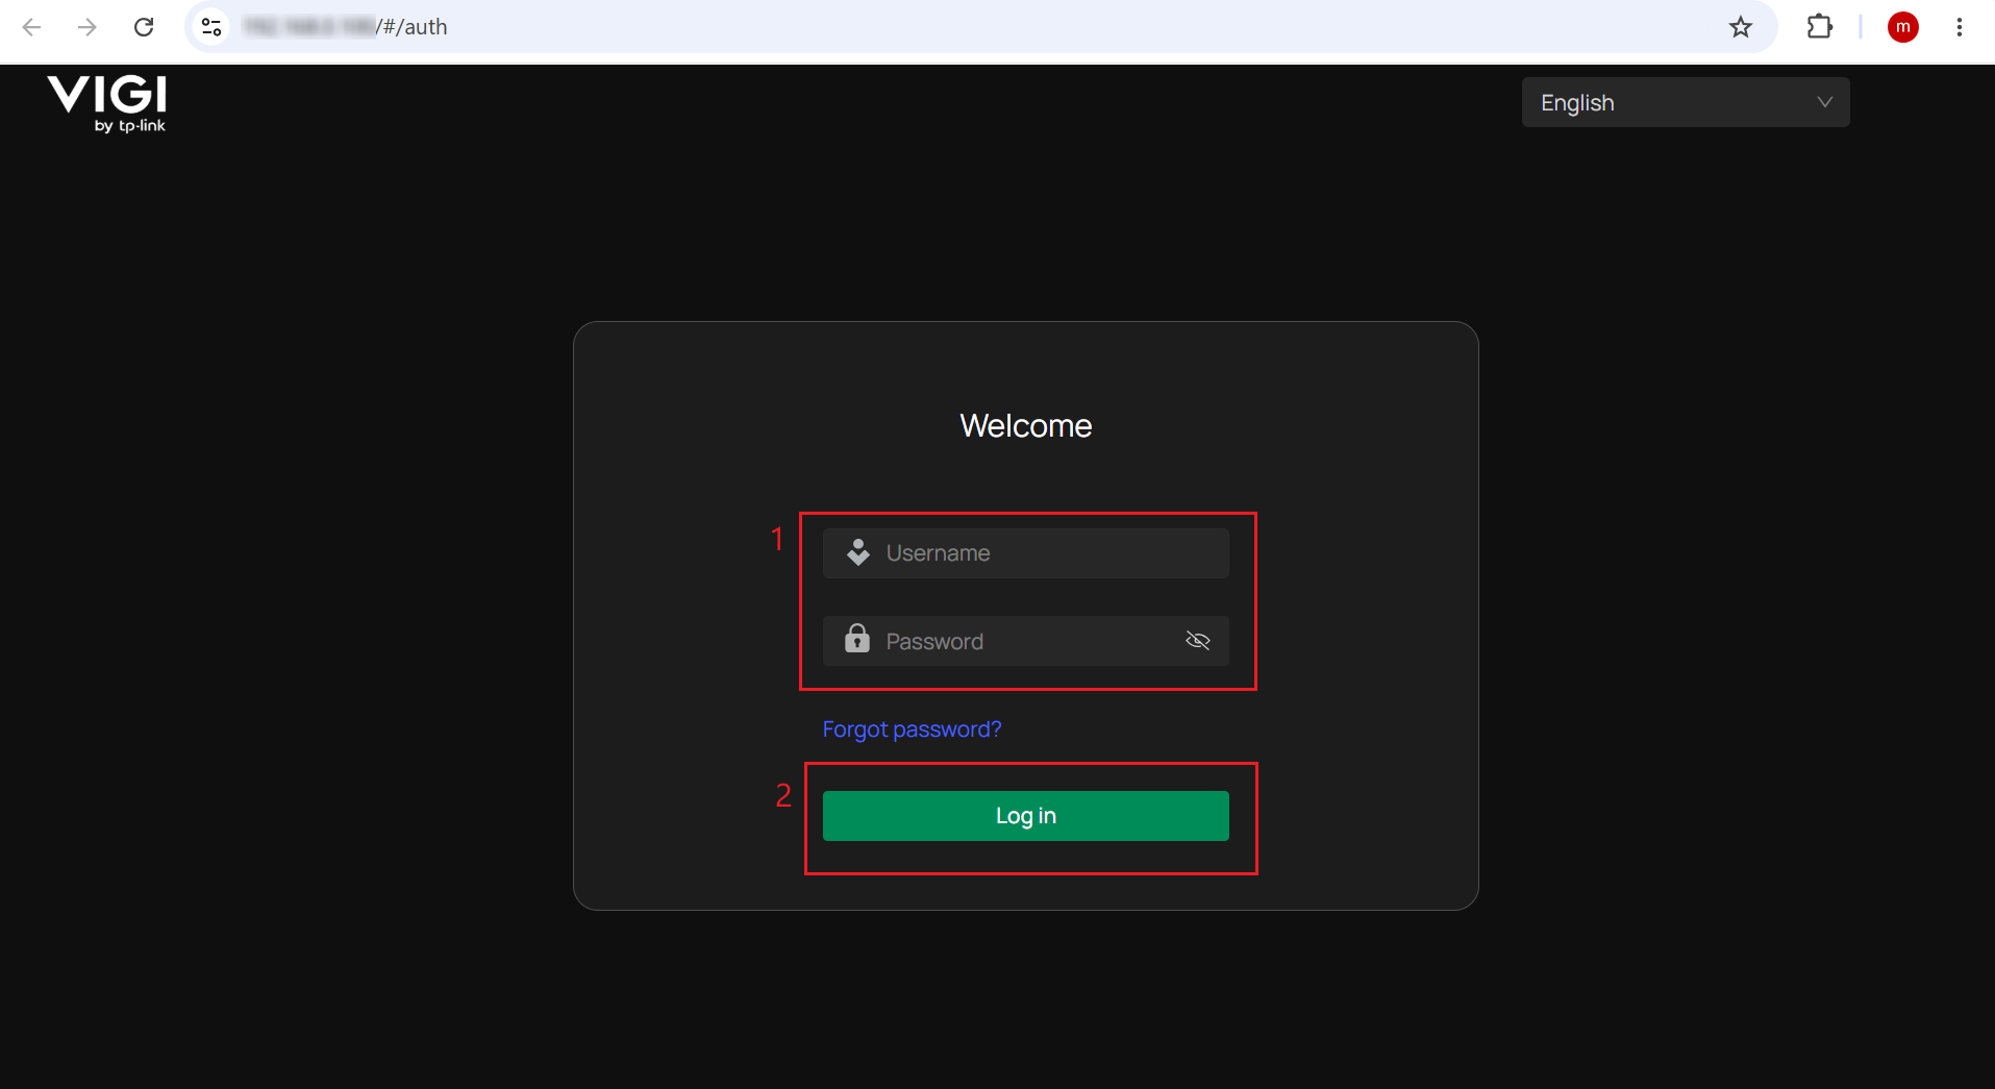
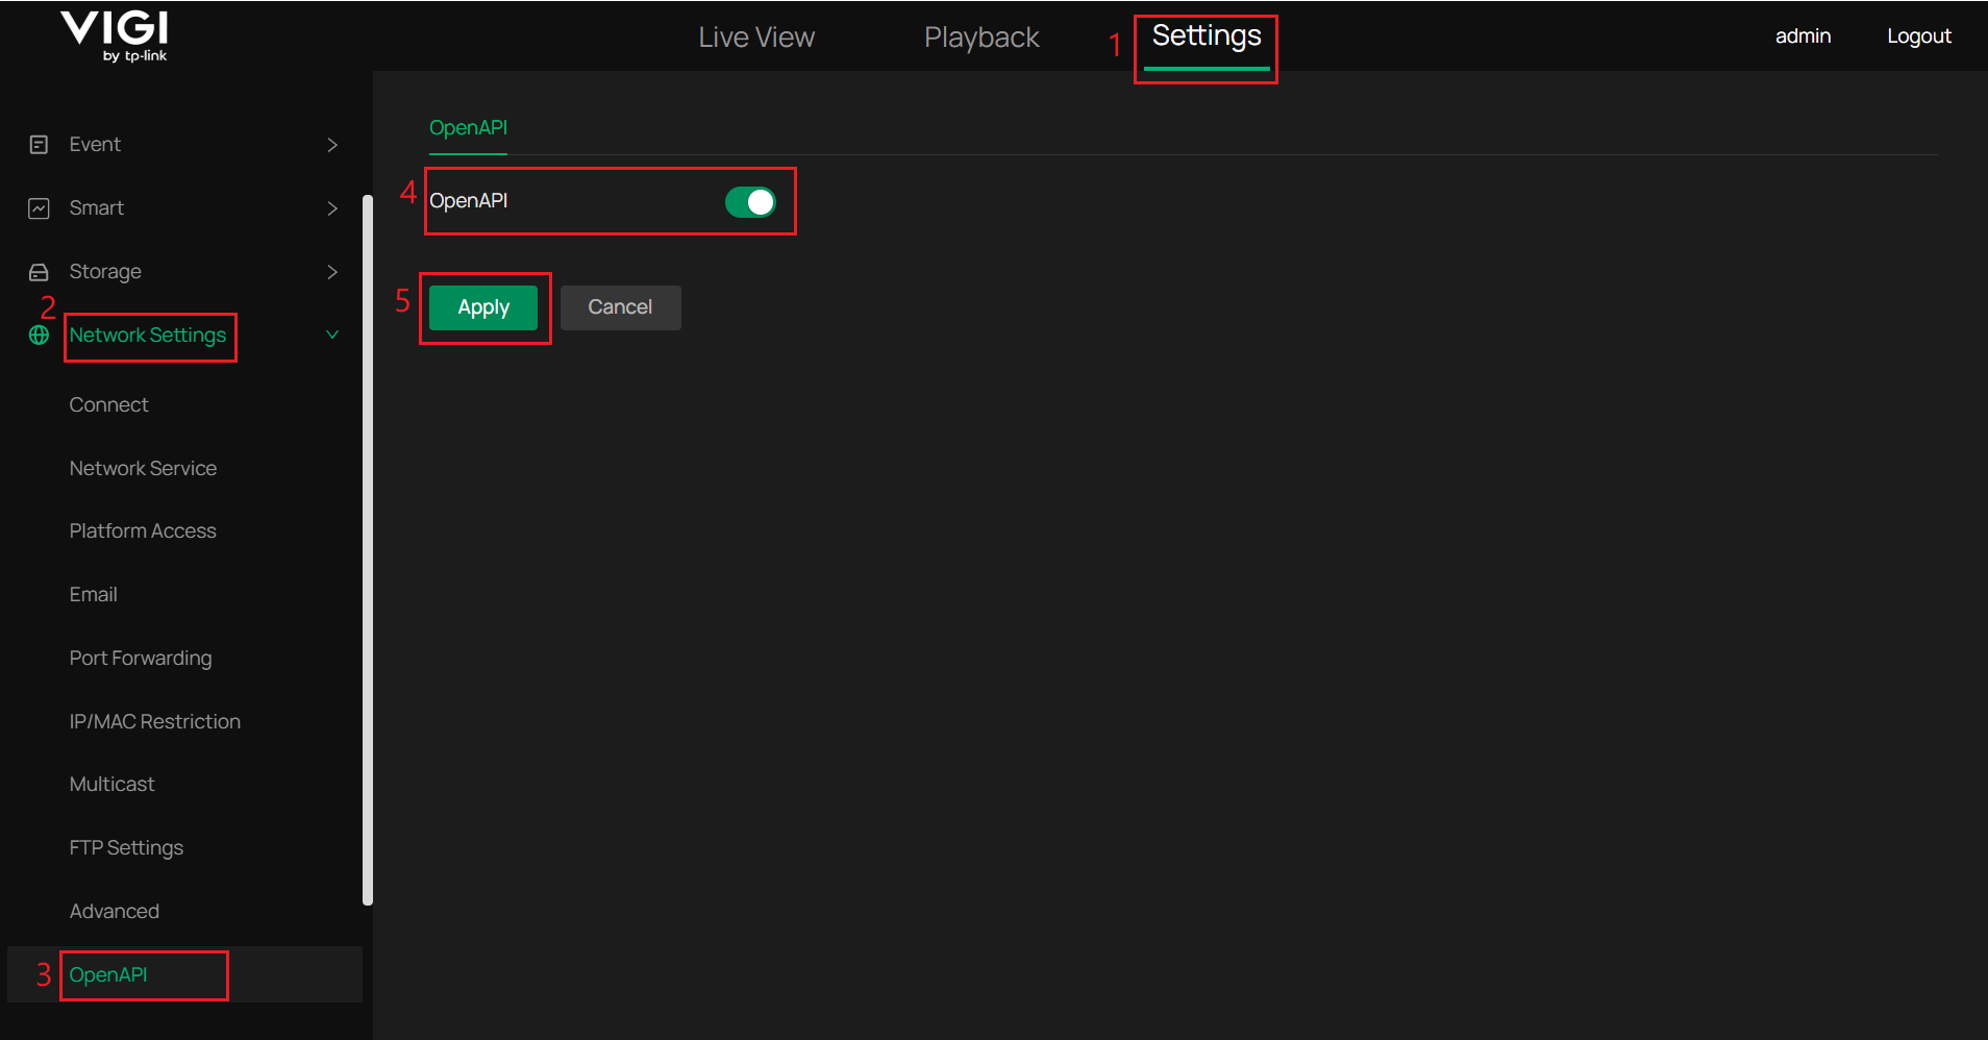
Step 2. Go to Settings > Network Settings > OpenAPI, enable OpenAPI, and click Apply.
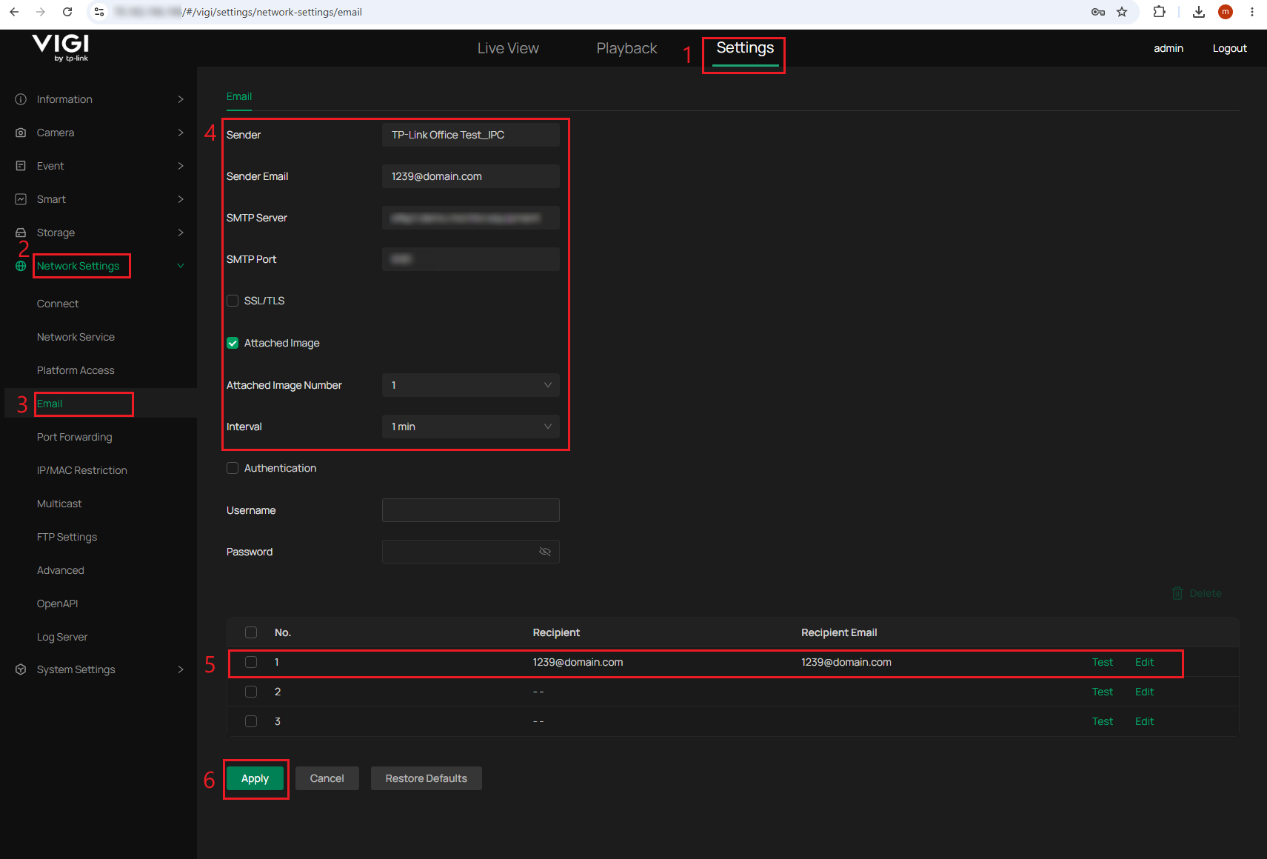
Step 3. Go to Settings > Network Settings > Email > Email, configure the email settings as follows, and click Apply.
- Sender: Enter any descriptive name.
- Sender Email: Enter an email address whose username matches the numeric Panel ID of the corresponding Sentinel transmitter. For example, if the Panel ID is 1239, use 1239@domain.com.
- SMTP Server: Enter the address of the Sentinel Line Handler provided by the ARC.
- SMTP Port: Enter the SMTP port provided by the ARC.
- Attached Image: Enable this option if event snapshots should be included in the alarm notification, and set the required image number.
- Recipient / Recipient Email: Enter valid values. These fields do not affect how Sentinel identifies the transmitter.
After saving the settings, click Test for the configured recipient to verify that the camera can reach the Sentinel SMTP server.
Note: Leave the other settings at their default values unless otherwise specified by the ARC.
Step 4. Configure the event to be reported to Sentinel.
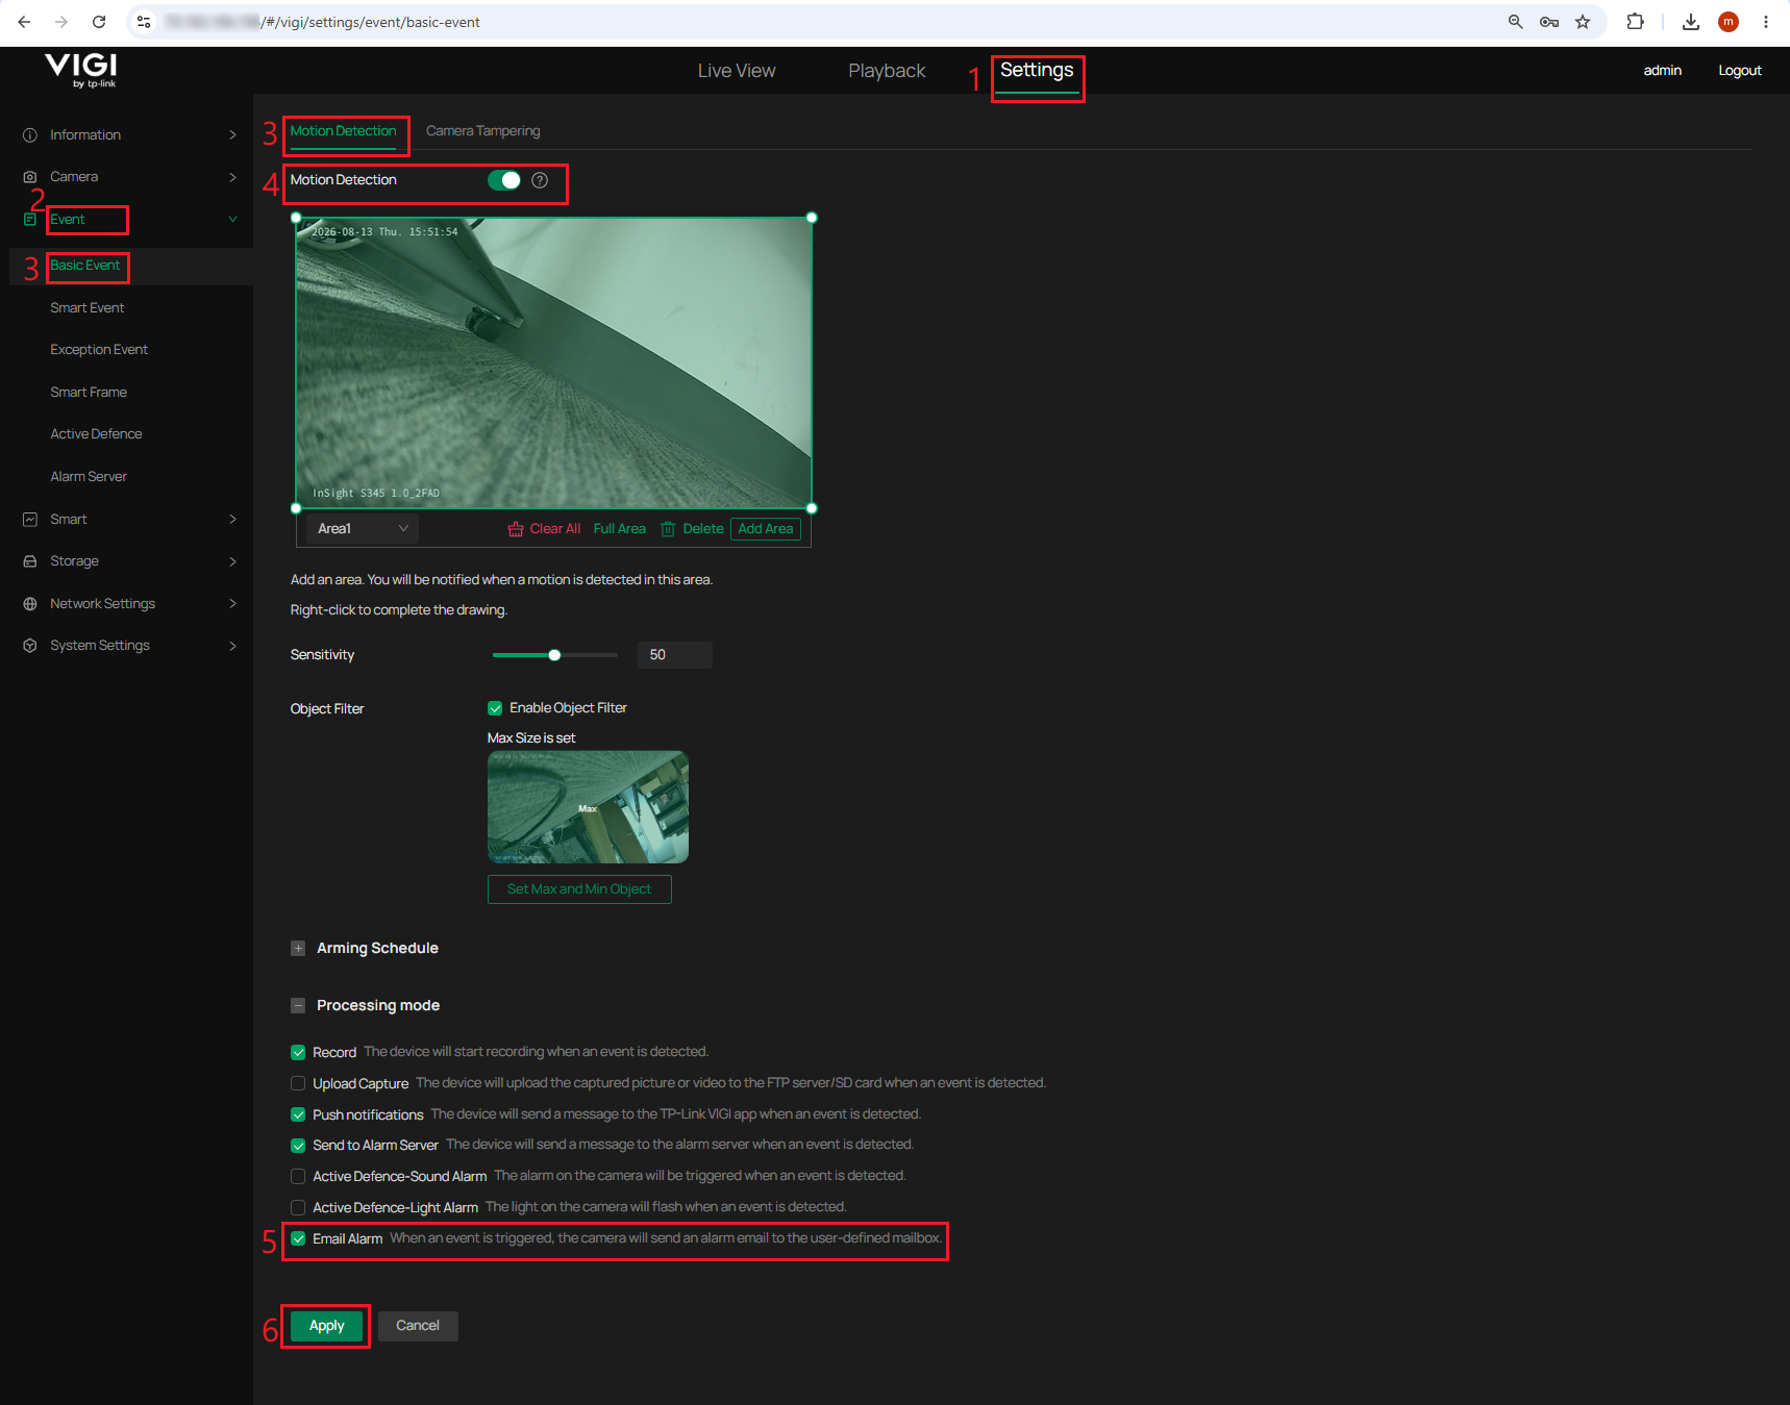
The following uses Motion Detection as an example. Go to Settings > Event > Basic Event > Motion Detection, enable Motion Detection, configure the detection area and related settings as needed, enable Email Alarm under Processing mode, and click Apply.
Configure the VIGI NVR
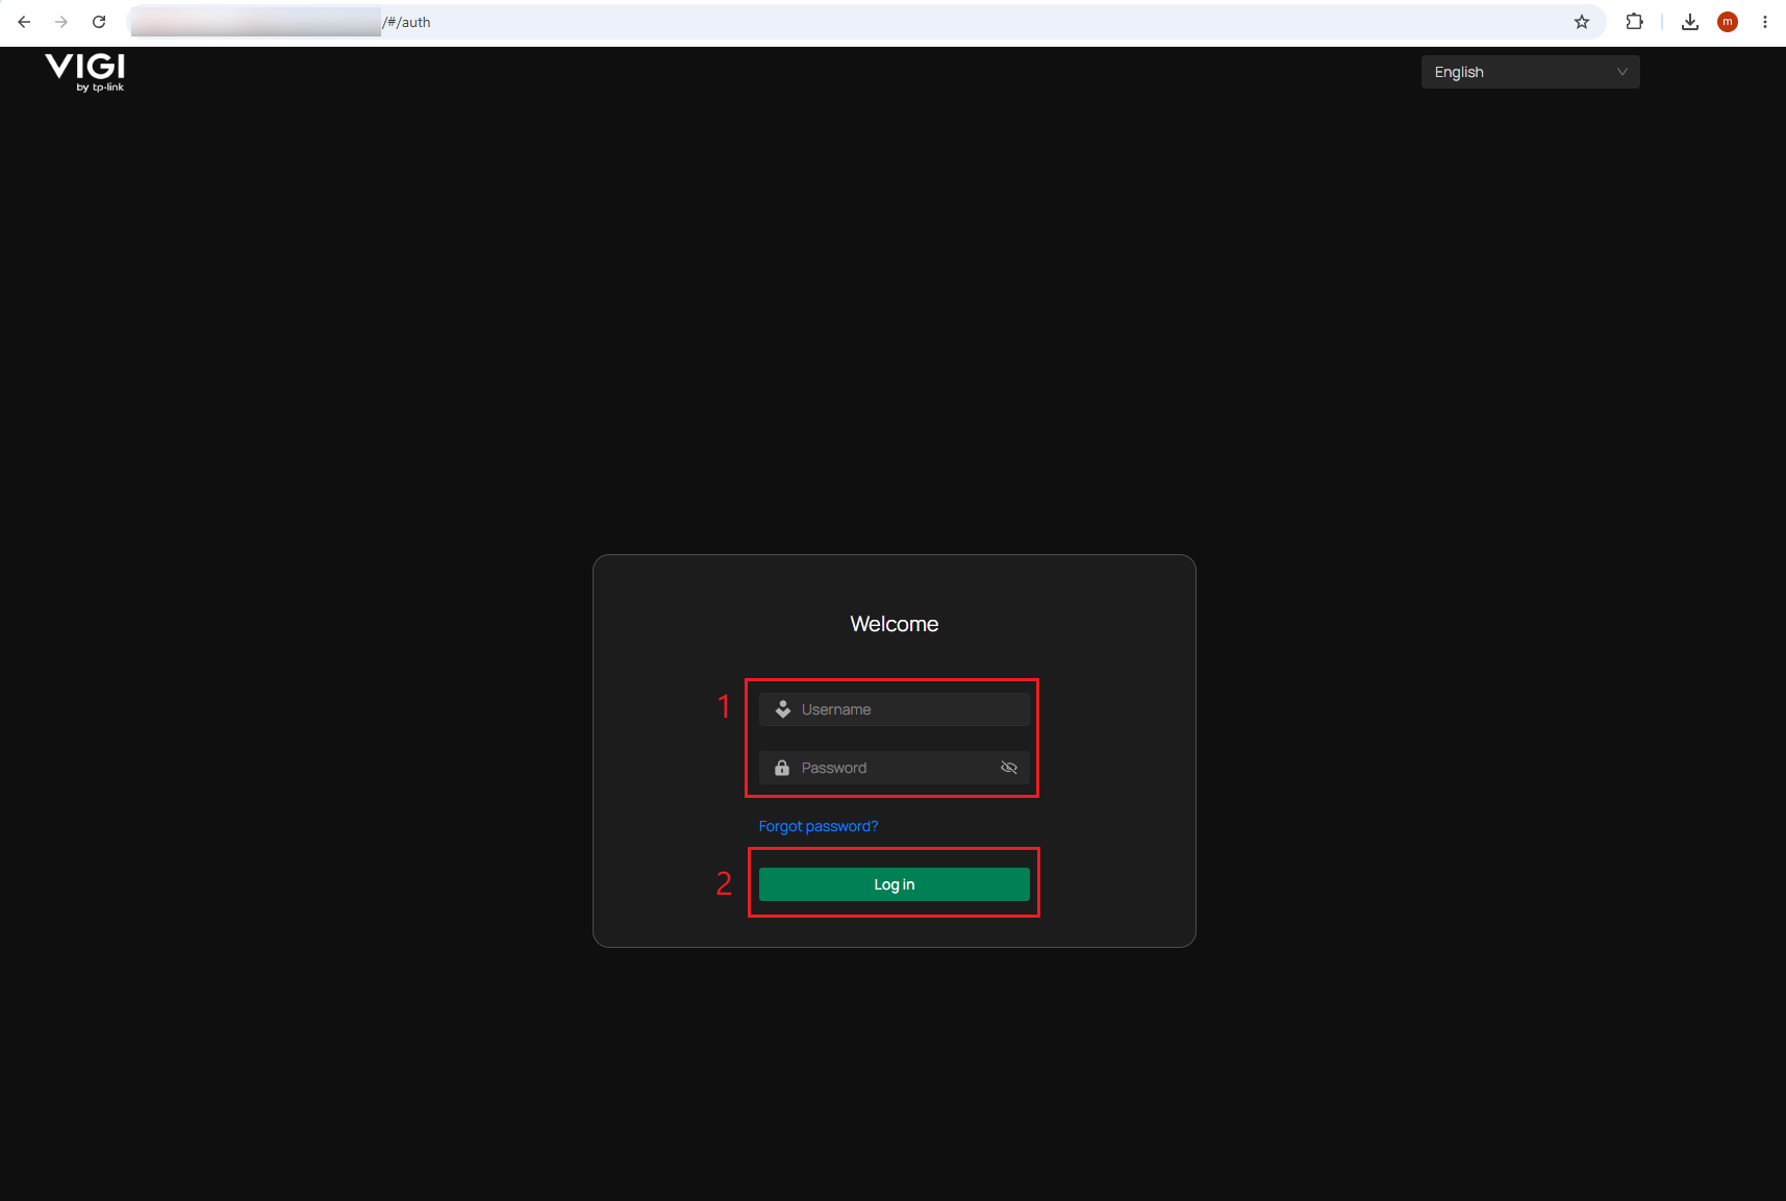
Step 1. Log in to the web management page of the VIGI NVR.
Step 2. Go to Settings > Network > OpenAPI, enable OpenAPI, confirm or configure the OpenAPI Port, and click Apply.
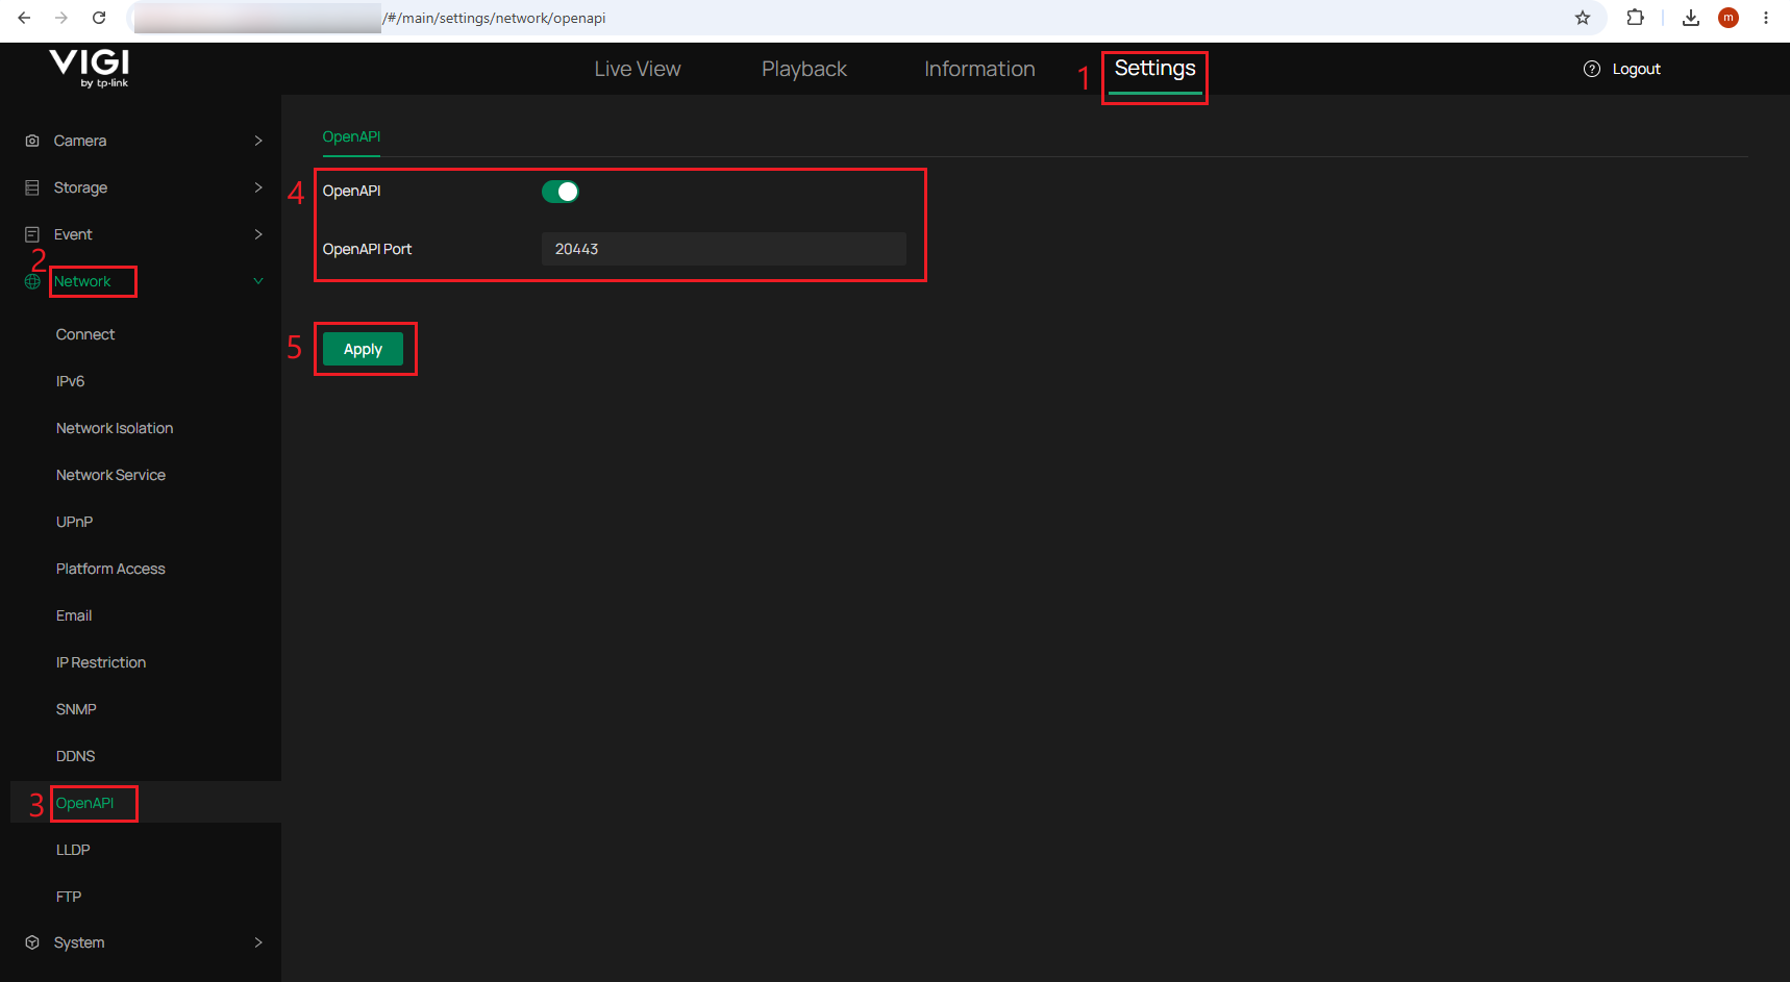
Note: The default OpenAPI port is 20443. The OpenAPI port on a VIGI NVR can be changed.
Step 3. Go to Settings > Network > Email > Email Settings, configure the email settings provided by the ARC, and click Apply.
Configure the following fields:
- Sender: Enter any descriptive name.
- Sender Email: Enter an email address whose username matches the numeric Panel ID of the corresponding Sentinel transmitter. For example, if the Panel ID is 1250, use 1250@domain.com.
- SMTP Server: Enter the address of the Sentinel Line Handler provided by the ARC.
- SMTP Port: Enter the SMTP port provided by the ARC.
- Attached Image: Enable this option if event snapshots should be included in the alarm notification, and set the required image number.
- Recipient Name / Recipient Email: Enter valid values. These fields do not affect how Sentinel identifies the transmitter.
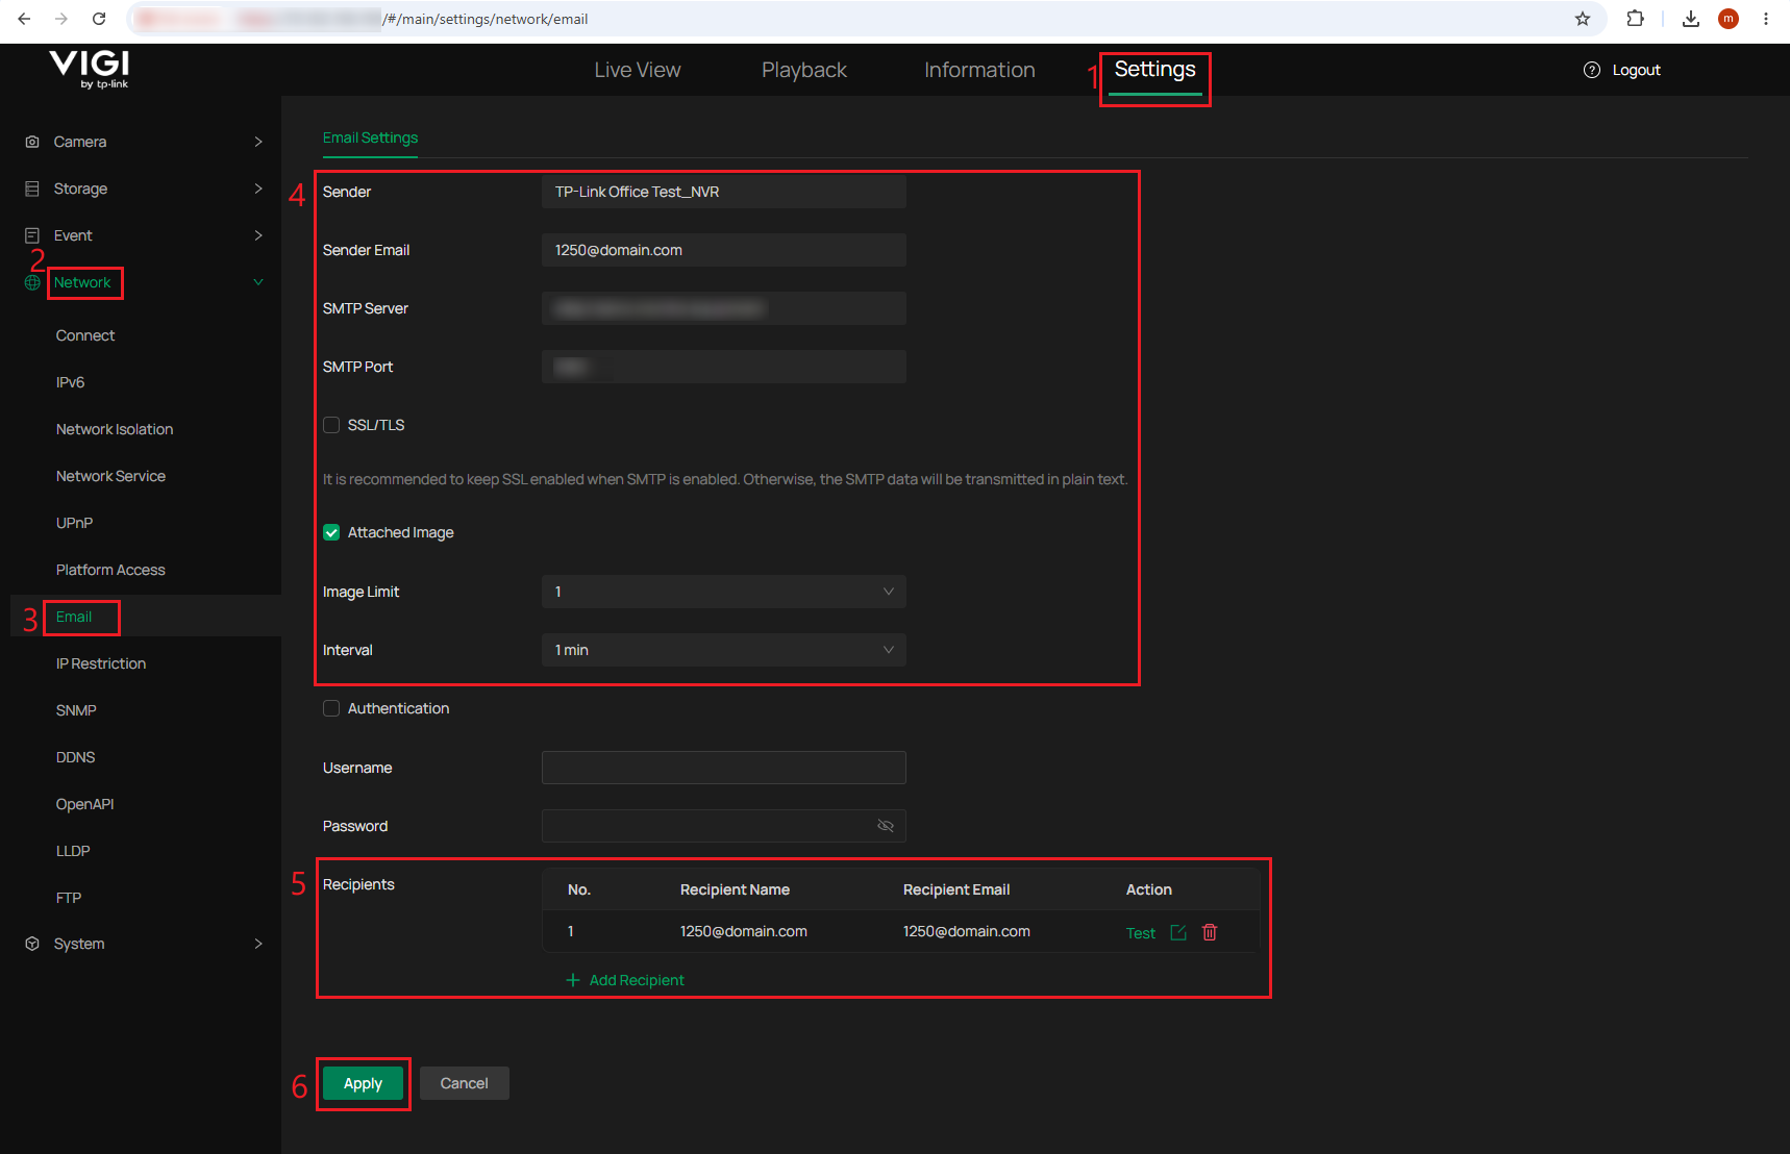
After saving the settings, click Test for the configured recipient to verify that the NVR can reach the Sentinel SMTP server.
Note: Leave the other settings at their default values unless otherwise specified by the ARC.
Step 4. Configure the event for each NVR channel that should report alarms to Sentinel. The following uses Human Detection as an example. Go to Settings > Event > Smart Event > Human Detection, select the required channel, configure the detection settings as needed, enable Send Email under Processing Mode, and click Apply.
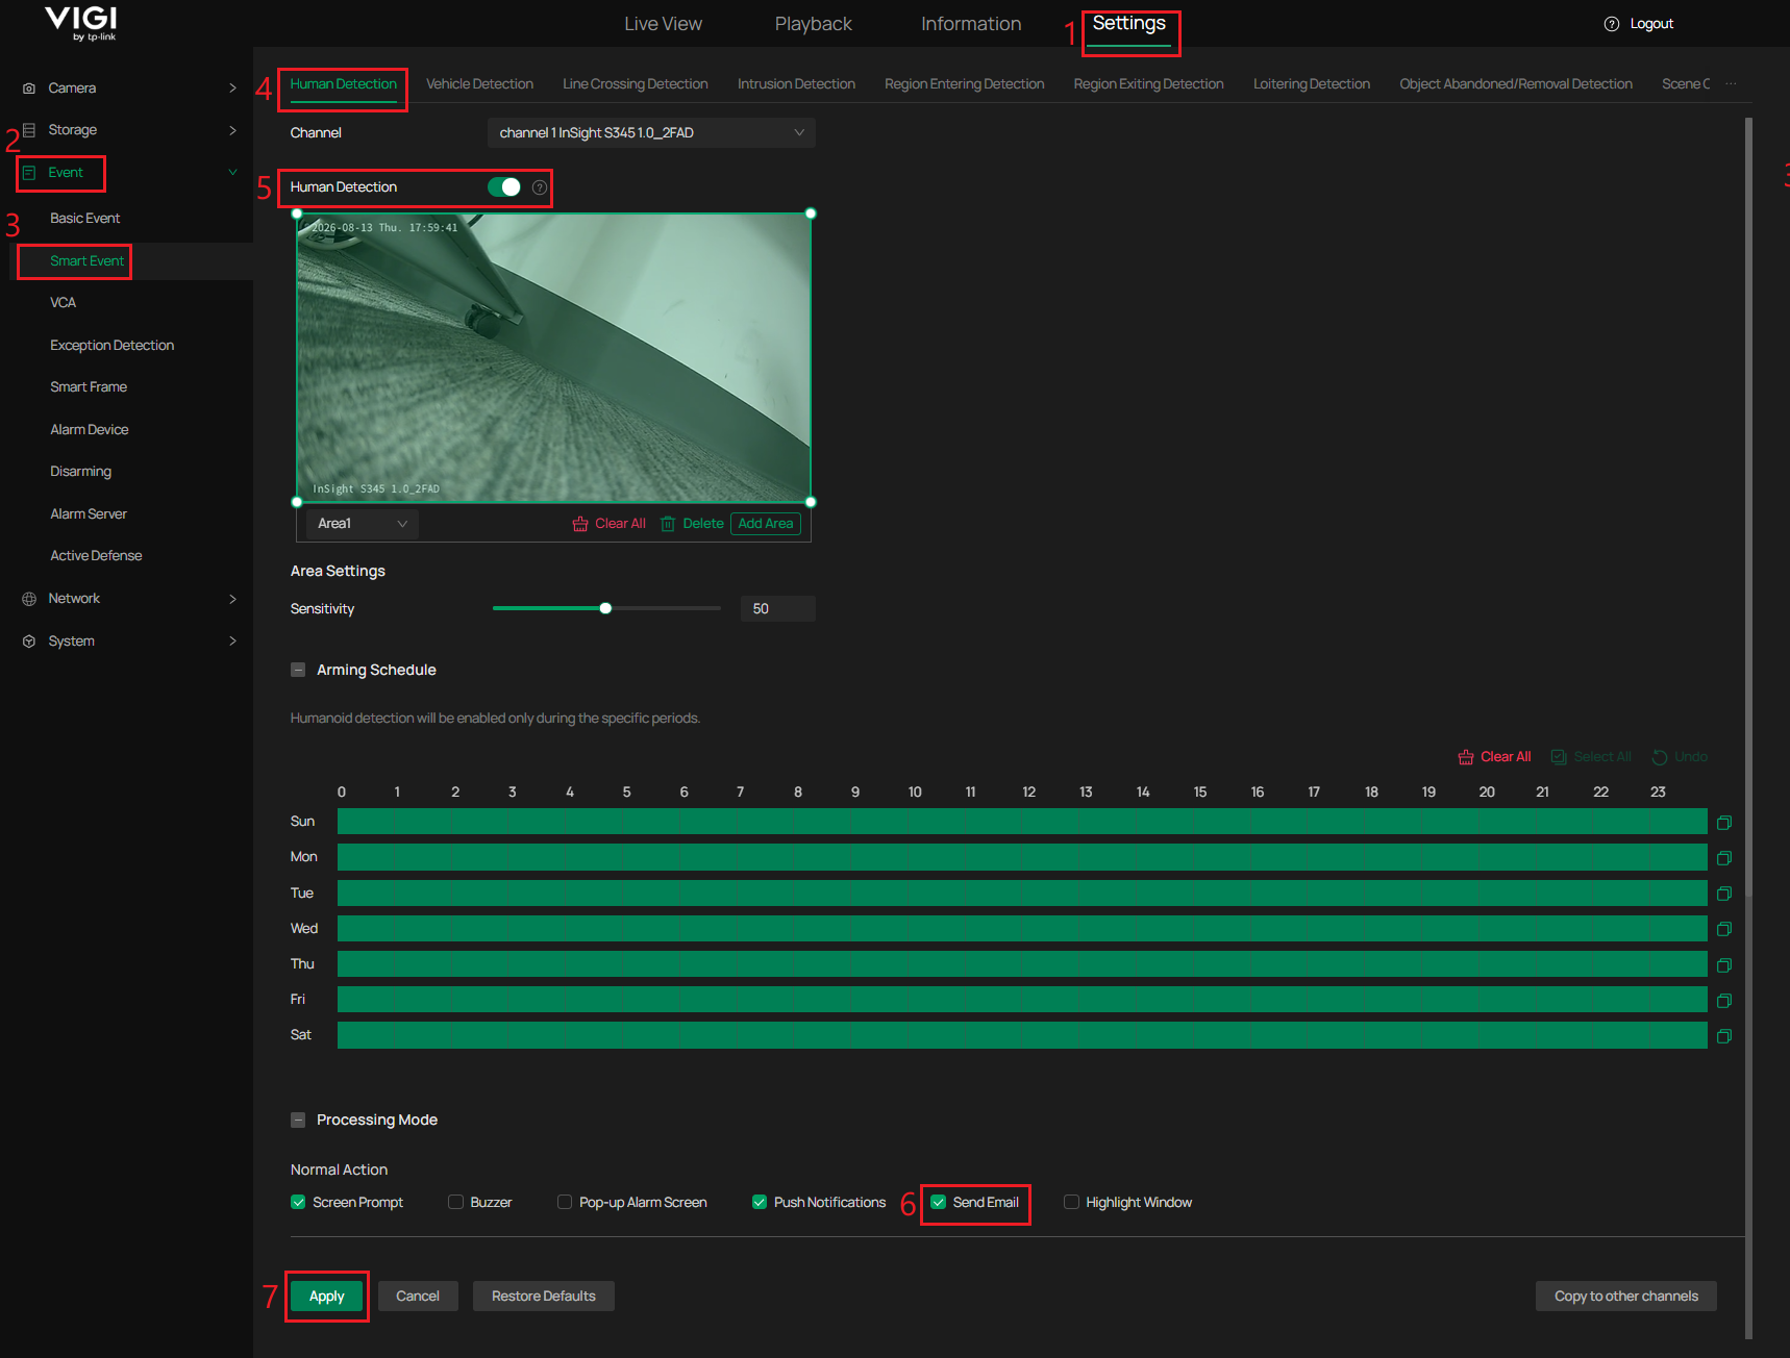
Note: Repeat this configuration for each channel and event type that should report alarms to Sentinel.
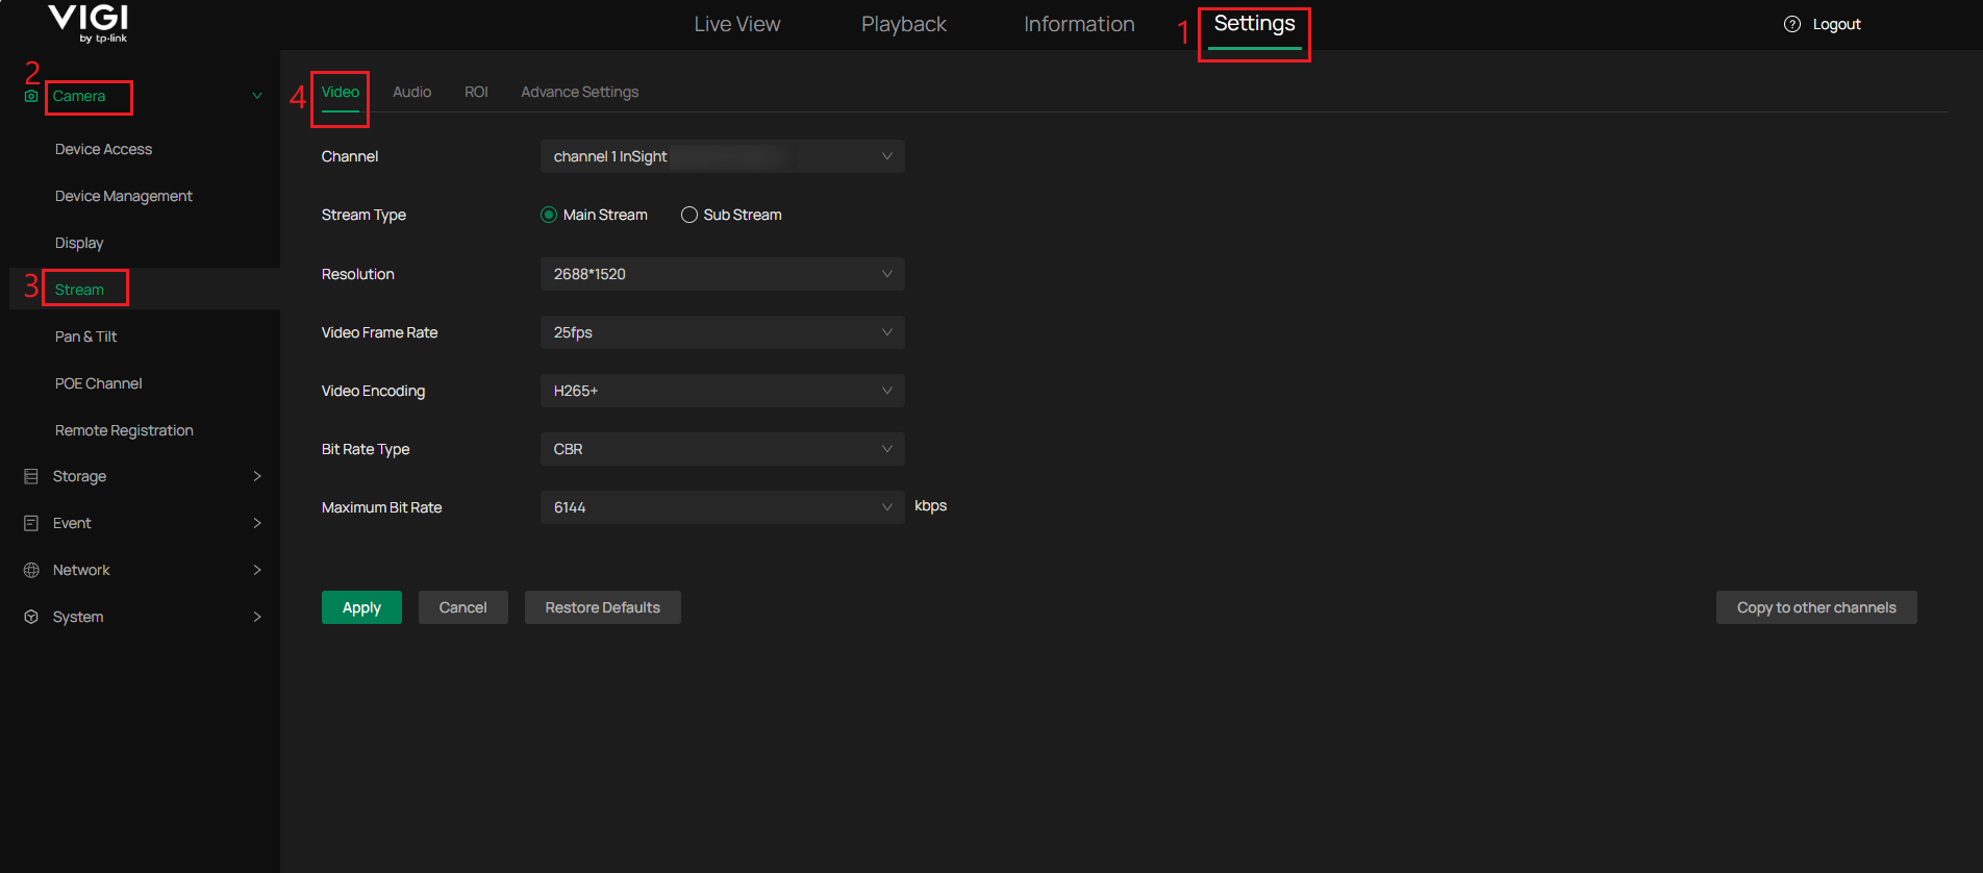
Step 5. Configure the video streams used for live view and playback.
Go to Settings > Camera > Stream. Configure the Main Stream with higher quality than the Sub Stream.
For playback through Sentinel, go to Settings > Storage > Recording Control and ensure that the required cameras are configured to record the Main Stream or Both, as Sentinel uses the Main Stream for archive playback by default.
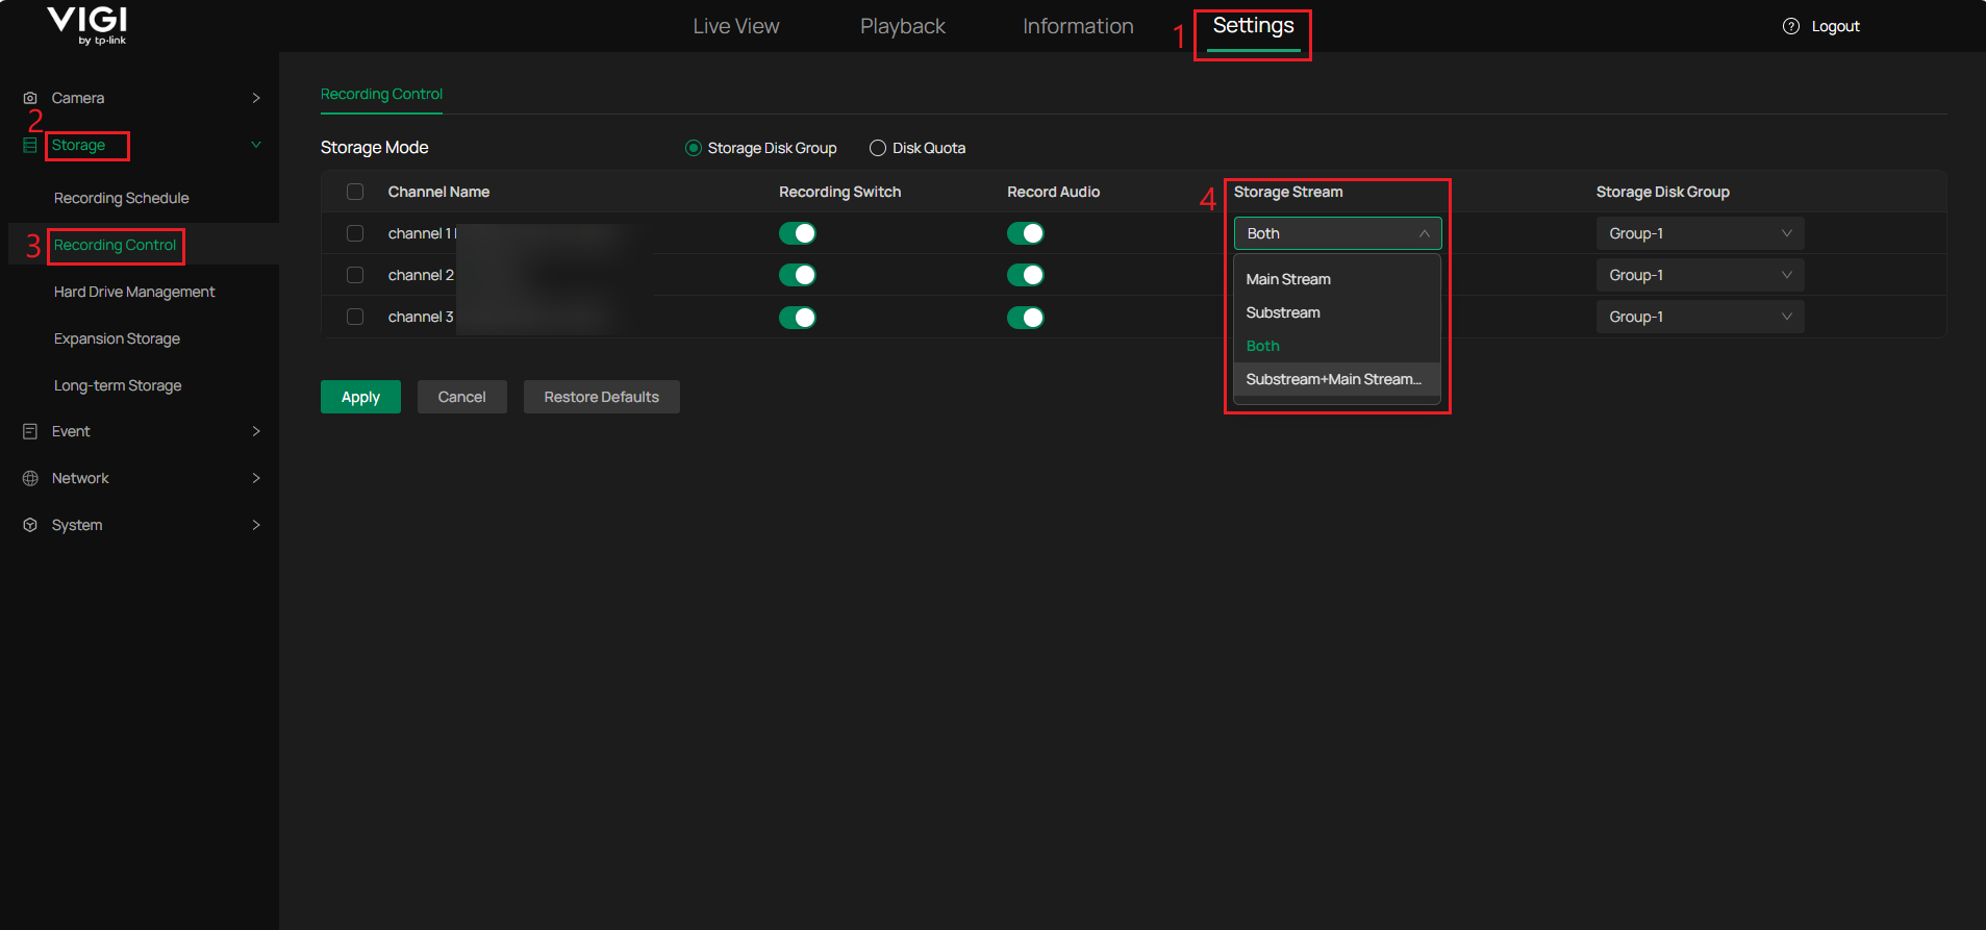
Note: By default, Sentinel uses the Main Stream for high-quality live view and the Sub Stream for medium- or low-quality live view. For archive playback, recording the Main Stream is recommended. VIGI NVR supports recording the Main Stream, Sub Stream, or both. If only the Sub Stream is recorded, for example due to storage limitations, Sentinel can be configured to use the Sub Stream for archive playback, but additional configuration on the Sentinel side is required.
Supported models and firmware versions
The following tables list the supported VIGI NVRs and cameras, together with the hardware versions and required firmware versions for Sentinel ARC integration.
Ensure that the device is running a supported firmware version before configuring the integration.
Supported VIGI NVR models:
|
Model |
Hardware Version |
Required Firmware Version |
|
VIGI NVR2016H-16MP (UN) |
2.0 |
1.7.1 Build 260717 |
|
VIGI NVR2008H-8MP (UN) |
2.0 |
1.7.1 Build 260717 |
|
VIGI NVR2016H-16P (UN) |
2.0 |
1.8.0 Build 260717 |
|
VIGI NVR2016H (UN) |
2.0 |
1.8.0 Build 260717 |
|
VIGI NVR1008H-8MP (UN) |
1.20 |
1.6.0 Build 260730 |
|
VIGI NVR1008H-8P (UN) |
1.20 |
1.6.0 Build 260730 |
|
VIGI NVR1008H (UN) |
2.30 |
1.6.0 Build 260730 |
|
VIGI NVR1016H (UN) |
1.20 |
1.6.0 Build 260730 |
Supported VIGI camera models:
|
Model |
Hardware Version |
Required Firmware Version |
|
VIGI C345 |
1.0/1.6 |
3.3.2 Build 260708 |
|
VIGI C445 |
1.0/1.6 |
3.3.2 Build 260708 |
|
InSight S245 |
1.0/1.6 |
3.3.2 Build 260708 |
|
InSight S345 |
1.0/1.6 |
3.3.2 Build 260708 |
|
InSight S445 |
1.6 |
3.3.2 Build 260708 |
|
VIGI C385 |
1.0 |
3.3.2 Build 260713 |
|
VIGI C485 |
1.0 |
3.3.2 Build 260713 |
|
InSight S285 |
1.0/1.6 |
3.3.2 Build 260713 |
|
InSight S385 |
1.0/1.6 |
3.3.2 Build 260713 |
|
InSight S485 |
1.0/1.6 |
3.3.2 Build 260713 |
|
InSight S245ZI |
1.0/1.6 |
1.5.1 Build 260708 |
|
InSight S345ZI |
1.0/1.6/1.8 |
1.5.1 Build 260708 |
|
InSight S445ZI |
1.0/1.6/1.8 |
1.5.1 Build 260708 |
|
InSight S245ZI |
1.20/1.26 |
1.5.1 Build 260708 |
|
InSight S345ZI |
1.20/1.26 |
1.5.1 Build 260708 |
|
InSight S445ZI |
1.20/1.26 |
1.5.1 Build 260708 |
|
InSight S655I |
1.0/1.6/1.20/1.26 |
1.3.1 Build 260708 |
|
VIGI C355 |
1.0 |
3.3.1 Build 260708 |
|
VIGI C455 |
1.0 |
3.3.1 Build 260708 |
|
InSight S355 |
1.0/1.6 |
3.3.1 Build 260708 |
|
InSight S455 |
1.0/1.6 |
3.3.1 Build 260708 |
|
InSight S385PI |
1.0/1.6 |
Upcoming release |
|
InSight S485PI |
1.0/1.6 |
Upcoming release |
|
InSight S345-4G |
1.0 |
Upcoming release |
|
InSight S245 |
1.20/1.26 |
Upcoming release |
|
InSight S345 |
1.20/1.26 |
Upcoming release |
|
InSight S445 |
1.20/1.26 |
Upcoming release |
|
InSight S355 |
1.20/1.26 |
Upcoming release |
|
InSight S455 |
1.20/1.26 |
Upcoming release |
|
InSight S345S |
1.0/1.6 |
Upcoming release |
|
InSight S445S |
1.0 |
Upcoming release |
|
InSight PTZ5425 |
1.0/1.6 |
Upcoming release |
Note: Models marked Upcoming release will be supported after the corresponding firmware is officially released.
Supported functions and event types
Sentinel supports the following functions and event types when integrated with supported VIGI cameras and NVRs. Available functions may vary depending on the device capabilities and Sentinel version.
Supported functions
VIGI cameras:
|
Feature |
Sentinel Version |
Method/Comments |
|
Alarm Notification |
3.162 |
Through the Generic Line interface as email (SMTP) |
|
Video/Image on Alarm |
3.162 |
Snapshots attached to email |
|
Live Video |
3.162 |
Supported through MULTITRANS protocol |
|
Video History/Playback |
3.162 |
Supported through MULTITRANS protocol |
|
Audio Listen |
3.162 |
Supported through MULTITRANS protocol |
|
Audio Challenge |
3.162 |
Supported through MULTITRANS protocol |
|
PTZ |
3.162 |
Supported through HTTPS |
|
Arm/Disarm |
3.162 |
Supported through HTTPS |
|
Get Configuration |
3.162 |
Supported through HTTPS |
VIGI NVRs
|
Feature |
Sentinel Version |
Method/Comments |
|
Alarm Notification |
3.162 |
Through the Generic Line interface as email (SMTP) |
|
Video/Image on Alarm |
3.162 |
Snapshots attached to email |
|
Live Video |
3.162 |
Supported through RTSP |
|
Video History/Playback |
3.162 |
Supported through RTSP |
|
Audio Listen |
3.162 |
Supported through RTSP |
|
Audio Challenge |
3.163 |
Supported through MULTITRANS protocol |
|
PTZ |
3.162 |
Supported through HTTPS |
|
Arm/Disarm |
3.162 |
Supported through HTTPS |
|
Get Configuration |
3.162 |
Supported through HTTPS |
Supported camera and NVR events
|
VIGI Event |
Sentinel Derived Event |
|
Area Entry Detection |
Geofence Entered |
|
Area Leave Detection |
Geofence Exceeded |
|
Audio Anomaly Detection |
Audio Loss |
|
Cross Line Detection |
Line Crossed |
|
Drop and Take Detection |
Object Left |
|
Invasion Detection |
Overcrowding |
|
Loiter Detection |
Loitering |
|
Motion Detection |
Video Motion Alarm |
|
People Detection |
Person Detected |
|
Scene Change Detection |
Scene Changed |
|
Tamper Detection |
CCTV Tamper |
|
Vehicle Detection |
Vehicle Detected |
Additional camera events
|
VIGI Event |
Sentinel Derived Event |
|
Motion Detection (Human) |
Video Motion Alarm |
Additional NVR events
|
VIGI Event |
Sentinel Derived Event |
|
Fan working abnormally |
Fan Fail |
|
Hard drive exception |
DVR Disc Error |
|
Hard drive reallocated count error |
DVR Disc Error |
|
IPC IP conflicts |
IP Conflict |
|
Login Exception |
Login Failed |
|
No disk |
DVR Disc Error |
|
No enough space of hard drive |
DVR Storage Over Limit |
|
Video signal loss |
Video Loss Alarm |
Note: Supported event types may vary depending on the VIGI device model, firmware version, and available detection features.
Verification
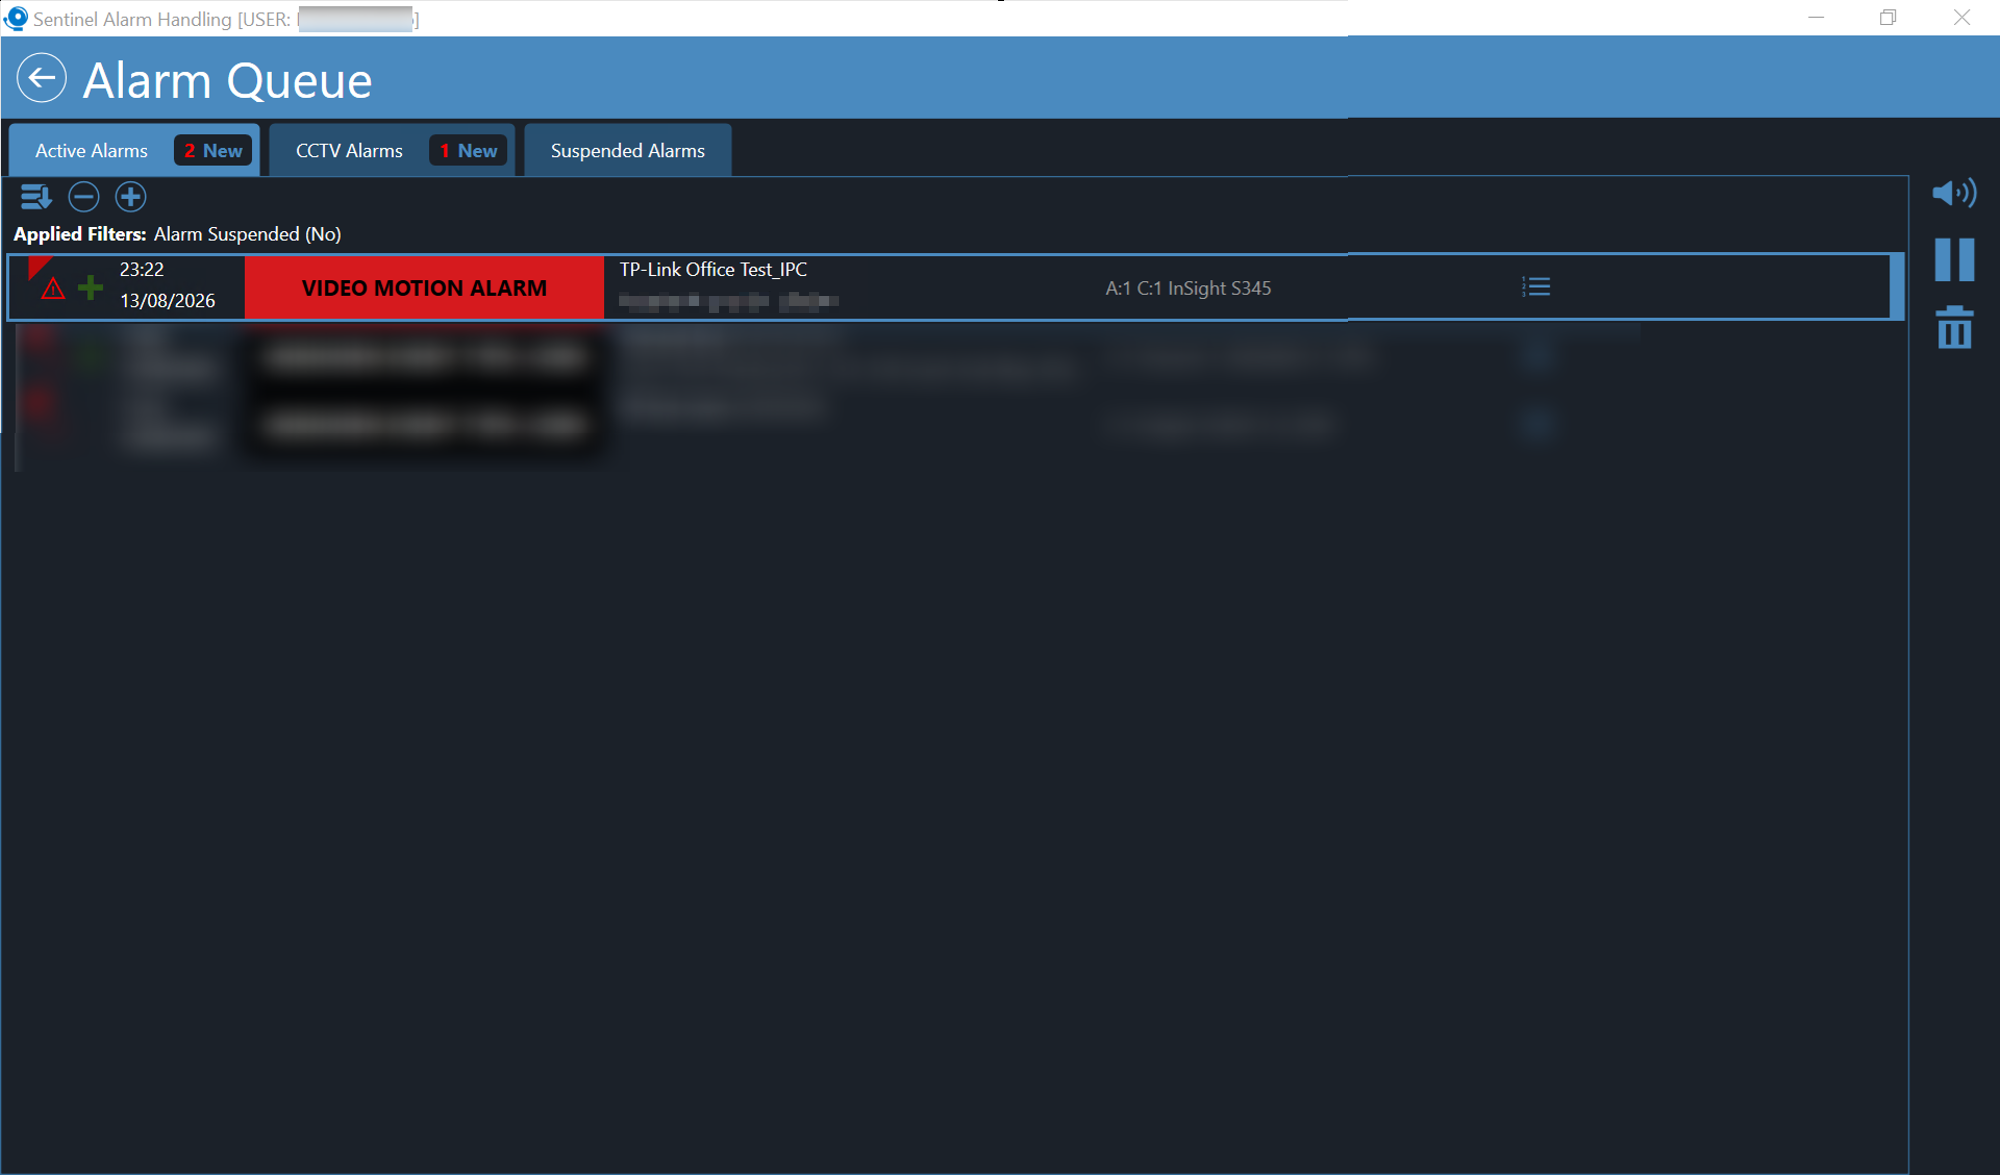
The following verification uses a VIGI camera integration as an example to confirm live video access, Arm/Disarm, and alarm reception in Sentinel. The same verification steps can be performed for a VIGI NVR.
Step 1. In Sentinel Operations Centre, click Open CCTV, then select the camera in the CCTV window and confirm that the live video can be viewed.
Use the shield control to switch between Arm and Disarm, and confirm that the status changes accordingly. After verification, switch the camera back to Arm before testing alarm reception.
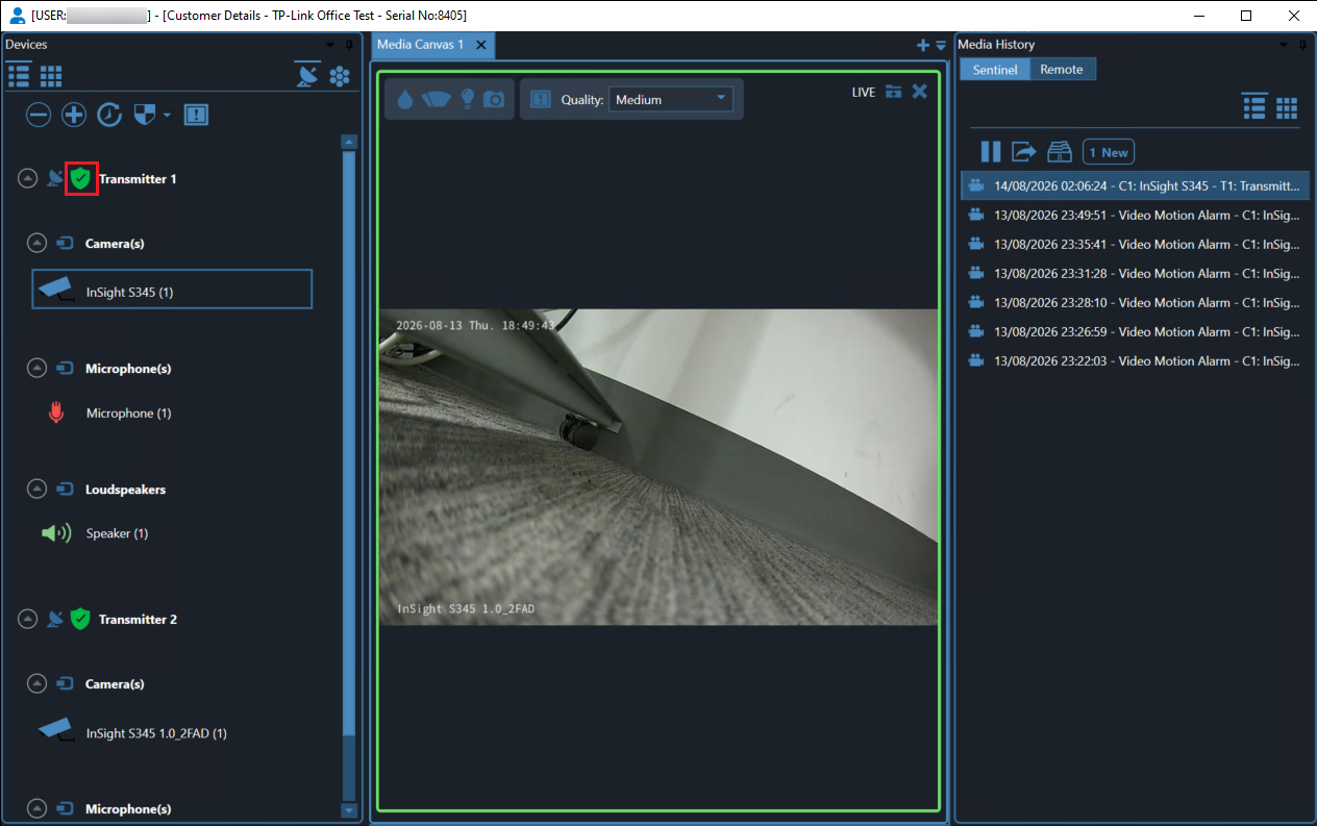
Step 2. Trigger a configured event on the VIGI camera. In Sentinel Alarm Handling, confirm that the triggered alarm appears in Alarm Queue for the correct site and camera.
Conclusion
You have now configured Sentinel ARC integration with supported VIGI cameras and NVRs, enabling alarm notifications, live video, playback, and supported remote control functions through Sentinel. By ensuring the required network connectivity, Sentinel configuration, and VIGI device settings are correctly configured, security events can be centrally monitored and managed through the Sentinel platform.
To learn more about each function and configuration, please visit Support Home to download or check the manual for your product.
QA
Q1: What port should I configure in Sentinel if port forwarding is used for the VIGI camera or NVR?
A1: If the VIGI camera or NVR is behind a NAT router and port forwarding is configured, enter the corresponding external ports in Sentinel for the HTTPS Port and RTSP Port.
Q2: What should I check if Sentinel cannot retrieve the VIGI device configuration?
A2: Verify that OpenAPI is enabled on the VIGI device and that the Sentinel Video Server can reach the configured IP address or domain name through the specified HTTPS/OpenAPI and RTSP ports. Also verify that the device username and password configured in Sentinel are correct.
Q3: What should I check if alarms are not received by Sentinel?
A3: Verify that the VIGI device can reach the SMTP server provided by the ARC, and confirm that the configured SMTP Server, SMTP Port, and Sender Email are correct. The username part of the Sender Email must match the numeric Panel ID of the corresponding Sentinel transmitter. Also ensure that Email Alarm or Send Email is enabled for the required event.
À procura de Mais
Este guia foi útil?
A sua resposta ajuda-nos a melhorar o nosso site.



TP-Link Community
Still need help? Search for answers, ask questions, and get help from TP-Link experts and other users around the world.