How to Set Up a TP-Link Router Without a Computer (Mobile-Only Setup)
By Laviet Joaquin, Head of Marketing, TP-Link Philippines | Published: June 18, 2026
_(1)_20260709091450m.png)
Quick Answer
-
Download the free TP-Link Tether app (iOS or Android), connect your phone to the router's default Wi-Fi using the name and password printed on the router label, open Tether, tap your router, and follow the on-screen setup in under 10 minutes, no laptop needed.
-
The most important step is choosing the right connection type: select Dynamic IP if your TP-Link router is plugged into an existing ISP modem, or PPPoE (with your ISP credentials) if the router is plugged directly into a fiber ONT box. If you are unsure which applies to your setup, call your ISP hotline before starting.
-
After setup completes, do three things immediately: update the firmware through the Tether app, write down your Wi-Fi name, password, and admin password somewhere physical, and enable a guest network if you receive visitors or work from home.
You do not need a laptop, a browser, or a LAN cable connected to a computer to set up a TP-Link router in the Philippines. The free Tether app on your Android or iPhone handles the complete setup, connecting to your ISP, naming your Wi-Fi, setting your password, and getting every device in your home online from your phone screen alone.
This guide walks through the exact steps, including which connection type to choose for Globe, PLDT, Converge, and Sky, and how to fix the most common errors Filipino households encounter during setup.
Table of Contents
Before You Start: What You Need Within Reach
How to Connect the Hardware Before Opening the App
How to Set Up Your TP-Link Router Using the Tether App: Step by Step
Three Things to Do Right After Setup Is Complete
Troubleshooting: What to Do When Setup Does Not Work
Before You Start: What You Need Within Reach
Gathering these four things before you open the Tether app prevents most setup interruptions:
-
Your TP-Link router and its power adapter
-
An Ethernet cable (included in the box) to connect the router to your ISP modem
-
Your smartphone (Android 5.0 or later, or iOS 11 or later)
-
Your ISP PPPoE username and password, if your router will connect directly to a fiber ONT box rather than behind an existing modem. If you are unsure, check with your ISP or look at the sticker on the ONT box.
Where to find the router's default Wi-Fi name and password: flip the router over and look at the label on the bottom. The default network name (SSID) usually starts with "TP-Link_" followed by letters or numbers. The default password is also printed there. Take a photo of the label before you begin.
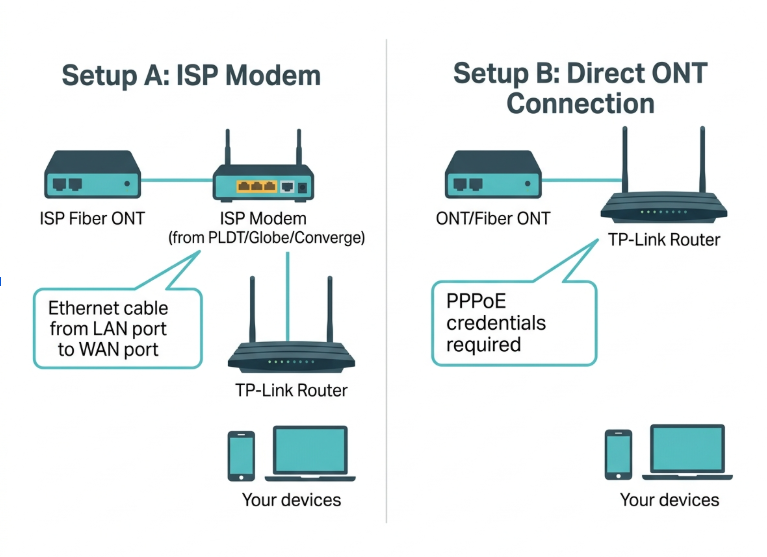
How to Connect the Hardware Before Opening the App
The Tether app handles software setup, but the physical connections need to be correct first. One wrong cable placement is the single most common reason setup fails on the first attempt.
If you have an ISP modem (most Philippine homes)
This is the setup for households where PLDT, Globe, Converge, or Sky installed a separate modem or modem-router unit. Your TP-Link router goes behind that box.
-
Plug the Ethernet cable from any LAN port on the ISP modem into the WAN port of your TP-Link router. The WAN port is usually a different color from the LAN ports - often blue - and labeled WAN or Internet.
-
Plug the TP-Link router's power adapter into the wall and into the router.
-
Wait 2 minutes for the router to fully boot. The Wi-Fi LEDs should be solid or slowly blinking before you proceed.
If you have a fiber ONT box (no separate modem)
Some Philippine homes, particularly those on Converge FiberX, PLDT Fiber, or newer Globe fiber installations, have an ONT (Optical Network Terminal) box that delivers the fiber signal directly. There is no separate modem.
-
Plug the Ethernet cable from the ONT LAN port into the WAN port of your TP-Link router.
-
Power on the TP-Link router and wait 2 minutes.
-
You will need your ISP-provided PPPoE username and password during the Tether app setup. This is different from your Wi-Fi password; it is the login credential for the internet line itself, usually provided in your ISP welcome letter or account portal.
How to Set Up Your TP-Link Router Using the Tether App: Step by Step
The following steps work for all current TP-Link Archer Wi-Fi routers. The screens may look slightly different depending on your router model and Tether app version, but the flow is the same.
Step 1: Download the Tether app
Search for "TP-Link Tether" on the Google Play Store or Apple App Store. It is free. Install it and open it. You do not need to create a TP-Link ID to use the app for local setup; you can tap through the login screen to reach the device list.
Step 2: Connect your phone to the router's default Wi-Fi
Go to your phone's Wi-Fi settings (Settings > Wi-Fi on iPhone, or pull down the notification shade and tap Wi-Fi on Android). Find the network named TP-Link_XXXX, the exact name is on the router label. Tap it and enter the default password also printed on the label. Your phone will show connected to the TP-Link network even though there is no internet yet.
Step 3: Open Tether and tap your router
Switch back to the Tether app. It will scan the local network and display your TP-Link router as a device. Tap it. If the router does not appear after 30 seconds, confirm your phone's Wi-Fi is connected to the TP-Link network - not to mobile data or another network.
Step 4: Create your router admin password
Newer TP-Link routers prompt you to create an admin password on first login. This is not your Wi-Fi password; it is the password for managing the router settings. Choose something different from your Wi-Fi password and note it somewhere safe. Older models may still use the default admin/admin credentials.
Step 5: Select your internet connection type
This is the most important step. The Tether app will ask for your connection type. Use the table below to choose the right one. Getting this wrong is the most common reason setup completes, but the internet does not work.
|
Connection Type |
When to Use It |
What You Need to Enter |
|---|---|---|
|
Dynamic IP |
Your TP-Link router is connected to an existing ISP modem or another router (the most common setup in Philippine homes) |
Nothing - the router gets its settings automatically from the modem |
|
PPPoE |
Your TP-Link router is connected directly to the ONT (fiber terminal) or DSL line from your ISP |
Username and password provided by your ISP (Globe, PLDT, Converge, Sky, etc.) |
|
Static IP |
Your ISP has given you a fixed IP address (rare for residential, more common for business accounts) |
IP address, subnet mask, default gateway, and DNS - all from your ISP |
ISP connection types vary and change. Always confirm with your specific ISP before selecting. TP-Link Philippines' FAQ on this topic is at https://www.tp-link.com/ph/support/faq/3837/
Step 6: Name your Wi-Fi and set your password
The Tether app will prompt you to enter a name (SSID) for your 2.4 GHz and 5 GHz networks and set a password for each. You can use the same name and password for both bands (simpler for most households) or different names if you want to control which devices connect to which band. Use WPA2 or WPA3 security; the app selects this automatically on current models.
Step 7: Let the app test the connection
After saving your settings, Tether runs a connection test. If it passes, you will see a success screen. If it fails, the app shows an error. The most common ones in the Philippines are covered in the troubleshooting section below.
Step 8: Reconnect your phone to your new Wi-Fi
Once setup is complete, your phone is still connected to the old default TP-Link network. Go to Wi-Fi settings and connect to the new network name you just set, using the new password. You should now have full internet access.

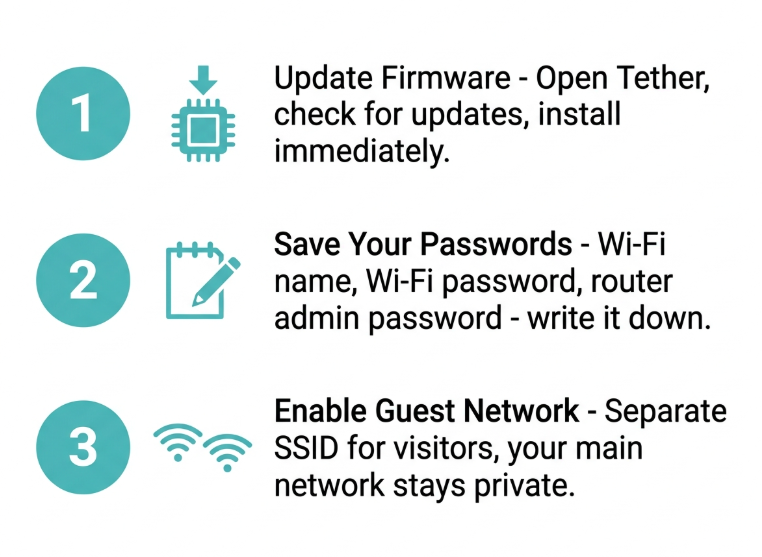
Three Things to Do Right After Setup Is Complete
Most Filipino households skip these steps and regret it later. They take five minutes total and prevent the most common post-setup problems.
1. Update the firmware
Routers ship from the factory with firmware that may be several months old by the time you buy and unbox them. In the Tether app, go to your router's device page and look for a Firmware Update notification. If one is available, install it. Firmware updates fix connectivity bugs, security vulnerabilities, and ISP compatibility issues. Updating immediately after setup means you are running the most stable version from day one.
2. Write down your Wi-Fi name, password, and admin password
Note your new Wi-Fi name, Wi-Fi password, and router admin password somewhere physical, like a notebook, a sticky note on the router itself, or your phone's notes app. In the Philippines, power interruptions are common, and after an outage, new family members or devices need to reconnect using these credentials. If you forget the admin password, you will need to factory reset the router and redo the entire setup.
3. Enable a guest network for visitors
If you receive visitors or run a small business from home, a guest network lets guests connect to the internet without sharing your main network with your work devices and personal data. In Tether, tap your router, go to Guest Network, and enable it with a separate name and password. Your main network stays private, and guests connect to the guest SSID only.
If you want to set this up now before anything else, tp-link.com/ph/support/faq/1082/ walks through every setting from guest SSID naming to bandwidth limits for visitors.
Troubleshooting: What to Do When Setup Does Not Work
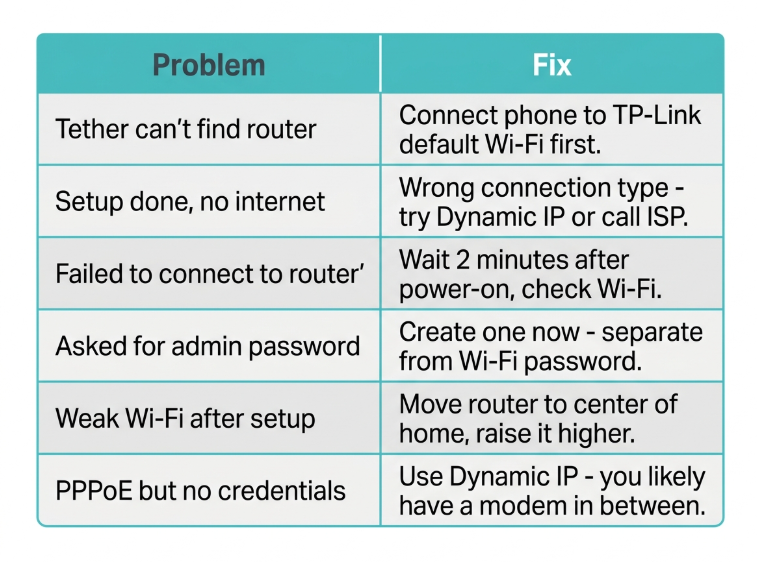
These are the problems Filipino users most commonly encounter when setting up a TP-Link router via mobile and the fixes that actually work.
|
Problem |
Most Likely Cause and Fix |
|---|---|
|
The Tether app cannot find the router |
Your phone is still connected to mobile data or the previous Wi-Fi network. Go to your phone's Wi-Fi settings, manually connect to the TP-Link default network (printed on the router label), then open Tether again. |
|
Setup completes, but there is no internet |
Wrong connection type selected. If you are behind an existing modem, switch to Dynamic IP. If connected directly to a fiber ONT, confirm your ISP connection type (PPPoE vs Dynamic IP) by calling their hotline. |
|
Tether says, "Failed to connect to router." |
The router is still in its boot sequence. Wait 2 minutes after plugging in before opening Tether. Also, confirm you are connected to the router's Wi-Fi, not your mobile hotspot or a neighbor's network. |
|
App asks for an admin password you did not set |
Newer Archer models require you to create an admin password on first login. This is the router admin password, separate from your Wi-Fi password. Create a strong one and note it somewhere safe. |
|
Wi-Fi signal weak after setup |
The router is placed too far from where you use devices or behind a concrete wall. Relocate centrally. If coverage is still insufficient, add a range extender or Deco mesh node. |
|
The connection type screen shows PPPoE, but I do not have credentials |
You likely have an ISP modem in between - switch to Dynamic IP. PPPoE credentials are only needed when the router is plugged directly into the fiber ONT box. |
If you have worked through all of the above and the internet still does not connect, confirm with your ISP whether they require a VLAN ID for your plan or area. Some Philippine ISPs use VLAN tagging on certain plans. The Tether app supports VLAN input. Go to Advanced Setup during the connection type step and look for the IPTV/VLAN option. Enter the VLAN ID your ISP provides.
For more connection type errors specific to Globe, PLDT, and Converge setups in the Philippines, the tp-link.com/ph/support/ cover ISP-specific configurations and common error resolutions.
Frequently Asked Questions
Does the TP-Link Tether app work on all Android and iPhone models available in the Philippines?
The Tether app requires Android 5.0 or later and iOS 11 or later, which covers virtually all smartphones currently in active use in the Philippines. Entry-level Android phones running MIUI, One UI Core or ColorOS all meet this requirement as long as they are on Android 5.0 or above. If your phone is too old to install Tether, set up the router through a browser instead: connect your phone to the router's default Wi-Fi, open Chrome, and type tplinkwifi.net directly into the address bar. If that does not load, try 192.168.0.1 or 192.168.1.1. The browser setup wizard covers the same steps as Tether and takes the same amount of time.
Can I set up the router using mobile data instead of connecting to the router's Wi-Fi?
No. The Tether app communicates with the router over your local network, not over the internet. Your phone must be connected to the router's own Wi-Fi during setup, not to mobile data, another Wi-Fi network, or a hotspot. Once setup is complete and the router has internet access, you can manage it remotely through the Tether app using mobile data from outside your home.
My ISP router already gives me Wi-Fi. Why do I need to set up another router?
ISP-bundled routers in the Philippines handle basic household use but typically lack guest network isolation, per-device bandwidth control, and robust parental controls. Adding a TP-Link router behind your ISP modem gives you those features plus stronger coverage for larger homes, a separate guest SSID, and remote management through the Tether app. You can also use a TP-Link router to replace the ISP unit entirely if your ISP allows it and the connection type is compatible.
What is the difference between the 2.4 GHz and 5 GHz networks I set up?
During setup, the Tether app asks you to name and set passwords for two separate bands. The 2.4 GHz band has a longer range and penetrates concrete walls better; it's the right choice for devices far from the router, smart TVs in other rooms, and IoT devices. The 5 GHz band is faster and less congested but has a shorter range, better for devices close to the router that need maximum speed, like a laptop used for work or an online class. You can name both bands the same if you want your phone to switch automatically based on signal strength.
Can I change the Wi-Fi password after setup using only my phone?
Yes. Open the Tether app, tap your router, go to Wireless, and update the Wi-Fi password for either band. The change takes effect immediately, which will disconnect all currently connected devices; they will need to reconnect using the new password. You can also change the password through a browser at tplinkwifi.net if you prefer a larger screen.
What if the Tether app prompts me to create a TP-Link ID? Do I need one?
No. A TP-Link ID is optional for local setup. Tap "Skip" or "Set Up Later" on the account creation screen to proceed directly to the device setup without registering. A TP-Link ID becomes useful if you want to manage your router remotely from outside your home using mobile data, enabling cloud access to the Tether app from any location. For households that only manage the router from home, it is not required.
Final Thoughts
Setting up a TP-Link router in a Philippine home is a 10-minute task done entirely from your phone. The Tether app handles the connection type, the Wi-Fi naming, the password setup, and the firmware notification in one guided flow. The only thing it cannot do for you is confirm your ISP's connection type. That one piece of information, Dynamic IP or PPPoE, is worth a quick call to your ISP hotline if you are not sure, because getting it wrong means redoing the setup from Step 5.
After setup, update the firmware, write down your credentials, and enable a guest network. Those three steps take five minutes and prevent the most common Wi-Fi problems Filipino households deal with in the first weeks after a new router installation.
Your next steps from here:
-
Received visitors last time and did not want them on your main network? Follow the tp-link.com/ph/support/faq/1082/ - the guest SSID takes under 5 minutes to set up from the Tether app and keeps your main network completely private
-
Setup complete but no internet, or are you getting a connection error you cannot identify? The tp-link.com/ph/support/ cover ISP-specific configurations for Globe, PLDT, Converge, and Sky and walk through every error type by symptom
-
Not sure if your router model is supported by the Tether app or how to set up a router for the first time? tp-link.com/ph/tether/ before starting, the compatibility list covers every current Archer model available in the Philippines
Disclosure: App interface descriptions and setup steps in this article are accurate as of the publication date. TP-Link may update the Tether app interface in future versions. Always refer to the official TP-Link Philippines support page at tp-link.com/ph/support/ for the most current setup guides for your specific router model.
By Laviet Joaquin, Head of Marketing, TP-Link Philippines | Published: June 18, 2026

_20240830055723o.jpg)
