My Range Extender won’t connect to my apple Router after pressing the WPS
Αυτό το άρθρο ισχύει για:
On Apple Router, like Airport Extreme, there's an option of “Add WPS Printer” on the Utility. This WPS process will pass the Range Extender with the same SSID but a random wireless password. Apple means to make this feature only for printers. It cannot be used to setup the Range Extender with WPS button.
If, while attempting to connect your apple router with our range extender, you don’t see the RE light come on indicating a successful connection. We would, at that point, recommend you do follow the below steps to manually setup your router with our range extender.
Step 1: the most efficient way of gaining access to the web interface of the range extender is to take the Ethernet cable provided in the packaging with our device and plug one end of the cable to your Mac and connect the other end of the cable directly into the Ethernet port of our range extender. Once a direct Ethernet connection has been established between your computer and the range extender be sure to disconnect from any wireless network that your computer may be connected to as well. This will only apply to laptops and/or desktop PCs that have wireless capability.
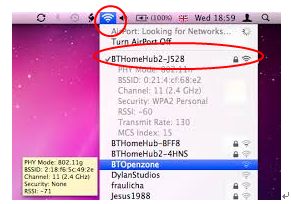
Step 2: If your Mac is only capable of connecting wirelessly then please open your list of wireless networks as displayed below. Within there you will find the TP-LinkXXXX (X’s will vary) SSID. Please choose to connect to this one. You will be prompted to enter a password which will be located on the back of the device.
Here is an example of how to locate your wireless networks on Mac
During this process you will not have internet access from this computer, but since you are directly connected to the TP-Link extender, this will allow you to interface with our device and properly access its web management page.
Step 3: Once a connection has been established from your device to the TP-Link range extender, please open a web browser on your Mac and type the following into the address/URL bar at the top of the browser: tplinkrepeater.net, 192.168.0.254
Note: If the login attempt with the domain tplinkrepeater.net is unsuccessful, clear out your address bar and type the following IP address 192.168.0.254, which is the default IP address of the TP-Link extender. Both the domain address and/or the default IP address will bring up the same login windows as displayed above.
Step 4: If the login is successful, the following window will appear within your browser. The username and password will be admin.
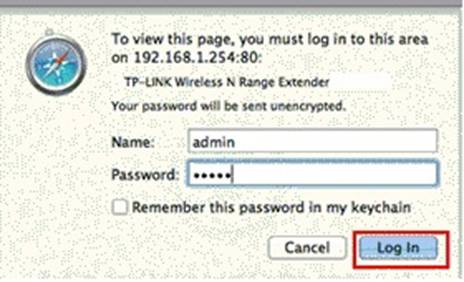
***If attempting to configure the TP-Link extender from a Mac computer, the login window above will immediately display once the direct Ethernet connection is established between your computer and the TP-Link extender.
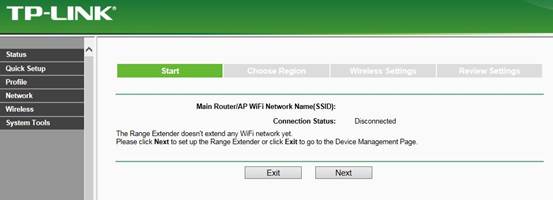
Step 5: Once you have successfully logged into the TP-Link extender, the following window will appear
1) Select Next within the middle section of the web management page.
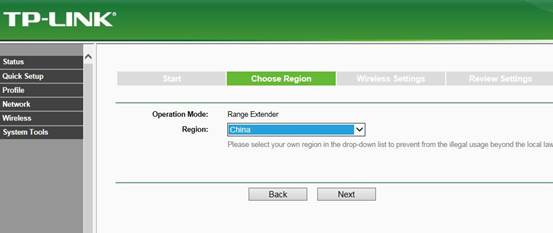
2) Select your region
3) Check or Select your own wireless network
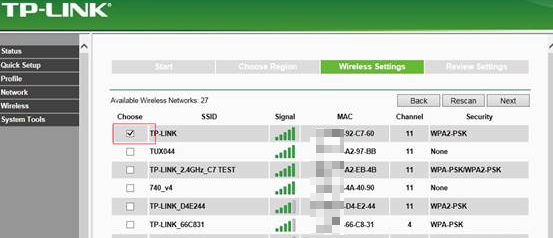
Note: If your main router’s wireless network name is hidden or you have disabled the SSID broadcast on your wireless router, please select Set SSID and MAC Manually.
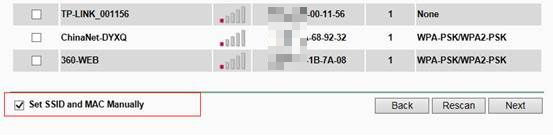
Below is the window for set SSID and MAC manually (you will need to key in everything below manually as per the settings of your wireless network).
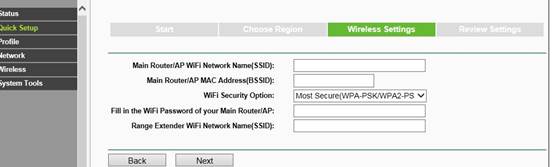
4) Input the exact wireless password of your wireless network utilizes.
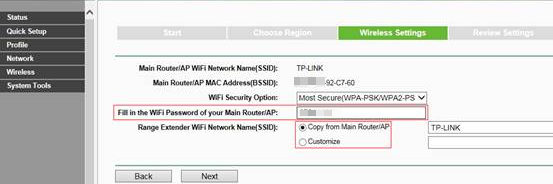
5) From this same window you can select Copy from Main Router/AP which will cause the TP-Link extender to broadcast the same name as your existing wireless network. If you select Customize, this will allow you to manually set the wireless name that the TP-Link extender will broadcast, we recommend leaving the selection on Copy from Main Router/AP. Then select NEXT.
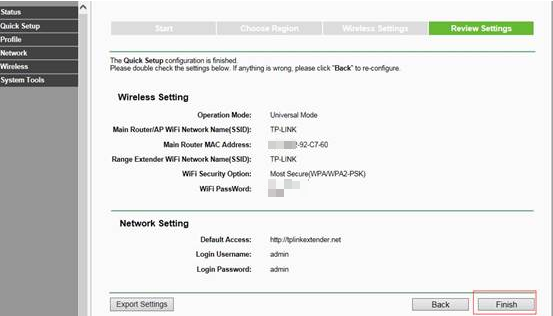
6) Please review your settings to ensure all the information is correct and then select FINISH.
Upon selecting FINISH, the TP-Link extender will reboot to apply your settings, please allow up to 2 minutes for this process to complete.
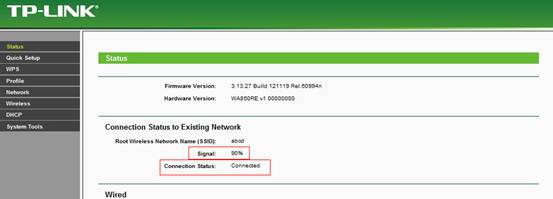
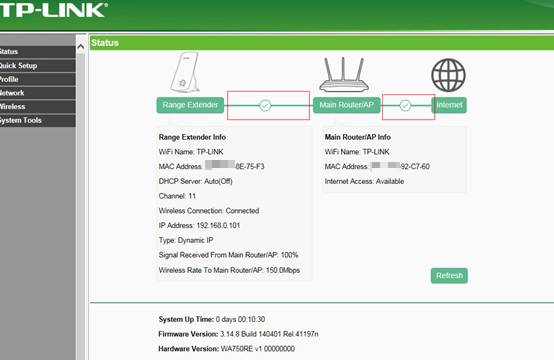
The following info indicates the extender is set up successfully:
1) The RE light and wifi signal lights are on.
2) For one version, the connection status is connected and there is a signal strength
For another version, there will be a checkmark between Range extender and Main router/AP.( if the router and the extender are both connected to the internet, there will be a checkmark between main router/ap and internet)
Είναι χρήσιμο αυτό το FAQ;
Τα σχόλιά σας συμβάλλουν στη βελτίωση αυτού του ιστότοπου.


