How to configure IP&MAC Binding on Archer C2_V5
Note: Archer C2_V5 is used for demonstration in this article.
1. Login the router. For how to do that, please refer to How do I log into the web-based Utility (Management Page) of TP-Link wireless router?
2. Go to IP & MAC Binding > Binding Settings.
3. Select Enable for ARP Binding.

4. Click Save.
To add IP & MAC Binding entries:
1. Click Add New.
2. Select the Bind checkbox.
3. Enter the MAC address and IP address.

4. Click Save.
To modify or delete an existing entry:
1. Select the desired entry in the table.
2. Click Edit or Delete Selected.
You can observe the device on the LAN by checking its MAC address and IP address on the ARP list, and you can also configure the items.
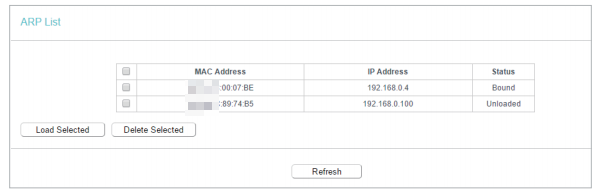
• MAC Address - The MAC address of the listed computer on the LAN.
• IP Address - The assigned IP address of the listed computer on the LAN. • Status - Indicates whether or not the MAC and IP addresses are bound.
• Status - Indicates whether or not the MAC and IP addresses are bound.
• Click the Load Selected button to load the selected items to the IP & MAC Binding list.
• Click the Delete Selected button to delete the selected items to the IP & MAC Binding list.
Note: An item cannot be loaded to the IP & MAC Binding list if the IP address of the item has been loaded before. Error warning will prompt as well. Likewise, Load All only loads the items without interference to the IP & MAC Binding list.
Get to know more details of each function and configuration please go to Download Center to download the manual of your product.
Finden Sie diese FAQ hilfreich?
Mit Ihrer Rückmeldung tragen Sie dazu bei, dass wir unsere Webpräsenz verbessern.
Von United States?
Erhalten Sie Produkte, Events und Leistungen speziell für Ihre Region