What should I do if I fails to login web interface of TP-Link Range Extender?
For customers who failed login the web interface of TP-Link range extender, there are a number of steps you can take, here we take RE215 as an example.
Step 1: Check your physical wired or wireless connection
For wired connection: Look at the Ethernet port of your PC to make sure the Ethernet cable is firmly plugged in and connected to the extender.
For wireless connection: Make sure your PC has already connected to the extender’s Wi-Fi.
Note: Sometimes, the wireless client device might switch to the router Wi-Fi especially when your extender has no internet yet. Or if you are using a smartphone with mobile data enabled, the phone might use mobile data even though Wi-Fi is connected, so please do make sure the wireless client device is connected to the extender Wi-Fi instead of your router and disable mobile data for smartphone.
Step 2: Check the TCP/IP Settings
1) Check the TCP/IP properties and make sure the client device is configured to obtain IP address automatically
You could refer to: How to configure TCP/IP Properties of the Wireless Connection on my computer, to configure Windows OS as “obtain an IP address automatically”, and configure MAC OS as “Using DHCP”.
For MAC OS, you could also refer to How to Set up the Mac OS to obtain an IP address automatically
2) Check if your computer gets an IP address correctly
Please refer to this instruction to find the IP address on your client device: How to find IP address on your devices
If your IP address begins with 192, that means you have already got an IP address. You could try to access the web interface now.
However, if it begins with 169, or is 0.0.0.0, which means you have not obtained valid IP address, please check your TCP/IP configuration again or try to RESTART or RESET the Range Extender.
Step 3: Login with domain name
If the client device connected to the extender could access the internet, but web interface is not accessible, probably the issue is caused by your browser or firewall. The steps below will help you eliminate influence of your browser/firewall.
1) Sometimes the browser will create DNS cache data or just go wrong and block the reply message from network.
a. Please open the web interface on the browser’s incognito window: Refer to the below picture, open an Incognito window on Chrome or InPrivate window on Microsoft Edge

b. Clear the DNS cache: As the IP address of extender will be assigned by the front router, sometimes the DNS cache will lead you to a wrong IP address, please refer to the instruction here to clear the DNS cache on your computer: How to clear the DNS cache on your computer
c. Reopen the browser: Close the browser and open it again, simply restart might be able to get the browser back to normal.
d. Try a different browser: Sometimes the particular settings on your browser will block the reply message from network, simply try another browser (Google Chrome, Firefox, Microsoft Edge) will solve the problem.
2) Sometimes the firewall on your computer will block the reply message from network, close the firewall or antivirus software will fix the issue.
For example: Kaspersky
In the lower right part of Desktop: click the Kaspersky icon and select Exit in the context menu.

Step 4: Login with range extender’s IP address
If you fail to login with the domain name, please use the IP address for a try:
If the extender is not configured to connect any router yet, please use the default IP address of the extender which is usually 192.168.0.254.
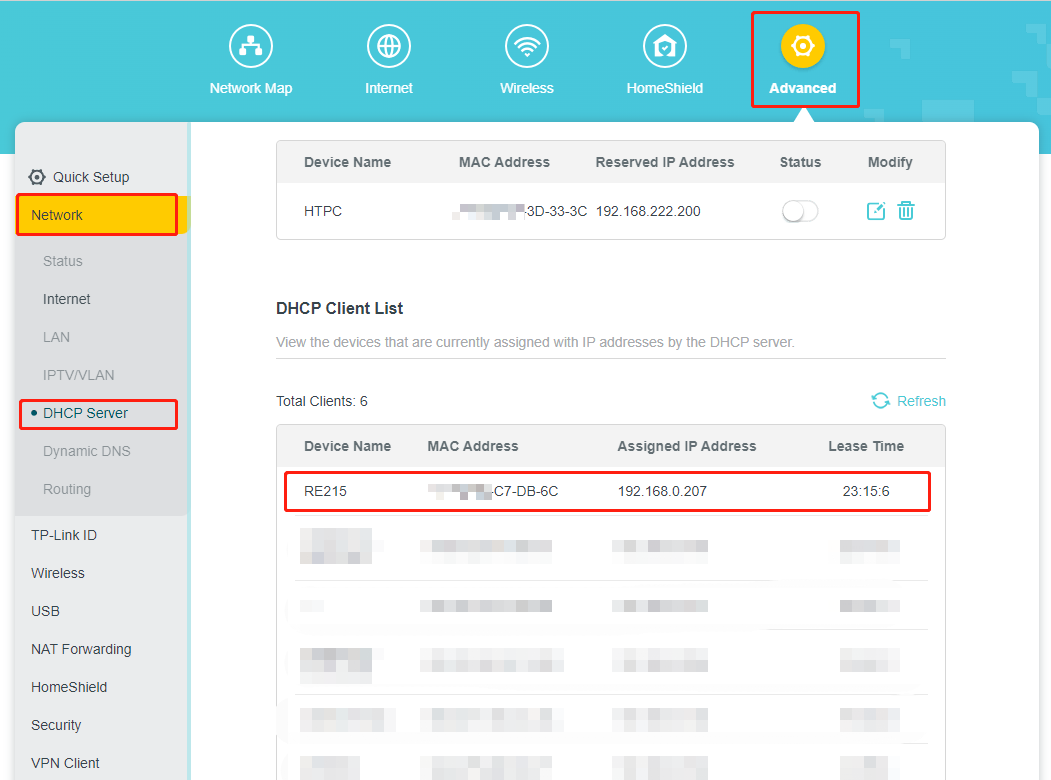
However, if it is already connected to your router, please login the router’s web interface, and find the extender’s IP address in the Client list.
For example, if the front router is TP-Link Router, you could find the extender’s IP address from the DHCP Client list.
Step 5: Reset to the factory defaults
If you still fail to login the web interface of extender after trying the above steps, it is recommended to reset it to factory defaults and reconfigure the extender.
How to reset the extender to factory defaults: With the Range Extender powered on, use a pin to press RESET button until all the LEDs flash once, then release the button and wait the Range Extender to reboot.
After that, please try to access the web interface by using the default IP address 192.168.0.254 or default domain name http://tplinkrepeater.net (the default IP/domain name is also printed on the label of the extender itself).
¿Es útil este artículo?
Tus comentarios nos ayudan a mejorar esta web.


