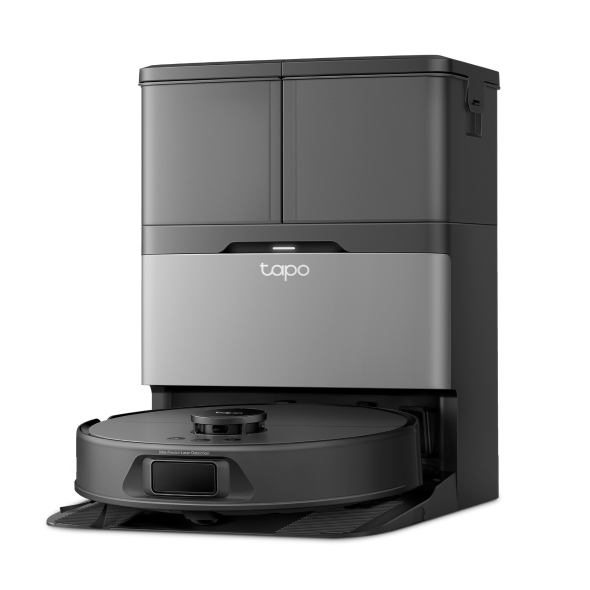
How to troubleshoot if Tapo RV50 series Robot Vacuum work abnormally
Introduction
This article provides troubleshooting guides when Tapo RV50 series Smart Robot Vacuums work abnormally in different scenarios.
Troubleshooting
Here we take Tapo RV50 Pro Omni as an example.
Step 1. Disconnect the robot from the dock and check whether the LED indicator light in front of the dock is lit.

Step 2. Ensure the power cord is securely inserted into both the All-in-One Dock and the wall outlet.
Step 3. Try plugging another appliance into the outlet to confirm whether the outlet itself is working normally.
Step 4. Inspect the power cord for any obvious signs of damage.
If you have already tried all of the above methods but the problem persists, please contact TP-Link Support for further assistance.
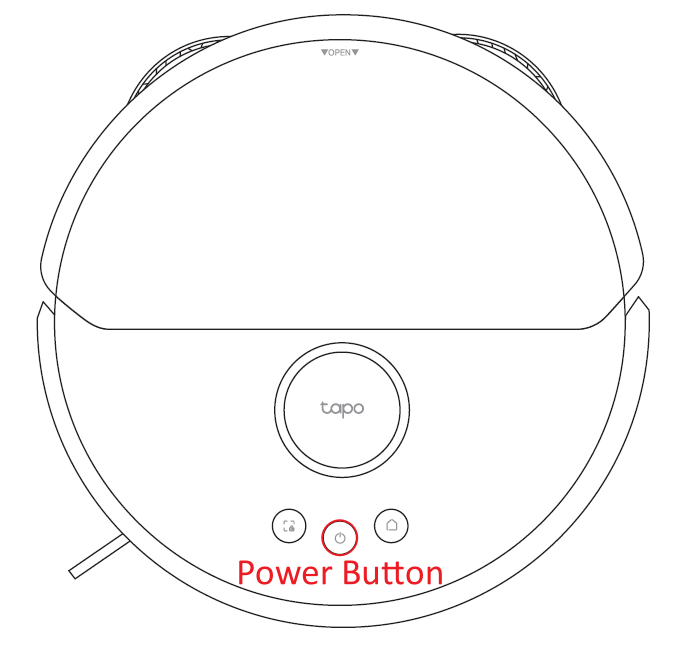
Step 1. The robot vacuum may be powered off. Try to press and hold the power button for 3 seconds to power it on.

Step 2. The battery may be completely depleted. Manually place the robot vacuum on the charging station, ensuring the charging contacts are properly aligned, and check if it powers on automatically.
Note: Ensure the charging contacts on both the robot and the station are clean and free of dirt, and that they make good contact.
If you have already tried all of the above methods but the problem persists, please contact TP-Link Support for further assistance.
There are two main steps when configuring the Tapo RV50 series Robot Vacuum: the Tapo app first finds the device via Bluetooth, then the device connects to the router's Wi-Fi. Please check which step failed based on the Tapo App's report, then follow the corresponding troubleshooting steps below.
Error message 1: “We couldn’t find this Tapo device” on Tapo app
Step 1. It may be that your phone's Bluetooth function is not enabled. Please turn it on in the system settings. If it's already on, try turning it off and then turning it back on.
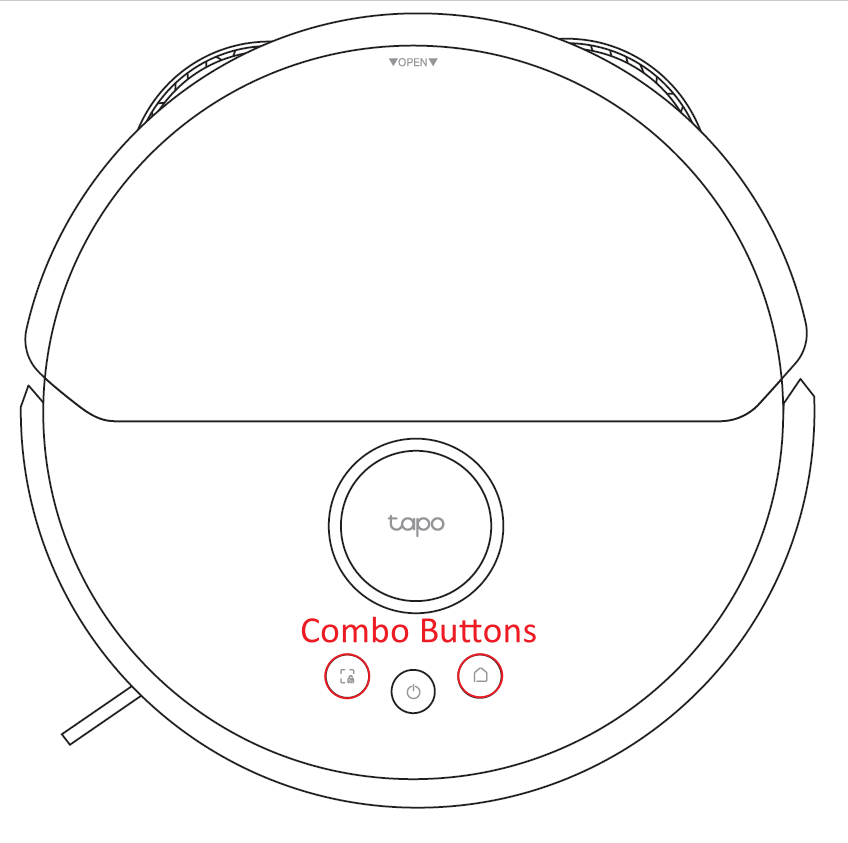
Step 2. Ensure the robot vacuum is in configuration mode. If all buttons are flashing white lights, the robot vacuum is already in configuration mode. If not, press and hold both combo buttons (left and right) simultaneously for 5 seconds to enter configuration mode.
Step 3. Your phone may be too far from the robot vacuum. Please move it closer and try again.
Step 4. If you have another phone or tablet, try using that one.
Error message 2: “The device cannot find the router Wi-Fi” on Tapo app
Step 1. Check the Wi-Fi network: Ensure your router is powered on and that the Wi-Fi network is working normally.
Step 2. Check the Wi-Fi band: The Tapo RV50 Pro Omni only supports 2.4GHz Wi-Fi networks. Please ensure your router has the 2.4 GHz band enabled and that the robot is connecting to it.
Step 3. Move the robot closer to the router: Try moving it closer to the router to ensure a stronger signal.
Step 4. Update the App and firmware: Ensure the Tapo App and the router firmware are up to date for optimal performance.
Step 5. Reboot the router and robot: Try rebooting your Wi-Fi router and the Tapo RV50 Pro Omni, then try again.
Note: How to reboot the Tapo RV50 Pro Omni: Press and hold the power button for 3 seconds to power it off, then press and hold it again for 3 seconds to power it back on.

Step 6. Reset the robot vacuum: Press and hold combo buttons (the left and right buttons) on the top of the robot vacuum for more than 10 seconds to restore factory settings, then try again.
If you have already tried all of the above methods but the problem persists, please contact TP-Link Support for further assistance.
Step 1. Before updating, ensure the robot's battery is above 50% and connected to the base station in charging state.
Step 2. Ensure the robot vacuum is connected to a stable Wi-Fi network with internet access.
Step 3. During the update, do not operate the robot vacuum or disconnect power, and please patiently wait for the update to complete.
Step 4. If the update fails, try disconnecting the robot vacuum from the base station, rebooting, and try again.
Note: How to reboot the Tapo RV50 Pro Omni: Press and hold the power button for 3 seconds to power it off, then press and hold it again for 3 seconds to power it back on.
Step 5. Enable a 2.4GHz hotspot on your phone, reset the robot vacuum, and connect it to the phone hotspot, then update the firmware again.
Note: How to reset the Tapo RV50 Pro Omni: press and hold the combo buttons (the left and right buttons) simultaneously for 5 seconds.
Step 6. If the above methods don't resolve the issue, please contact Tapo technical support for help.
If you have already tried all of the above methods but the problem persists, please contact TP-Link Support for further assistance.
Step 1. Make sure that the charging dock is powered and the indicator light is on normally.

Step 2. Ensure the charging dock is placed in an open, flat area, with at least 0.5 meters of space on both sides and at least 1.5 meters clear in front. Avoid placing it on thick carpets or in direct sunlight.

Step 3. Each time the robot vacuum starts cleaning, ensure it is triggered from the charging dock so it records the dock's position on the map, and it will return via the shortest path after cleaning.
Step 4. Check for new obstacles (such as wires, shoes, or furniture) blocking the robot vacuum's path back to the charging dock.
Note: Although the Tapo RV50 has AI obstacle avoidance, too many obstacles may still affect navigation.
Step 5. Clean the robot vacuum's sensors and bumper to ensure they are free of dust and dirt.

Step 6. If the robot vacuum is stuck and cannot return, manually carry it back to the charging dock.
If you have already tried all of the above methods but the problem persists, please contact TP-Link Support for further assistance.
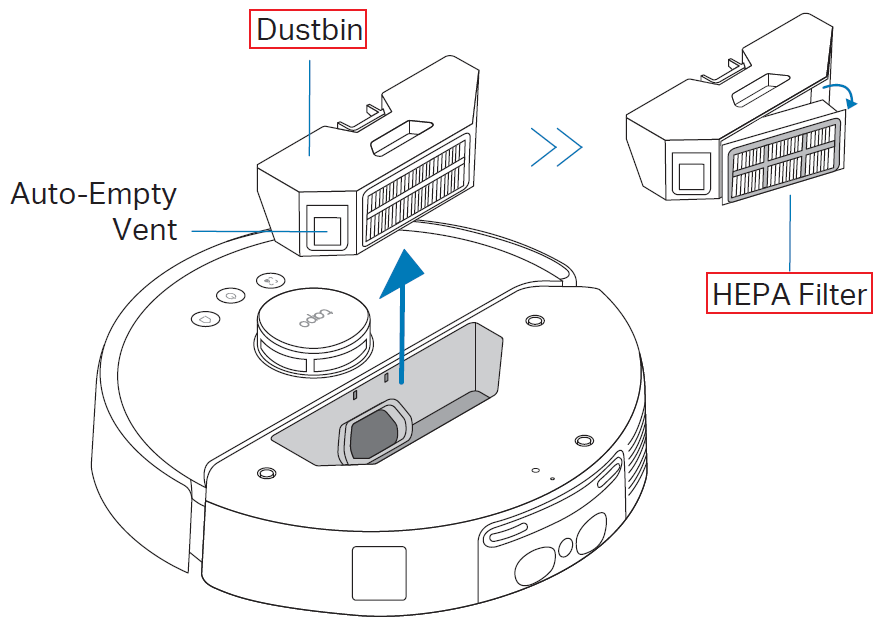
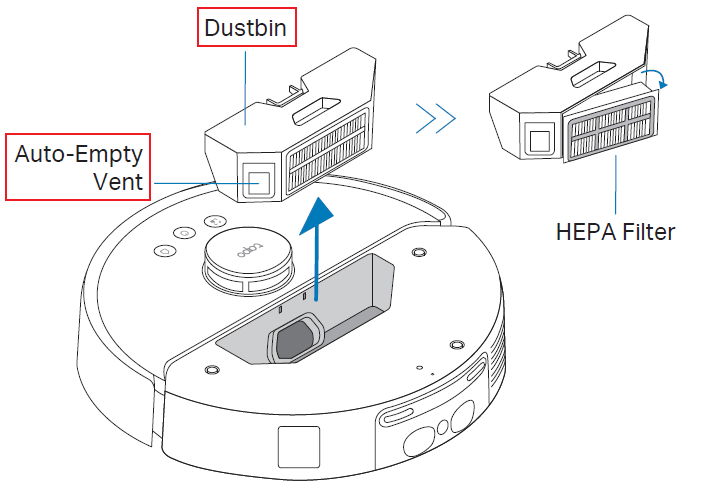
Step 1. A full dust bin may clog the suction inlet and severely affect suction power. If this occurs, please manually empty the dust bin.
Step 2. The HEPA filter may be clogged with dust, reducing fan suction power. Please regularly remove and clean the HEPA filter, and replace it if necessary. It is recommended to replace the HEPA filter every 3-6 months.
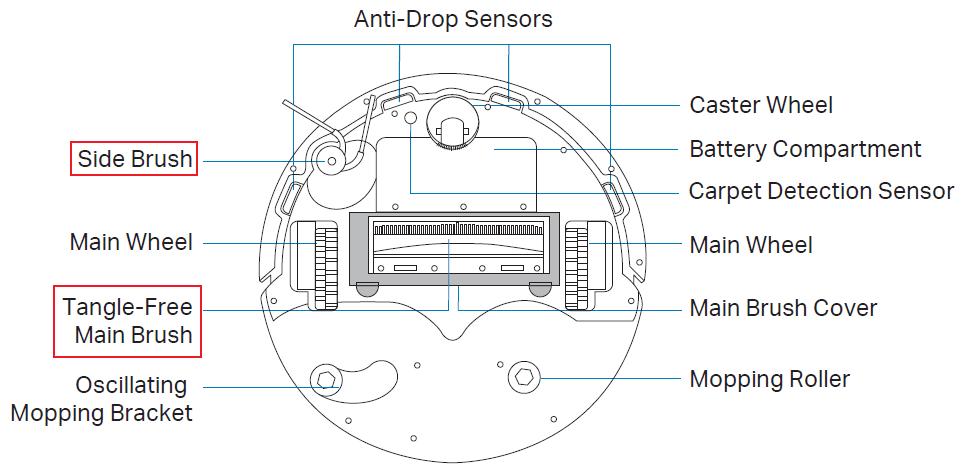
Step 3. Inspect if there are hairs, threads, or other debris wrapped around the main brush and side brush. Wrapped objects will hinder brush rotation and affect cleaning performance. Please use the included cleaning brush to clean them.
Step 4. Ensure that the main brush chamber inlet at the bottom of the robot vacuum is not blocked and remove any foreign objects.
Step 5. The Tapo RV50 provides 5 adjustable suction levels for different usage scenarios. Please try increasing suction power by opening the Tapo App > RV50 Pro Omni > bottom-left cleaning mode on the home page > Vacuum Power.
If you have already tried all of the above methods but the problem persists, please contact TP-Link Support for further assistance.
If your Tapo RV50 is using Max or Ultra suction levels, it will inevitably produce a relatively loud noise. However, if an abnormal sound is not from the suction fan during cleaning, it may be caused by the following reasons. Please refer to the troubleshooting steps below:
Step 1. Inspect the main and side brushes for any foreign objects (such as hair, threads, or small stones) wrapped around or stuck in them, and clean them with the cleaning brush.
Step 2. Inspect for foreign objects stuck in the main wheels and the caster wheel, and clean them thoroughly.
Step 3. Inspect for foreign objects blocking the suction inlet at the bottom of the robot and the internal air duct, and clean them thoroughly.
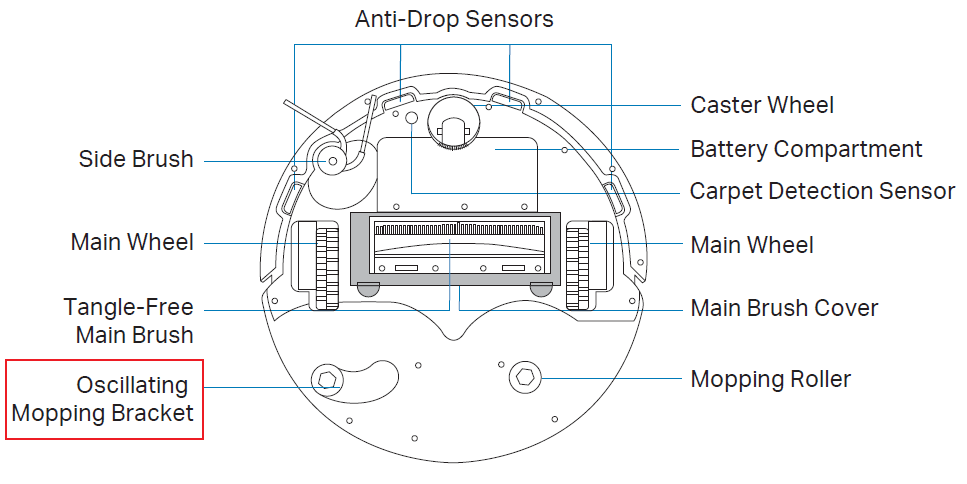
Step 4. If noise occurs during mopping, make sure that the mop mount is installed correctly and there are no foreign objects stuck between the mop and the floor.

If you have already tried all of the above methods but the problem persists, please contact TP-Link Support for further assistance.
The Tapo RV50 can intelligently lift the mop mount when mopping encounters carpets you don't want it to mop, to prevent wetting the carpets. However, if it doesn't automatically lift, please refer to the following troubleshooting steps:
Step 1. Ensure that the carpet area is successfully set in the map. If not, set it in the map editor by opening Tapo App > RV50 Pro Omni > Top right map icon > Carpet.
Step 2. The Tapo RV50 supports 4 preferred carpet cleaning modes, and only in Cross and Vacuum Only modes will the mop lift when encountering a carpet. You can check via opening Tapo App > RV50 Pro Omni > Top right three dots > Settings > Carpet Cleaning Settings > Manage All Carpets > Select a carpet area > Cleaning Preferences.
Step 3. Make sure there are no foreign objects stuck in the oscillating mopping bracket, preventing normal lifting and lowering, and clean it thoroughly.
If you have already tried all of the above methods but the problem persists, please contact TP-Link Support for further assistance.
The Tapo RV50 base station supports automatic mop-cloth cleaning. If you encounter the issue where the clean water tank or dirty water tank of the Tapo RV50 base station is not recognized, please refer to the following troubleshooting steps:
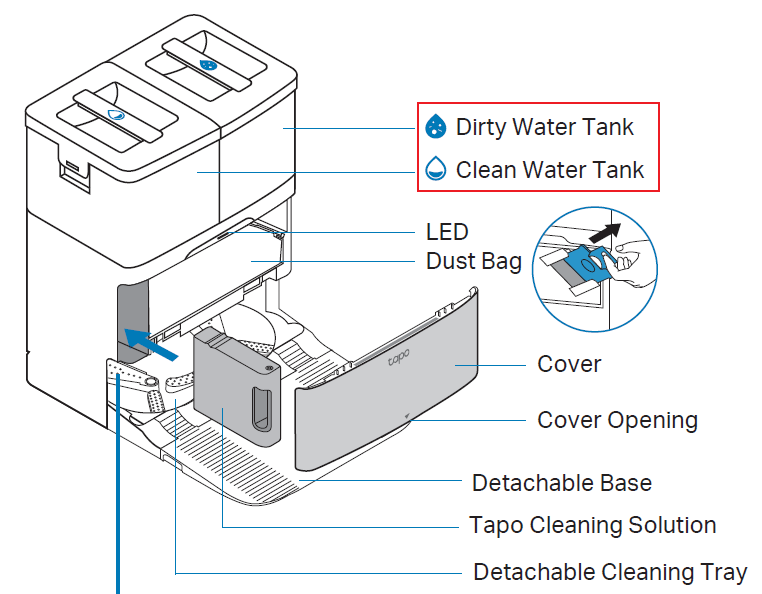
Step 1. Remove the water tank and reinstall it, ensuring it is fully pushed in and that you hear a click.
Step 2. Make sure there are no water stains or dirt on the sensing area at the bottom of the water tank, and wipe it clean.
Step 3. Make sure there are no foreign objects in the position on the top of the base station where the water tank is placed, and clean it thoroughly.
Step 4. Try unplugging the base station's power, wait a moment, then reconnect the power and try again.

If you have already tried all of the above methods but the problem persists, please contact TP-Link Support for further assistance.
The Tapo RV50 base station supports auto-empty the dustbin, freeing your hands from manually emptying the trash. However, if your robot vacuum's empty function fails, please refer to the following troubleshooting steps:
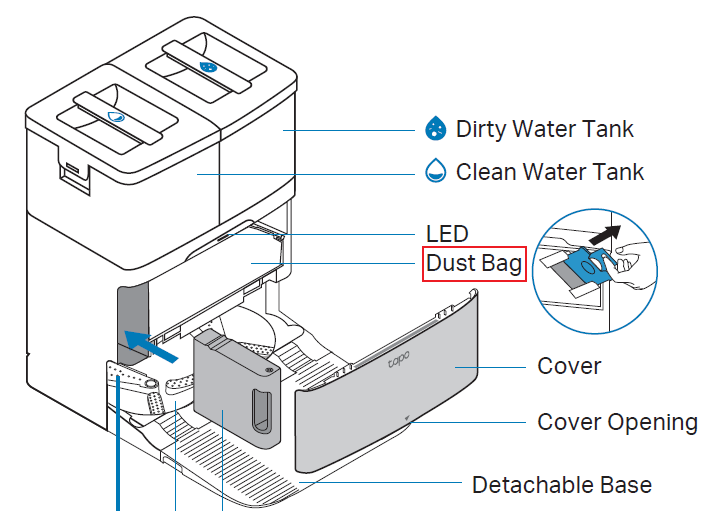
Step 1. Make sure the dust bag inside the base station is correctly installed and not full. If full, replace it with a new dust bag immediately.
Step 2. Ensure the robot vacuum's dust bin is correctly installed and that its auto-empty vent is not blocked by large debris.
Step 3. Ensure the robot vacuum is fully aligned with the base station so that the empty ports can connect tightly.
Step 4. Ensure that the entire channel from the robot vacuum's dust bin to the base station's dust bag is unobstructed, especially the base station's dust collection inlet.
If you have already tried all of the above methods but the problem persists, please contact TP-Link Support for further assistance.
The Tapo RV50 base station supports automatic mop cleaning and automatic dispensing of cleaning solution. If you encounter the issue of not being able to automatically dispense cleaning solution, please refer to the following troubleshooting steps:
Step 1. Ensure the cleaning solution type is correct and that you're using the dedicated Tapo robot vacuum cleaning solution.
Step 2. According to the quick installation guide, ensure the cleaning solution is correctly installed in the designated position on the base station.
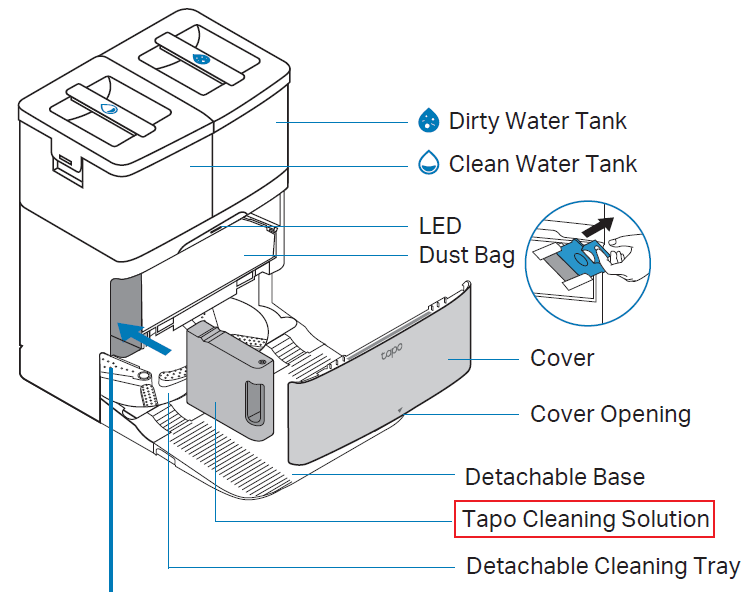
Step 3. Ensure that the dedicated Tapo cleaning solution module is not empty. If empty, replace with a new cleaning solution module.
Step 4. In the Tapo App, make sure that the Auto-Dispensing Detergent function is enabled via opening Tapo App > Tapo RV50 > Top right three dots > Settings > Dock Settings > Auto-Dispensing Detergent.
Step 5. Avoid repeated disassembly and assembly. Frequent disassembly and assembly of the cleaning solution module may cause interface damage or recognition issues.
If you have already tried all of the above methods but the problem persists, please contact TP-Link Support for further assistance.
The Tapo RV50 base station supports automatic washing of the mop, which makes mopping more effortless and cleaner. But if you encounter the base station's wash mop function not working, please refer to the following troubleshooting steps:
Step 1. Ensure the clean water tank has water, and the dirty water tank is not full. If the base station's LED indicator light is red, it may indicate insufficient clean water or that the dirty water tank is full/not installed correctly.
Step 2. Ensure the robot has returned to the base station correctly and is aligned with the mop washing position. If docking is misaligned, it may cause washing failure.
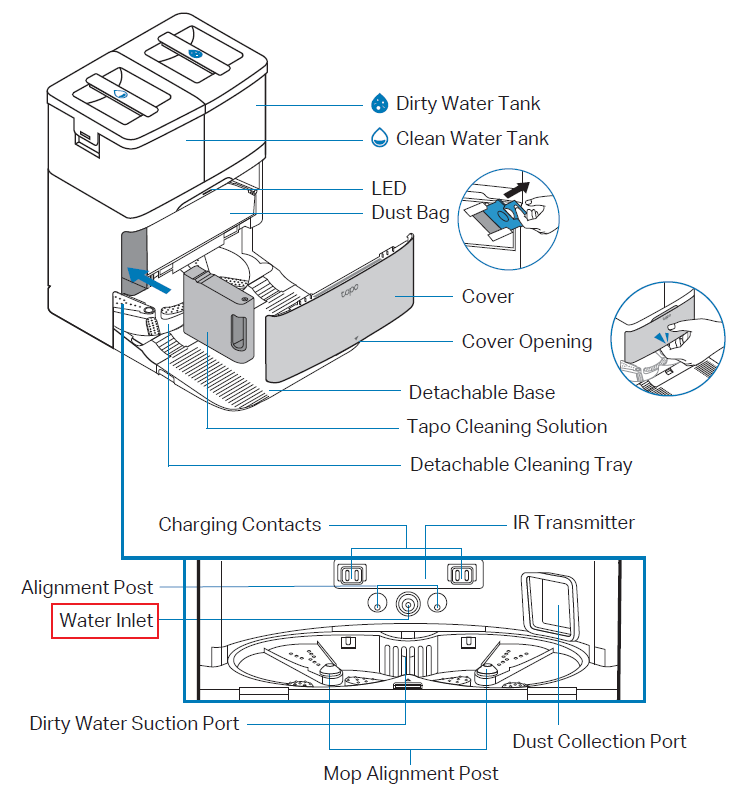
Step 3. Remove the robot vacuum and make sure the water inlet inside the base station is free of foreign objects.
Step 4. Remove the detachable cleaning plate at the bottom of the base station, and make sure it's not stuck with dirt, hair, or other foreign objects.
Step 5. Connect the robot vacuum to the base station, then manually start washing the mop in the Tapo App by opening Tapo App > RV50 Pro Omni > Station > Wash Mop. Then observe if it's normal.
Step 6. Try unplugging the base station's power, waiting a moment, then plugging it back in to reboot it, and try again.
If you have already tried all of the above methods but the problem persists, please contact TP-Link Support for further assistance.
¿Es útil este artículo?
Tus comentarios nos ayudan a mejorar esta web.