How to Configure Router Mode on TL-WR700N
Este artículo se aplica a:
Definition:The TL-WR700N is connected to a DSL or cable modem and works as a regular wireless router.
Application:Internet access from DSL or cable modem is available for one user but more users need to share the Internet.
Physical Connection
Step 1:
Connect the WR700N directly to your computer’s Ethernet port by an Ethernet cable;
Step 2:
Power on the WR700N
.png)
Initial Computer Setup– For Windows 7, Vista & XP (For Mac OS X, please go to page3)
Step 1:
Windows 7&Windows Vista: Go to Start->Control Panel ->Network and Sharing Center
Windows XP: Go to Start->Control Panel->Network Connections
.jpg)
Step 2:
Windows 7: Go to Network andSharing Center->Change Adapter settings
Windows Vista: Go to Network andSharing Center->Manage Network Connections
Windows XP: (Go to Next Step)
.png)
Step 3:
Windows 7, Vista and XP: Right Click Local Area Connection >Select Properties -> Double Click Internet Protocol Version 4 (TCP/IPv4) or Internet Protocol (TCP/IP) forWindows XP.
.png)
Step 4:
Windows 7, Vista and XP: Select “Use the Following IP address:”
Type the following information:
1. IP address: 192.168.0.10
2. Subnet mask: 255.255.255.0
Click OK to exit
Click OK again to apply the settings.
.png) Windows 7, Vista & XP
|
Initial Computer Setup– For Mac OS X
Go to the Apple>System Preferences->Network-> Highlight Ethernet ->Configure IPv4: Using DHCP with manual address
Input the IPv4 Address: 192.168.0.10
Click Apply
.jpg)
Access the Management Page
Open a Web Browser -> Type 192.168.0.254 in the address bar -> Press Enter
.jpg)
Enter the default User Name: admin
Enter the default Password: admin
Click OK
.jpg)
Run Quick Setup
Step 1:
Go to Quick Setup-> Click Next
.jpg)
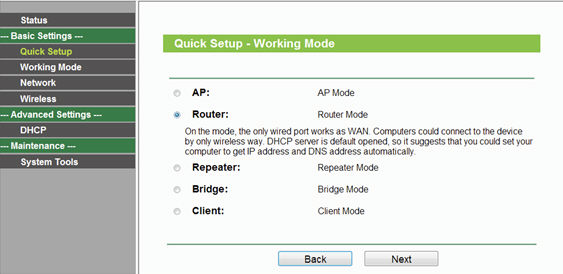
Step 2:
Select Router-> Click Next
Step 3:
Customize your wireless name (SSID) and password
|
Wireless Radio: Enable
SSID: (Rename Your Wireless Name)
Region:(Select Your Current Location)
Channel: Auto
Mode: 11bgn mixed
Channel Width: Auto
Security Options: WPA-PSK/WPA2-PSK
PSK Password: (Create a Private Password)
Click Next
|

Step 4:
Choose the WAN Connection your ISP is using. For most DSL and cable ISP, they use Dynamic IP.
If you’re not sure, please consult with your ISP customer service.
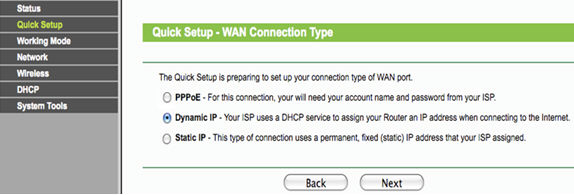
Procedures are different according to the Connection Type you choose.
1) Select Dynamic IP, and click Next;
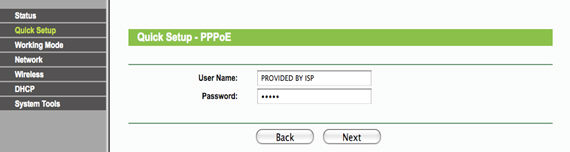
2) Select PPPoE, input the Username and Password provided by ISP and then click Next;
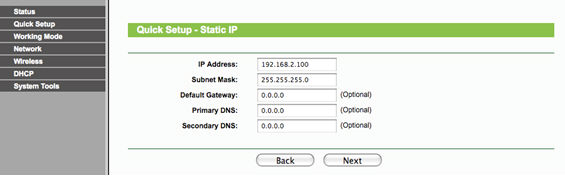
3) Select Static IP, input the IP parameters provided by ISP and then click Next;
Step 5:
Click: Reboot, and wait until it goes to 100%
.jpg)
At the same time please reboot your modem.
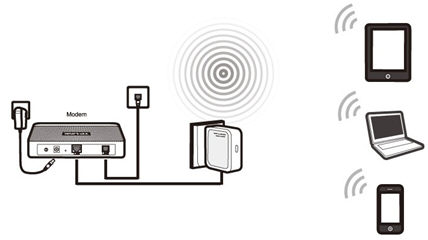
Relocate the WR700N
You may now connect the WR700N directly into the LAN Ethernet port on the back of your Modem.
Congratulations! Youcan share your internet to multiple wireless devices.
Final Computer Reversion– For Windows 7, Vista & XP (For Mac OS X, please go to page 9)
Step 1:
Windows 7&Windows Vista: Go to Start->Control Panel ->Network and Sharing Center
Windows XP: Go to Start->Control Panel->Network Connections
Step 2:
Windows 7: Go to Network and Sharing Center->Change Adapter settings
Windows Vista: Go to Network and Sharing Center->Manage Network Connections
Windows XP: (Go to Next Step)
Step 3:
Windows 7, Vista and XP: Right Click Local Area Connection ->Select Properties -> Double Click Internet Protocol Version 4 (TCP/IPv4) or Internet Protocol (TCP/IP) forWindows XP.
Step 4:
Windows 7, Vista and XP: Select “Obtainan IP address automatically” and “Obtain DNS server address automatically”
Click OK to exit
Click OK again to apply the settings.
|
Windows 7, Vista & XP
|
Final Computer Reversion – For Mac OS X
Go to the Apple->System Preferences->Network-> Highlight Ethernet ->Configure IPv4: Using DHCP
Click Apply.
Get to know more details of each function and configuration please go to Download Center to download the manual of your product.
¿Es útil este artículo?
Tus comentarios nos ayudan a mejorar esta web.