Setup Guide
Tapo C710 Outdoor Pan/Tilt Security Floodlight Camera
Welcome to the setup guide.
To ensure equal access for all users, we offer this accessible setup guide. This guide is designed to meet accessibility needs, enabling a successful setup. It will introduce the appearance of your camera, including its ports, buttons, and labels, and then guide you through the setup process.
Before you start
WARNING: Risk of Electric Shocks
This camera is a hardwired product, which can only be installed by a skilled person. Please hire a professional licensed electrician if necessary and exercise caution at all times to avoid the risk of electric shock, injury, or death.
You can always find detailed wiring and mounting instructions on the Tapo app.
Step 1. Know about your camera
In this section, we will describe the camera's appearance, including its ports, buttons, and labels.
1. You can find your camera in the package.
The camera is composed of two rectangular blocks. The bigger one is the floodlight part on top, and the smaller one is the camera body on the bottom.
2. Next, keep the floodlight on the top and the camera body on the bottom.
To ensure the camera is placed correctly, you should position it with the lampshade and the camera lens facing forward.
3. After positioning your camera correctly, we will introduce the ports, buttons, and labels on your device in a certain order.
Floodlight: For enhanced security by providing adjustable brightness, motion activation, flexible area monitoring, and vibrant color night vision for effective surveillance.
Motion Sensor: It is right below the floodlight for detecting motion.
Lens: For capturing things within its view.
Microphone: For capturing your voice. It is on the upper left of the lens.
System LED: It is on the upper right of the lens, showing your camera status. You can check the camera status on the Tapo app.
IR LEDs: For creating black-and-white images at night. They are on left and right sides of the lens.
White Light LEDs: For creating colorful images at night. They are between the lens and IR LEDs.
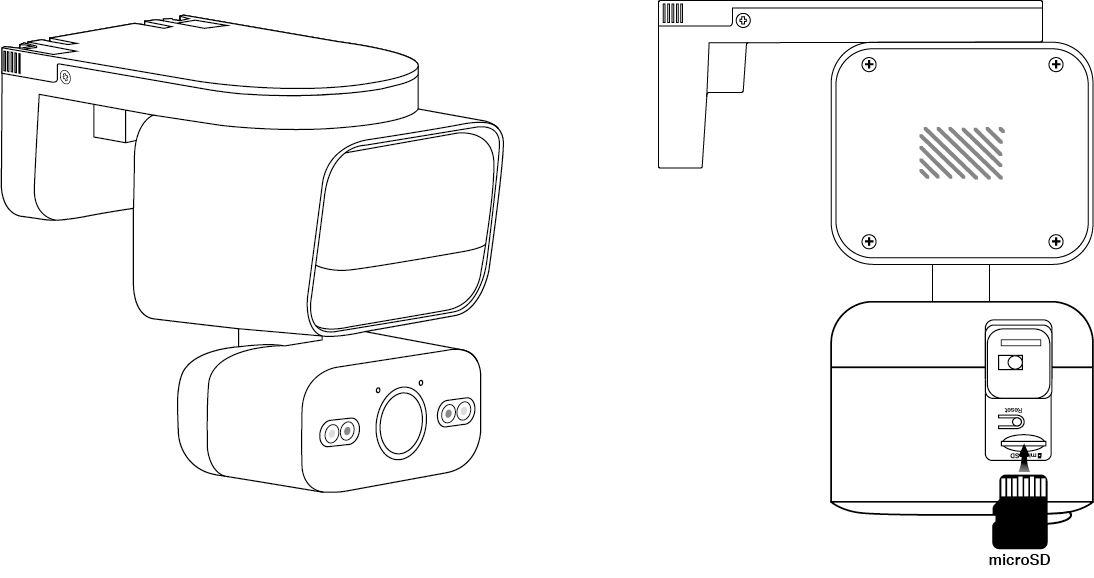
On the bottom of the camera body, you can locate the silicone cover for the microSD card slot, the Power button, and the Reset button. Once opened, you'll find the microSD card slot on the top, and the Reset button below it.
microSD Card Slot: While facing the bottom of the camera with the lens looking upward, insert a microSD card with the notch on the right side, and gold contacts facing the slot.
RESET Button: The reset button is a circular, raised button below the slot. While the camera is on, press and hold the RESET button to reset the camera.
Press and hold for 5 seconds: Reset Wi-Fi settings only
Press and hold for 10 seconds: Reset to factory settings
Light Sensor: It is right below the lens, for detecting whether the environment is dark or bright.
System LED: It is right below the light sensor. It shows your camera status. You can check the camera status on the Tapo app.
Microphone: For capturing your voice. It is right below the System LED.
Motion Sensor: It is at the bottom of the camera body for detecting motion.
On the left side of the camera body, you can find the reset button and the cover for the microSD card slot.
RESET Button: The reset button is in the center of the cover. While the camera is powered on, press and hold the RESET button for at least 5 seconds. The camera will reset and reboot.
microSD Card Slot: Loosen two scews on the cover and remove the cover to find the microSD card slot. While facing the card slot, insert a microSD card with the notch at the top and the gold contacts facing the slot.
Turn to the back side of the floodlight part to find the speaker and the product label.
Speaker: For producing sound, allowing you to hear the audio.
Product Label: The product information is partially laser-engraved. The MAC address and serial number are printed on stickers.
Step 2. Set up your camera
1. Get the Tapo app from the App Store or Google Play, then log in.

2. After the wiring and installation by a licensed electrician, turn on the circuit breaker and wait 30 seconds for the camera to start up. You can hear a clicking sound.
2. Tap the + button in the app and select your camera model. Follow the app instructions to complete the setup.
If you need help, please visit https://www.tapo.com/support/ for technical support, the user guide, FAQs, warranty, and more.
For details on Tapo app accessibility, please check Accessibility Support.
English: Safety Information
Never touch the product with wet hands.
Do not disassemble, repair or modify the product.
Do not use the device where wireless devices are not allowed.
Do not use the product if the casing has been broken. Danger of electric shock.
Keep the device away from fire or hot environments. DO NOT immerse in water or any other liquid.
It is NOT recommended to expose this product to heavy rain or any type of moisture.
Do not place near automatically controlled devices such as fire alarms. Radio waves emitted from this product may cause such devices to malfunction resulting in an accident.
Observe restrictions on using wireless products in fuel depots, chemical plants or when blasting operations are in progress.
Do not use liquid to clean the product. Only use a dry cloth.
Never put metal objects inside the product. If a metal object enters the product turn off the circuit breaker and contact an authorized electrician.
This product is not intended to be used when providing medical care. Consult the manufacturer of any personal medical devices, such as pacemakers or hearing aids to determine if they are adequately shielded from external RF (radio frequency) energy.
Do not use this product in health care facilities. Hospitals or health care facilities may be using equipment that could be sensitive to external RF energy.
The product should be kept free from excessive smoke, dust or high temperature and vibration.
Avoid direct sunlight for better performance.
Do not place heavy objects on top of the product.
This product may interfere with other electronic products such as TV, radios, personal computers, phones or other wireless devices.
The light source of this luminaire is not replaceable; when the light source reaches its end of life the whole luminaire shall be replaced.
To reduce the risk of strangulation the flexible wiring connected to this luminaire shall be effectively fixed to the wall if the wiring is within arm's reach.
The product can only be installed by skilled person.
Operating Temperature: -20 °C ~ 45 °C (-4 °F ~ 113 °F)
Only to be installed outside arm's reach. The maximum installation height is 3 meters.
Weight of the floodlight camera: 580 g (20.46 oz)
Maximum projected area of the floodlight: 12415 mm² (19.24 sq in.)
Detaching the wet mounting bracket may allow water to enter the power connection compartment. Ensure all water has dried thoroughly before reassembly.
Please read and follow the above safety information when operating the device. We cannot guarantee that no accidents or damage will occur due to improper use of the device. Please use this product with care and operate at your own risk.
This product contains a light source of energy efficiency class D.
Non-replaceable light source
Non-replaceable control gear