Setup Guide
KE100 KIT Kasa Smart Thermostatic Radiator Valve Starter Kit
Welcome to the setup guide.
To ensure equal access for all users, we offer this accessible setup guide. This guide is designed to meet accessibility needs, enabling a successful setup. It will introduce the appearance of your device, including its ports, buttons and labels, and then guide you through the setup process.
Step 1. Know about your device
The Kasa Smart Thermostatic Radiator Valve Starter Kit contains a Smart Thermostatic Radiator Valve and a Smart IoT Hub.
In this section, we will describe the appearance of the valve and hub, including its buttons and labels.
Smart Thermostatic Radiator Valve
1. You can find your device and provided batteries in the package.
2. Next, place your device on a horizontal surface such as on a shelf or desktop, with the connector at facing down. The connector is the narrow end of the device and can be rotated.
3. After positioning your device correctly, we will introduce the buttons and labels on your device in a certain order.
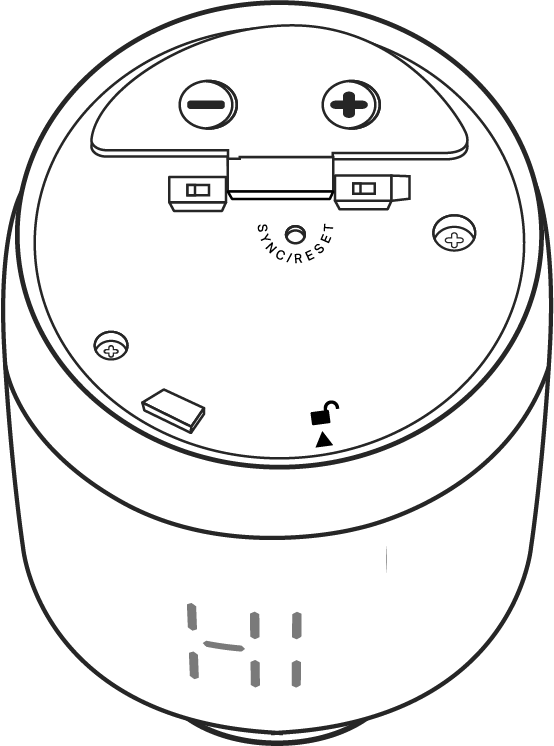
Top Panel: Use the provided cover opener to remove the top panel, then you can see the battery cover and the SYNC/RESET button.
SYNC/RESET button: It's a hole located under the top panel. Use the provided cover-opener to press and hold the SYNC/RESET button for 5 seconds to reset the valve.
Battery Cover: Open the cover, then you can see the battery compartment.
Battery Compartment: Insert two AA LR6 Alkaline batteries to power up your device. Make sure the positive and negative terminals face the correct direction.
Control Knob: The upper part of the device body. Rotate clockwise to raise temperature. Rotate counterclockwise to lower temperature.
Screen: It contains a Connection LED, Schedule LED, Heating LED, Battery LED, and a Temperature LED. This shows the device status and the temperature. You can check the status and temperature in the Kasa Smart app.
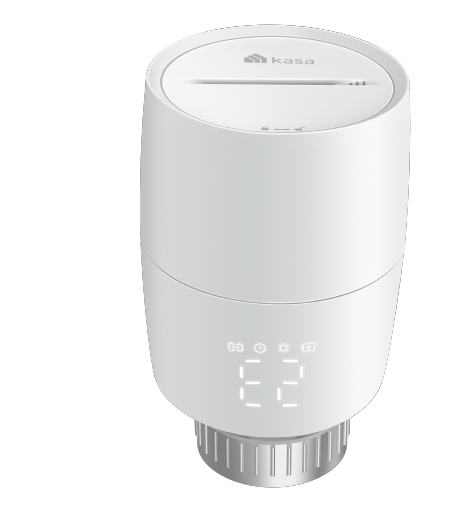
Product label: The product label is on the connector of the device through laser engraving.
Smart IoT Hub:
1. You can find your device in the package.
2. Hold the device with the plug on the back, the front panel facing you and the speaker holes on the upper side.
3. Now we will introduce the buttons and labels on your device in a certain order.
Status LED: It is located at the lower left corner. This shows the device status. You can check the status in the Kasa Smart app.
SYNC button: It's located at the right panel. Press the button once to enter pairing mode or silence the hub when it's ringing. Press and hold the button for 5 seconds to reset Wi-Fi settings. Press and hold the button for 10 seconds to restore your hub to factory default settings.
1.0-Package_20250825035015n.jpg)
Step 2. Valve Install Tips
1. Check existing valve type
There are two types of valves: Thermostatic and Manual.
Kasa Smart Thermostatic Radiator Valve is only compatible with the thermostatic valve.
2. Check install requirements
1) Check the valve’s compatibility. For the comprehensive compatibility guide, check Kasa Smart Thermostat Radiator Valve Compatibility Guide. Kasa Smart Thermostatic Radiator Valve is only compatible with the thermostatic valve.
2) Install the valve first before powering it up.
3) No need to shut off water before changing the radiator valve. Water will not leak.
4) Avoid installing the valve in the same room where you have installed the boiler thermostat.
Step 3. Install and Set Up
1. Get the Kasa Smart app from the App Store or Google Play, then log in.

2. Tap the + button in the app and select your device model. Follow app instructions to install your valve and set up the hub and valve.
If you need help, please visit https://www.tp-link.com/support for technical support, the user guide, FAQs, warranty & more.
For details on Kasa Smart app accessibility, please check Accessibility Support.
English: Safety Information
Smart Thermostatic Radiator Valve:
Keep the device away from water, fire, humidity or hot environments.
Do not attempt to disassemble, repair, or modify the device. If you need service, please contact us.
Do not use the device where wireless devices are not allowed.
Please read and follow the above safety information when operating the device.
We cannot guarantee that no accidents or damage will occur due to improper use of the device. Please use this product with care and operate at your own risk.
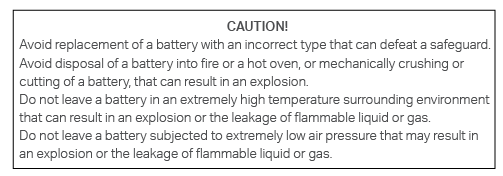
Do not ingest battery, Chemical Burn Hazard
Keep new and used batteries away from children.

TP-Link hereby declares that Kasa Smart Thermostatic Radiator Valve is in compliance with the essential requirements and other relevant provisions of directives 2014/53/EU, 2009/125/EC, 2011/65/EU and (EU)2015/863.
The original EU declaration of conformity may be found at https://www.tp-link.com/en/support/ce/
TP-Link hereby declares that Kasa Smart Thermostatic Radiator Valve is in compliance with the essential requirements and other relevant provisions of the Radio Equipment Regulations 2017.
The original UK declaration of conformity may be found at https://www.tp-link.com/support/ukca/
Smart IoT Hub:
Do not install in a socket facing downward.
Keep the device away from water, fire, humidity or hot environments.
Do not attempt to disassemble, repair, or modify the device. If you need service, please contact us.
Do not use the device where wireless devices are not allowed.
The socket-outlet shall be installed near the equipment and shall be easily accessible.
Please read and follow the above safety information when operating the device. We cannot guarantee that no accidents or damage will occur due to improper use of the device. Please use this product with care and operate at your own risk.
TP-Link hereby declares that Kasa Smart IoT Hub is in compliance with the essential requirements and other relevant provisions of directives 2014/53/EU, 2009/125/EC, 2011/65/EU and (EU) 2015/863.
The original EU declaration of conformity may be found at https://www.tp-link.com/en/support/ce/
TP-Link hereby declares that Kasa Smart IoT Hub in compliance with the essential requirements and other relevant provisions of the Radio Equipment Regulations 2017.
The original UK declaration of conformity may be found at https://www.tp-link.com/support/ukca/