Setup Guide
Tapo S220 Smart Light Switch, 2 Gang 1 Way
Welcome to the setup guide.
To ensure equal access for all users, we offer this accessible setup guide. This guide is designed to meet accessibility needs, enabling a successful setup. It will introduce the appearance of your switch, including its ports, buttons, and labels, and then guide you through the setup process.
Before you start
WARNING: Risk of Electric Shocks
This switch should be wired to your home circuit, which can only be installed by a skilled person. Please hire a professional licensed electrician if necessary and exercise caution at all times to avoid the risk of electric shock, injury, or death.
You can always find detailed wiring and mounting instructions on the Tapo app.

Step 1. Know about your switch
In this section, we will describe the switch's appearance, including its ports, buttons, and labels.
1. You can find your switch in the package.
2. Next, place the switch's base on a flat surface.
To ensure the switch is placed correctly, make sure the lock, which is a buckle that can be slid to the left or right, facing forward.
3. After positioning your switch correctly, we will introduce the ports, buttons, and labels on your device in a certain order.
Open/Close Lock: Slide left to lock the switch and slide right when you want to remove the faceplate.
The faceplate contains two switch buttons. Remove the faceplate to find the battery compartment. Insert two 1.5 V AAA/LR03 alkaline batteries to power on the device.
On the lower left side of the compartment is the RESET Button.
RESET Button: Press and hold the RESET button for at least 5 seconds to reset the switch and enter pairing mode.
Status LED: It is located on the left panel next to the RESET button. It shows your device status. You can check the device status on the Tapo app.
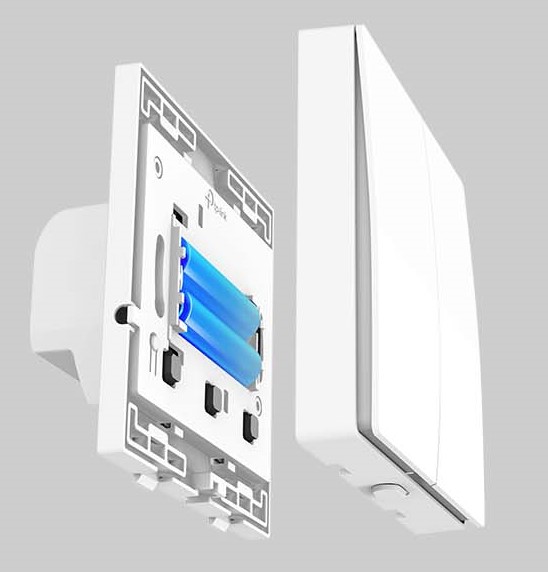
Product Label: The product label is placed on the back panel of the device.
Step 2. Set up your switch
1. Get the Tapo app from the App Store or Google Play, then log in.

2. After inserting the batteries, wait 30 seconds for the device to start up.
3. Tap the + button in the app and select your device model. Follow the app instructions to complete the setup.
4. Wire the switch by a licensed electrician.
For details on Tapo app accessibility, please check Accessibility Support.
Safety Information
Before installing, servicing or removing the switch, read and follow all safety precautions including the following:
• Follow all national and local safety regulations and practices. If you are uncertain or uncomfortable when performing the installation, consult a qualified electrician.
• CAUTION – Risk of Electric Shock – More than one disconnect switch may be required to de-energize the equipment before servicing. A circuit breaker which disconnects the Line and Neutral conductor simultaneously is suitable. Ensure power is off at the circuit breaker before removing or installing any switch. Use a non-contact voltage tester to ensure the power is off.
• Do not install the Smart Switch with wet hands or when standing on wet or damp surfaces.
• Keep the device away from water, fire, humidity or hot environments
• Do not attempt to disassemble, repair, or modify the device. If you need service, please contact us.
• Do not use the device where wireless devices are not allowed.