Setup Guide
Tapo C530WS/Tapo C520WS/Tapo C52A/TC43/TC42 Outdoor Pan/Tilt Security Wi-Fi Camera
Welcome to the setup guide.
To ensure equal access for all users, we offer this accessible setup guide. This guide is designed to meet accessibility needs, enabling a successful setup. It will introduce the appearance of your camera, including its ports, buttons, and labels, and then guide you through the setup process.
Step 1. Know about your camera
In this section, we will describe the camera's appearance, including its ports, buttons, and labels.
1. You can find your camera and power adapter in the package.
Power Adapter: The power adapter is typically a rectangular or square block with a cord on one end that plugs into the power port to power it up.
2. Next, keep the flat surface at the top, and the side where the power cable goes out facing backward.
To ensure the camera is placed correctly, you should position it with the camera lens facing forward.
3. After positioning your camera correctly, we will introduce the ports, buttons, and labels on your device in a certain order.
Antennas: For receiving the Wi-Fi signal better. They are on the left and right sides of the device, with flat and long shapes, and are adjustable.
System LED: It is right below the lens. It shows your camera status. You can check the camera status on the Tapo app.
Lens: For capturing things within its view.
Microphone: For capturing your voice. It is right below the lens.
Tilt the camera lens up to find the speaker.
Speaker: For producing sound, allowing you to hear the audio.
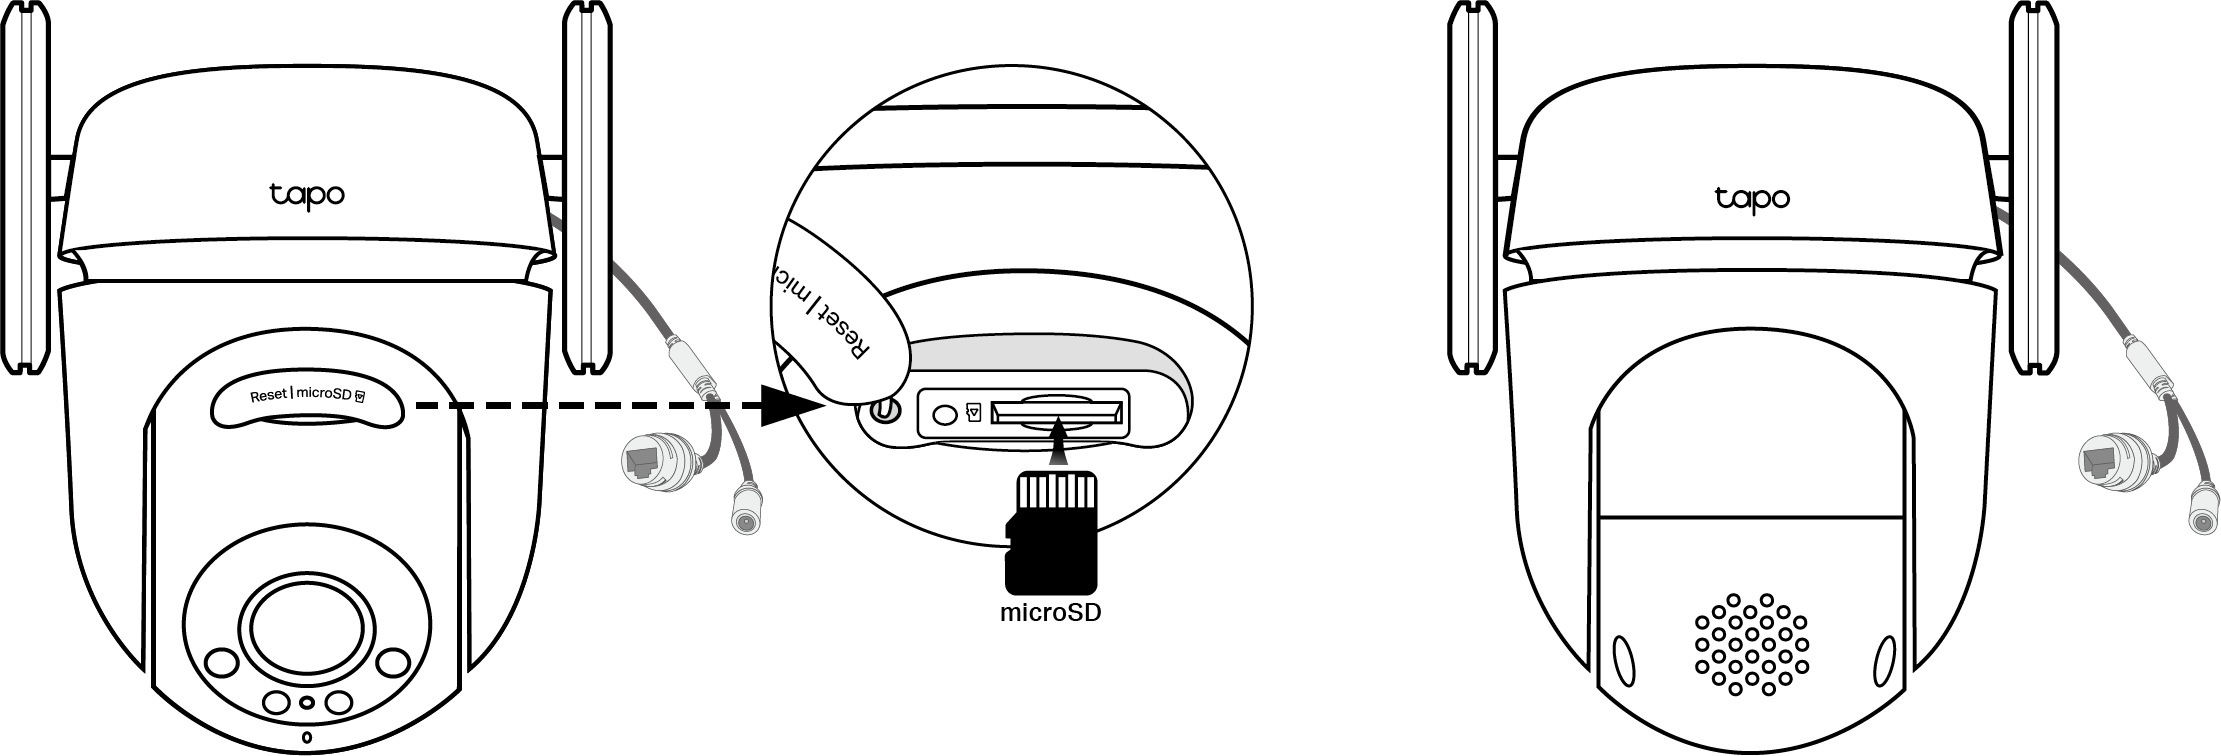
Tilt the camera lens down to find the silicone cover for the Reset button and microSD card. Open the cover, the RESET button is on the left, and the microSD card slot is on the right.
RESET Button: The reset button is a small, recessed button. You can feel for a small hole where the button is, and the edges may have a slight indentation. While the camera is on, use a pin to press and hold the RESET button to reset the camera.
Press and hold for 5 seconds: Reset Wi-Fi settings only
Press and hold for 10 seconds: Reset to factory settings
microSD Card Slot: While facing the front of the camera, insert a microSD card with the notch on the left side, and gold contacts facing the slot.
Above the silicone cover, you can find the product label.
Product Label: The product information is partially laser-engraved. The MAC address and serial number are printed on a sticker.
Turn to the back side of your camera to find the power cable. At the end of the power cable, you can find the DC power connector and Ethernet port.
DC Power Connector: For connecting the camera to the power adapter to power it up.
Ethernet Port: Used to connect to a network device by an Ethernet cable.
Step 2. Set Up
1. Get the Tapo app from the App Store or Google Play, then log in.

2. Plug in the power adapter. Wait 30 seconds for the camera to start up. You can hear a clicking sound.
3. Tap the + button in the app and select your camera model. Follow the app instructions to complete the setup.
If you need help, please visit https://www.tapo.com/support/ for technical support, the user guide, FAQs, warranty, and more.
For details on Tapo app accessibility, please check Accessibility Support.
English: Safety Information
Do not use damaged charger or USB cable to charge the device.
Do not use any other chargers than those recommended.
Do not use the device where wireless devices are not allowed.
Adapter shall be easily accessible.
Use only power supplies which are provided by manufacturer and in the original packing of this product. If you have any questions, please don't hesitate to contact us.
Keep the device away from fire or hot environments. DO NOT immerse in water or any other liquid.
Do not disassemble, repair or modify the product.
Do not use the product if the casing has been broken. Danger of electric shock.
Never touch the product with wet hands.
Do not place near automatically controlled devices such as fire alarms. Radio waves emitted from this product may cause such devices to malfunction resulting in an accident.
Observe restrictions on using wireless products in fuel depots, chemical plants or when blasting operations are in progress.
Do not use liquid to clean the product. Only use a dry cloth.
Never put metal objects inside the product. If a metal object enters the product turn off the circuit breaker and contact an authorised electrician.
This product is not intended to be used when providing medical care. Consult the manufacturer of any personal medical devices, such as pacemakers or hearing aids to determine if they are adequately shielded from external RF (radio frequency) energy.
Do not use this product in health care facilities. Hospitals or health care facilities may be using equipment that could be sensitive to external RF energy.
Do not place heavy objects on top of the product.
When you leave the product unused for a long time unplug the product from the power outlet.
This product may interfere with other electronic products such as TV, radios, personal computers, phones or other wireless devices.
Adapter should be used indoors where the ambient temperature is lower than or equal to 40 ºC.
Use only power supplies listed in the user instructions. Refer to the User Manual on the product support page.
Operating Temperature: -30 ºC ~ 60 ºC (-22 °F ~ 140 °F )
Please read and follow the above safety information when operating the device. We cannot guarantee that no accidents or damage will occur due to improper use of the device. Please use this product with care and operate at your own risk.