
RE705X-Outdoor Setup Guide
Model: RE705X-Outdoor
Welcome! Let’s get your range extender up and running together.
This guide makes setup simple for everyone, covering helpful accessibility resources, what’s in the box, how it looks, and where to begin.
Our Tether app also offers accessibility features, such as increasing page contrast, switching to landscape mode and increasing font size. You can enable them during setup to make it much easier to set up your device and adjust settings! For more accessibility guidance, refer to Accessibility Support.
Now, ready to explore your range extender and extend your network even further?
Step 1. Learn About Your Range Extender
This section introduces the range extender's package contents and appearance, including its ports, buttons, LEDs and product label.
1. Unpack Your Range Extender
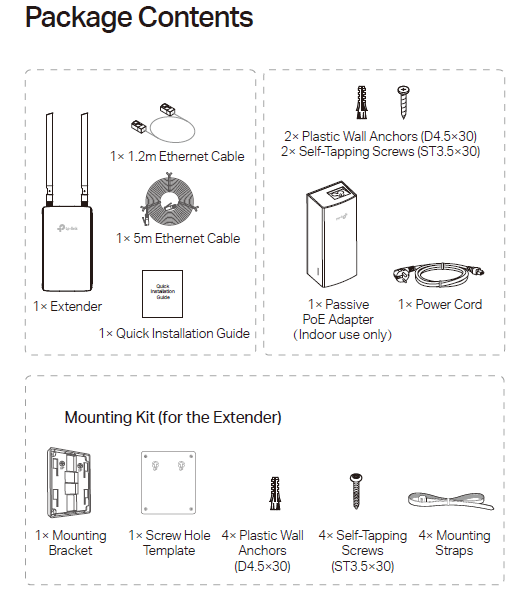
Your package includes a range extender, accessories and installation guides.
The accessories include:
1.2m Ethernet Cable: Short flat cable with small square plug connectors on both ends.
5m Ethernet Cable: Longer flat cable, matching small square plugs at each end.
Passive PoE Adapter: The PoE adapter has a cuboid shape and detachable mounting bracket. One end has a power slot, and the other end has a PoE port and a data port. Facing the end with the two ports, keep the power slot to the right of the other end. Now, the PoE port is on the left, and the Data port is on the right.
Power Cord: The power cord is usually a round cable with plugs on both ends. One end is for connecting to the wall outlet, and the other is for inserting into the PoE adapter's power slot to power it up.
2 Plastic Wall Anchors: Short hollow plastic tubes.
2 Self-Tapping Screws: Long thin screws with pointed tips.
Extender Mounting Kit:
- Mounting Bracket: a plastic frame, with slots to lock the extender.
- Screw Hole Template: Flat thin square sticker with printed marks for screw positioning.
- 4 Plastic Wall Anchors: Short hollow plastic tubes.
- 4 Self-Tapping Screws: Long thin screws with pointed tips.
- 4 Mounting Straps: Flat thin flexible plastic zip ties, one end has a small locking head.
2. Appearance of the Extender
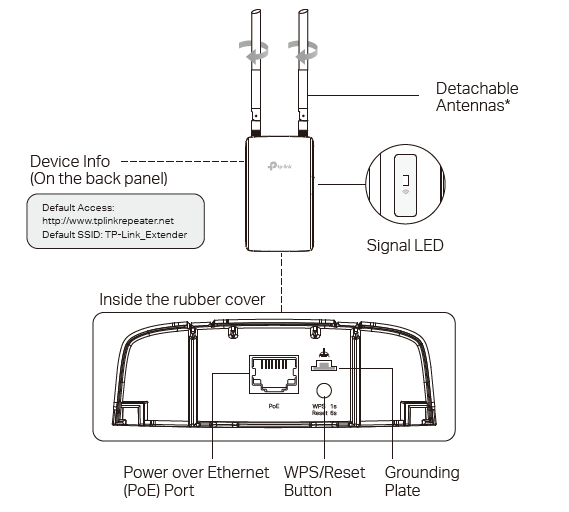
The range extender has a rectangular shape. On the back of the extender, four small square bumps stick out from the surface, two on the left, two on the right. These raised squares are used for mount. The opposite side is the front panel. It has two detachable antennas. For optimal Wi-Fi performance, we recommend keeping the antennas vertical.
Facing the front panel, on the right side, it features Signal that shows the working status of the extender.
|
Status |
Explanation |
|
Off |
The extender is off. |
|
Blinking Green |
The extender is starting up or resetting, or a firmware upgrade is in progress. |
|
Blinking Yellow |
AP Mode: WPS is in progress (blinking fast), or the host network is unavailable. RE Mode: WPS is in progress (blinking fast), or the extender is not connected / is connecting to the host network. |
|
Solid Green |
AP Mode: 2.4 GHz or 5 GHz is enabled. RE Mode: The extender is connected to your router’s wireless network and the signal strength is strong. |
|
Solid Yellow |
AP Mode: 2.4 GHz and 5 GHz is disabled. RE Mode: The extender is connected to your router’s wireless network, but the signal strength is weak. |
Facing the front panel, on the bottom side, there is a Power over Ethernet (PoE) Port in the middle. On the right of the PoE port, there are a flat grounding plate and a round WPS/Reset button.
Power over Ethernet (PoE) Port: A nearly square port. For connecting to the PoE port of the passive PoE adapter.
Grounding Plate: A flat metal block attached to the casing, with a round hole in the center.
WPS/ Reset Button: A small round button. Press the button on your main router, and immediately press this button on the extender for 1 second then wait for about 2 minutes to set up the connection. Press and hold for over 6 seconds to reset the extender to its factory settings then wait for about 2 minutes to reboot.
On the back of the extender, there is product info printed on the casing. The info includes the extender’s default access address, default network name (SSID), and so on. For your extender, the default SSID is "TP-Link_Extender" and no password.
Step 2. Get Started
1. Power On the Extender
(1) Connect an ethernet cable to the PoE port of the extender and the PoE port of the passive PoE adapter.
(2) Connect the power cord to the passive PoE adapter and an AC power outlet to power on the passive PoE adapter. Wait for about 2 minutes for the extender to get ready for setup.
2. Scan the QR code below to download the Tether app. The app will walk you through setup.
Note: Please remain online (Wi-Fi or mobile data) throughout the app download and login steps.
3. After the quick setup process, you can follow the app's instruction to relocate and mount the extender.

Support
For technical support, replacement services, user guides, and other information about your product model, please visit https://www.tp-link.com/support/