
Table of Contents
Installation and User Guide
About This Guide
This guide provides a brief introduction to the Solar Cam 2K Dual (2-Cam Kit) and the Tapo app, as well as regulatory information. Please note that features available in Tapo may vary by model and software version. Tapo availability may also vary by region. All images, steps, and descriptions in this guide are only examples and may not reflect your actual Tapo experience.
Conventions
In this guide, the following convention is used:
| Convention | Description |
|---|---|
| Blue | Key information appears in blue, including management page text such as menus, items, buttons and so on. |
| Underline | Hyperlinks are in blue and underlined. You can click to redirect to a website. |
| Note |
Ignoring this type of note might result in a malfunction or damage to the device. |
More Info
Specifications can be found on the product page at https://www.tapo.com.
Our Technical Support and troubleshooting information can be found at https://www.tapo.com/support/.
The setup video can be found at https://www.tp-link.com/support/setup-video/#cloud-cameras.
Introduction
Enjoy seamlessly unified whole-home security with your Solar Cam 2K Dual (2-Cam Kit): One hub brings everything together with private local storage and simple multi-camera viewing, while dual lenses and 360° tracking keep the full scene and key details in view.
- Synchronized Smart Tracking– The wide-angle lens detects movement, and the rotating lens instantly locks on and follows, giving you real-time, reactive coverage.
- Tap-to-Zoom Precision – Tap within the wide-angle view to instantly engage the telephoto lens for a closer, focused view of the action.
- High-Efficiency Solar Charging – Daily 55 minutes* of direct sunlight charges cameras for all-day use. No sun? No problem. The built-in battery provides power for up to 4 months.**
- Color Night Vision– Enhances your nighttime security by revealing vivid colors with the built-in spotlights.
- Scalable Connection Center–CentralHub connects up to 16 cameras or doorbells and 64 sensors***, providing a unified system that is easier to manage and expand.
- Customizable Sound and Light Alarm – Record your voice and set the spotlight brightness to create an alarm that fits your needs.
*55 min of sunlight time is based on standard environmental conditions (1000 W/m2, 25℃, AM1.5) and specified working scenes (up to 100 events triggered per day). Actual required time of sunlight may vary.
**120-day battery life is based on TP-Link laboratory tests with 300s of use per day. The time of use includes recording and watching live views. Actual battery life may vary due to device settings, usage, router specification, and environmental factors.
***Connect up to 64 Tapo IoT devices (Tapo sensors, buttons, Sub-1G switches) and 16 Tapo cameras/video doorbells. For the compatibility list, please refer to the link: tapo-h500/product-list
Know Your CentralHubTM
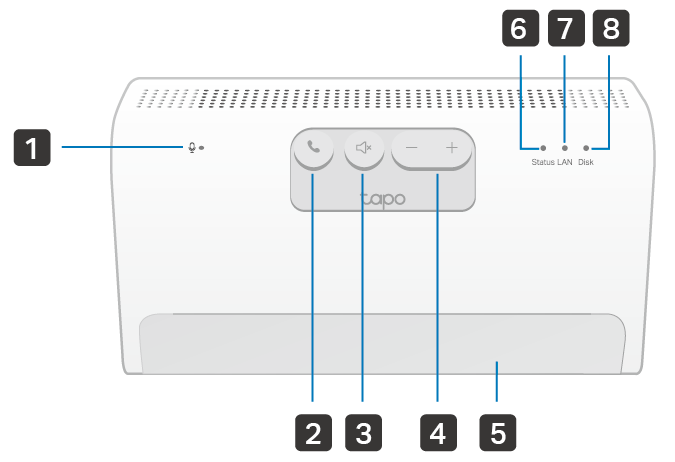
1 Microphone
2 Answer/SYNC Button
Press once: Answer a call.
Press and hold for 3 seconds: Enter pairing mode.
3 Decline/Mute Button: Decline a call, or silence the alarm.
4 Volume Button: Volume up or down.
2 + 4: Switch to the previous or next channel when using an HDMI output.
5 Pad Holder: Easily place your pad here.
6 Status LED
7 LAN LED
8 DISK LED
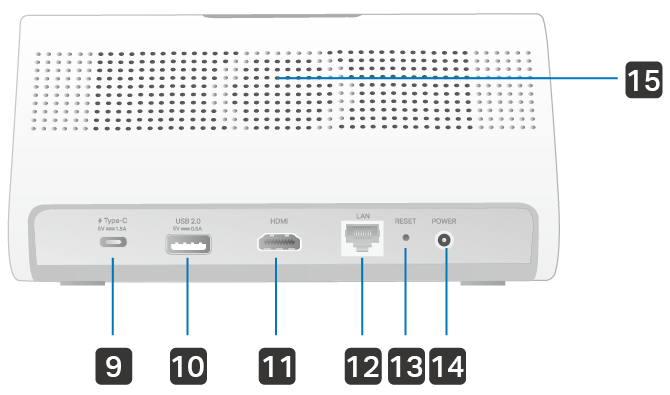
9 Type-C Port: 5V/1.5A type-C port for charging devices (e.g., battery-powered cameras). This port cannot transfer data.
10 USB 2.0 Port: 5V/0.5A USB port for exporting data to another device.
11 HDMI Port: Output port for high-definition video signals. You can connect it to a TV or monitor for screen mirroring.
12 LAN Port: Connect to a router or switch using an Ethernet cable.
13 RESET Button: Press and hold for 10 seconds to restore factory default settings.
14 Power Port
15 Speaker
Status LED Indication
| LED Status | Indication |
|---|---|
| Solid red | Starting up |
| Blinking red slowly | Ready for setup |
| Blinking red and green | Connecting to Wi-Fi |
| Blinking green slowly | Connected to Wi-Fi (Wireless) |
| Connected to router (Ethernet) | |
| Solid green | Connected to the cloud |
| Blinking amber slowly | Disconnected from router |
| Blinking red quickly | CentralHubTM resetting |
| Blinking green quickly | CentralHubTM updating |
| CentralHubTM pairing | |
| Off | CentralHubTM powered off |
LAN LED Indication
| LED Status | Indication |
|---|---|
| On | Ethernet network working properly |
| Off | Ethernet cable not connected |
Disk LED Indication
| LED Status | Indication |
|---|---|
| Solid green | Hard drive working properly |
| Solid red | Hard drive malfunctioning |
| Off | No hard drive connected |
Know Your Camera
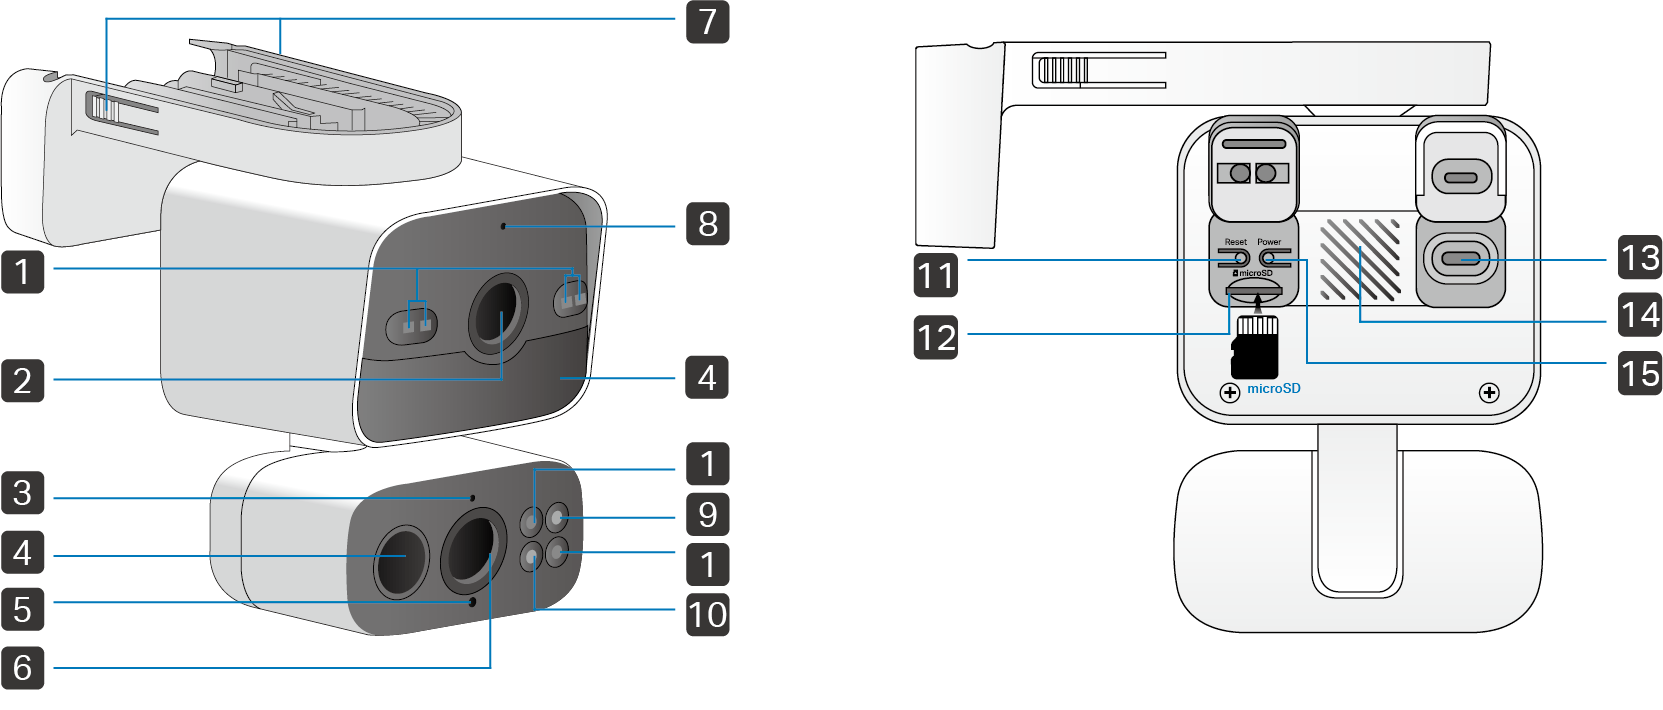
1 IR & White Light LEDs: IR LEDs for creating black-and-white images at night and white light LEDs for creating colorful images at night.
2 Wide-Angle Lens: For capturing things within its view. It's fixed in place but supports manual adjustment for the best viewing angle.
3 Status LED: It shows your camera status.
4 Motion Sensor
5 Light Sensor
6 Telephoto Lens: For capturing things within its view. It features automatic pan and tilt to follow motion or shift focus between different areas as needed.
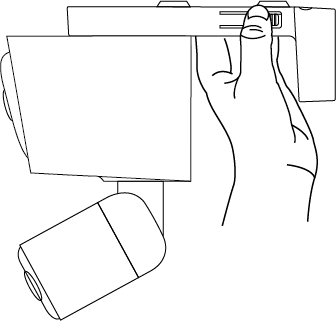
7 Release Latches: Press to detach the camera from the bracket.
8 Microphone: For capturing your voice.
9 Red Alarm Light
10 Blue Alarm Light
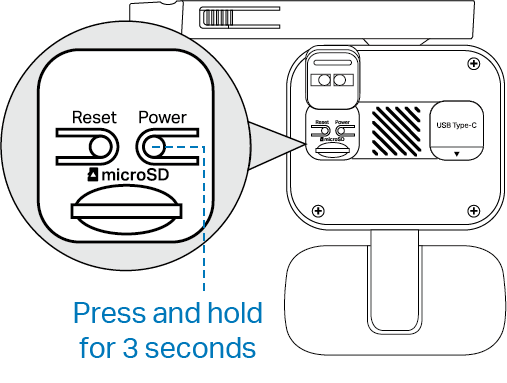
11 Reset Button: Open the cover to find the Reset Button. While the camera is powered on, press and hold the Reset button to reset the camera.
- Press and hold for 5 seconds: Reset Wi-Fi while preserving the other.
- Press and hold for 10 seconds: Reset to factory settings.
12 microSD Card Slot Button: Open the cover to find the microSD card slot. Insert a microSD card (not included) and initialize it on the Tapo app for local recording.
13 USB Type-C Charging Port: Open the cover for USB charging.
14 Speaker: For producing sound, allowing you to hear the audio.
15 On/Off Power Button: Open the cover to find the On/Off button. Press and hold the button for about 3s to turn on/off the camera.
Status LED Indication
| LED Status | Indication |
|---|---|
| Blinking amber quickly for 3 seconds | USB charger plugged in |
| Solid red | Starting up |
| Blinking red and green | Ready for setup |
| Blinking red slowly | Connecting to Wi-Fi |
| Solid amber | Connected to Wi-Fi |
| Solid green | Connected to the cloud |
| Blinking red quickly | Camera resetting |
| Blinking green quickly | Camera updating |
Set Up Your Kit
Follow the steps below to get started with your new smart devices.
Step 1. Power Up and Connect CentralHubTM
Warning: For easier setup, always start with the CentralHubTM, then the cameras. DO NOT power on the cameras until the CentralHubTM is added.
Option 1: Wired Connection (Ethernet)
Connect the CentralHubTM to your router or switch with the included Ethernet cable, then connect it to a power outlet using the provided power adapter.
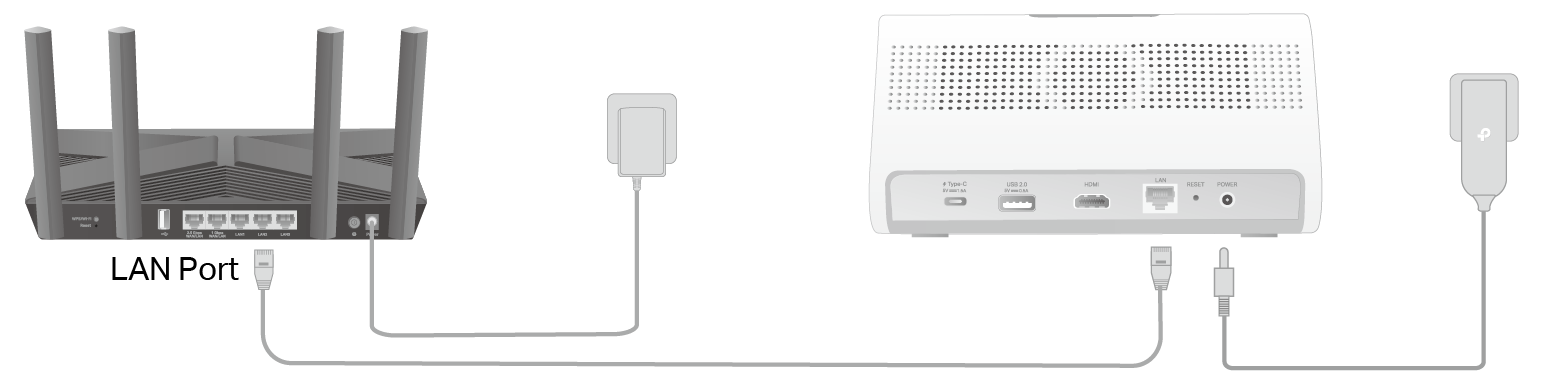
Option 2: Wireless Connection
Connect the CentralHubTM to a power outlet and follow the steps below to connect it to a 5 GHz Wi‑Fi network.
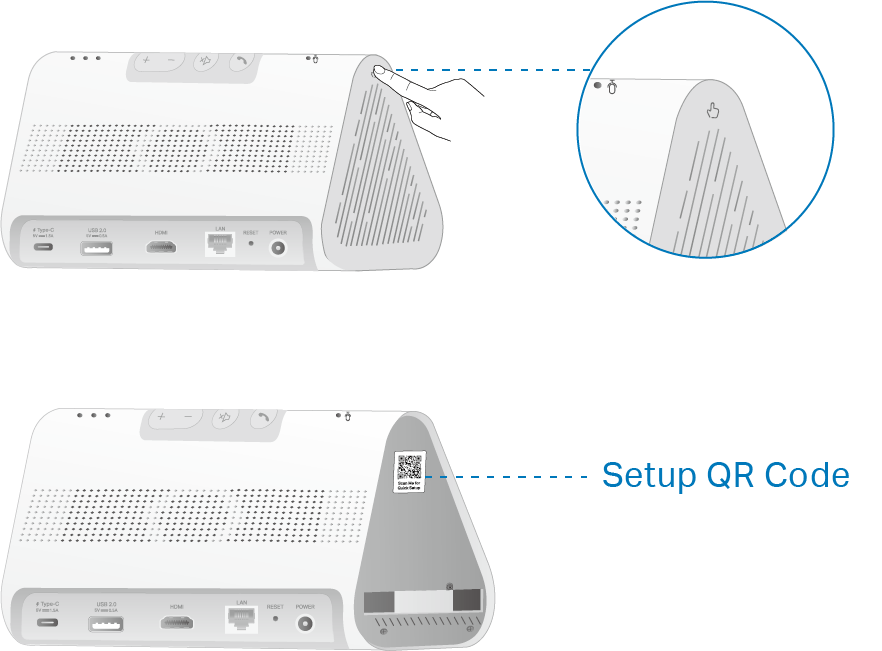
Step 2. Locate the Setup Code
The symbol shows where you should press. Push down the lid to remove it. You can find the Setup QR Code on the CentralHubTM is added.
Step 3. Download Tapo App
Get the Tapo app from the App Store or Google Play, or by scanning the QR code below. Open the app and log in or sign up to begin.

Step 4. Set Up Your Kit
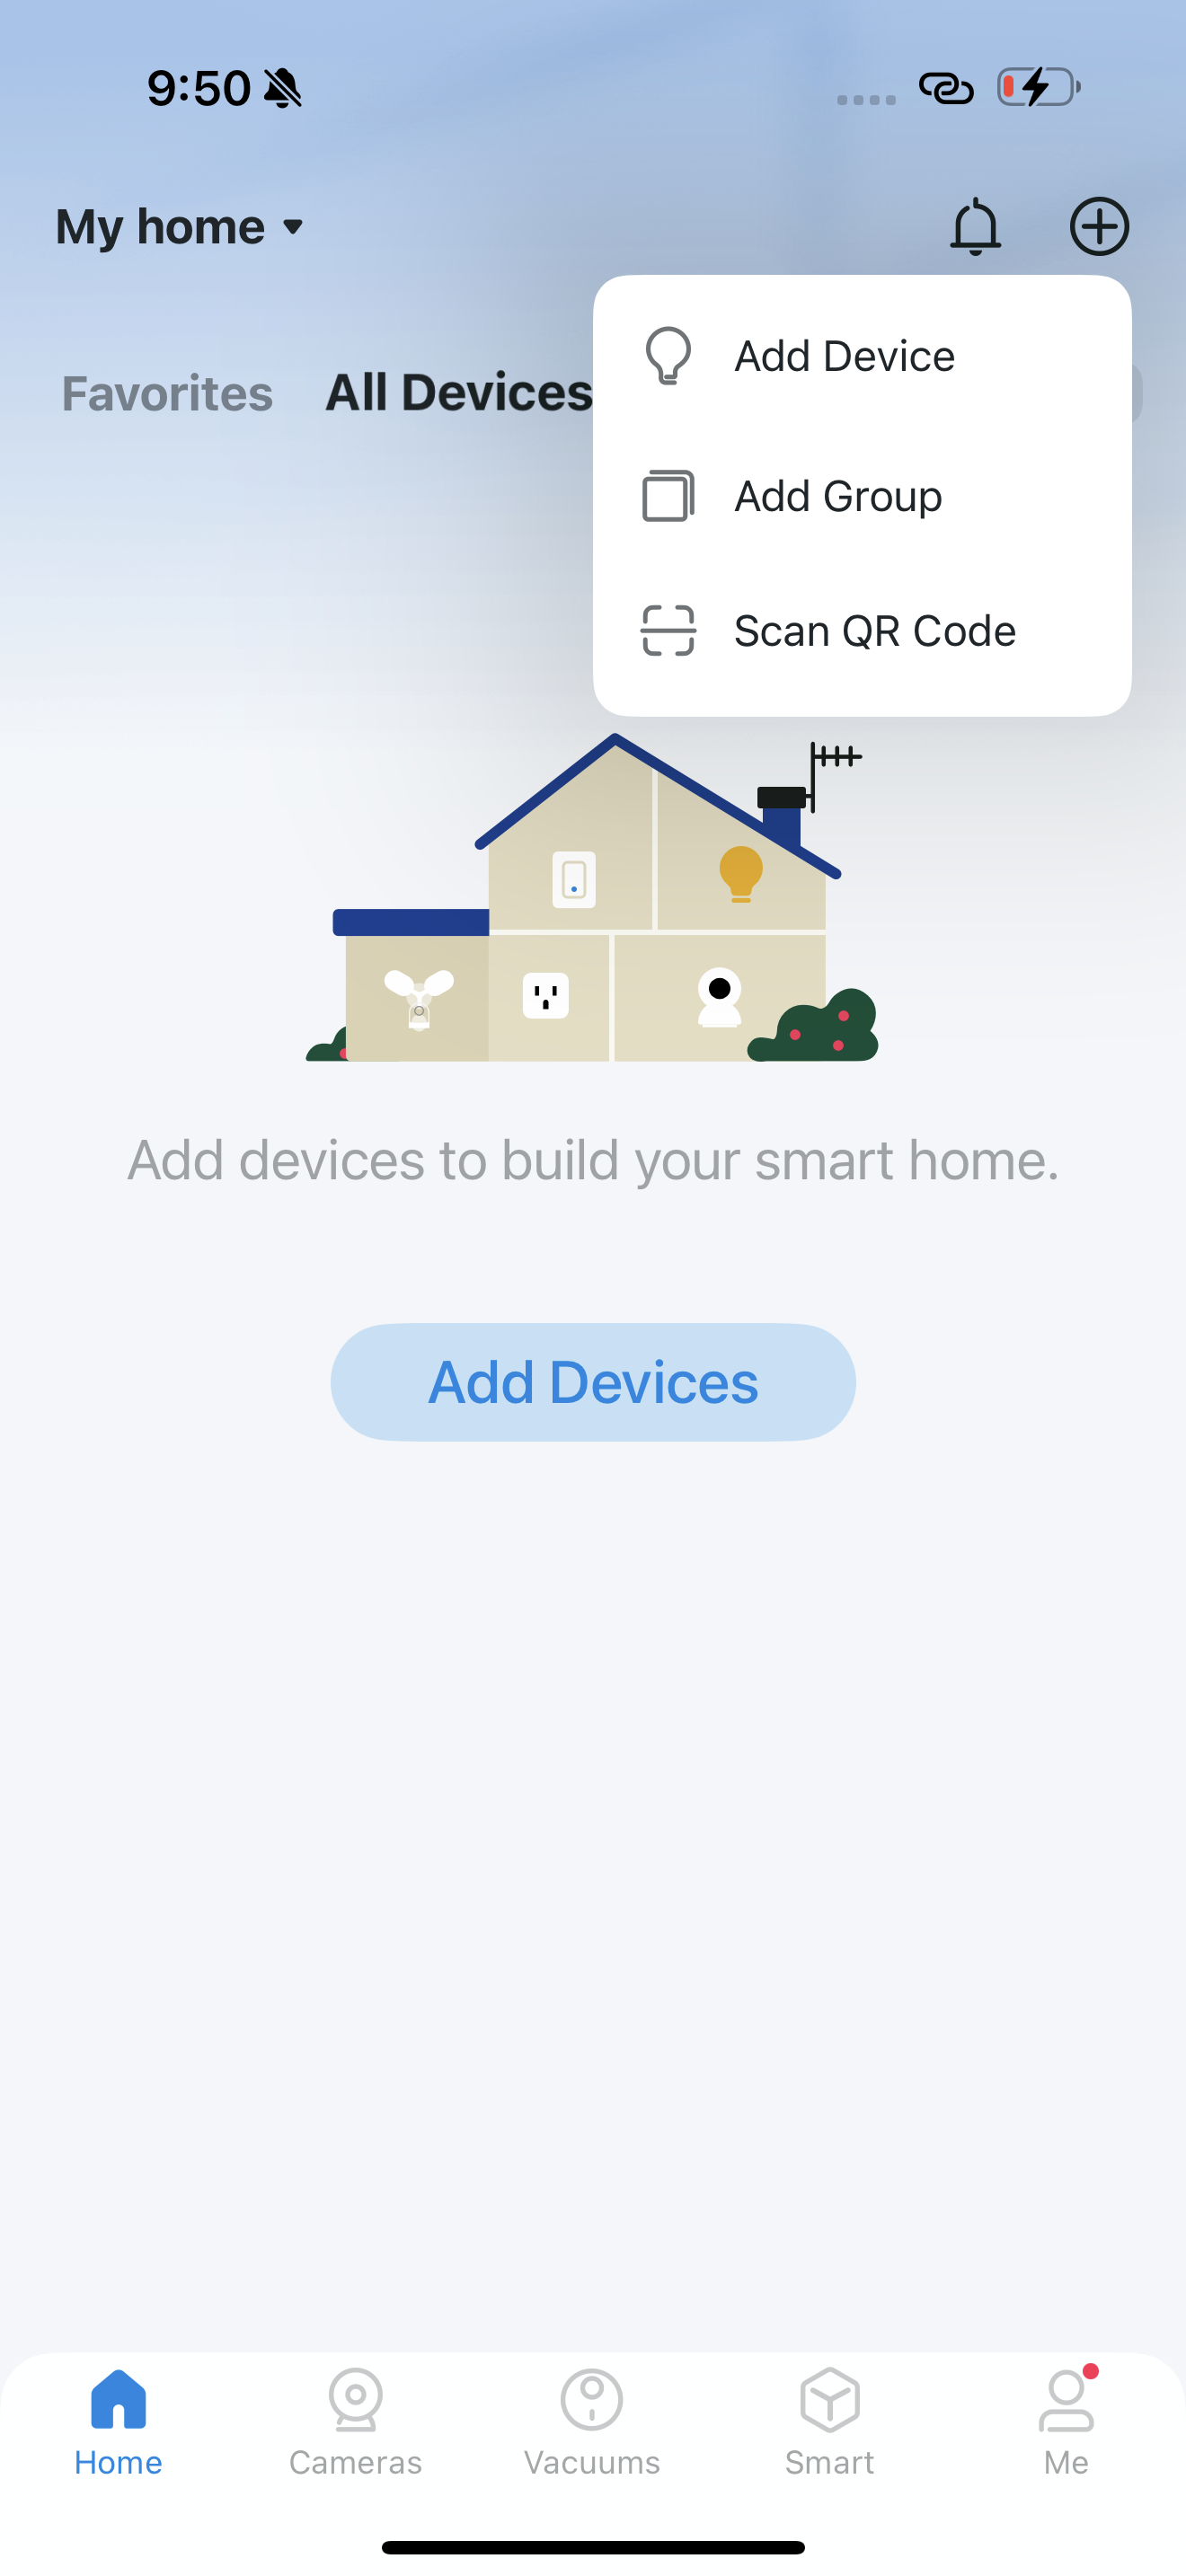
(1) Tap the + button in the Tapo app and select Scan QR Code to scan the setup QR code on the CentralHubTM to add it.
Note: DO NOT power on the cameras until the CentralHubTM is added.
(2) Power on the cameras and follow the app instructions to complete the setup.
(Optional) Expand Your CentralHubTM Local Storage
Caution:
1. Back up all the data on your hard drive before installation as Tapo may need to format your hard drive.
2. The CentralHubTM must be powered off when you install or remove a hard drive.
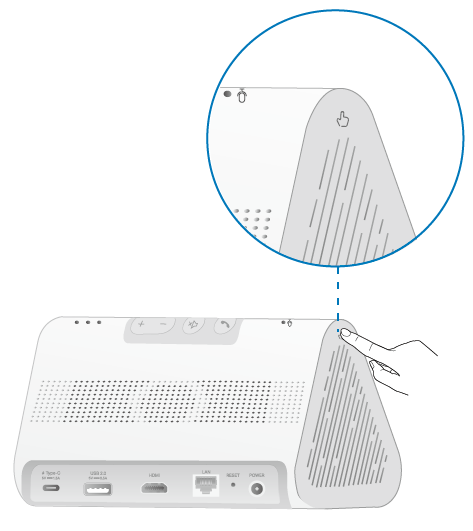
1. Remove the Lid
Push down the lid to remove it. The symbol shows where you should press.
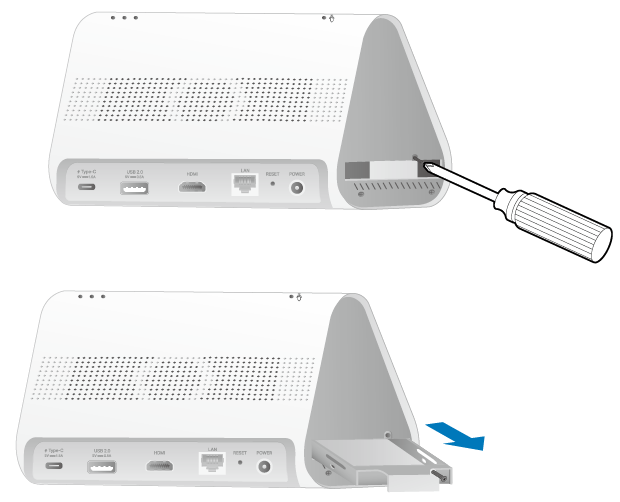
2. Take Out the Bracket
Loosen the screw and pull out the hard drive bracket.
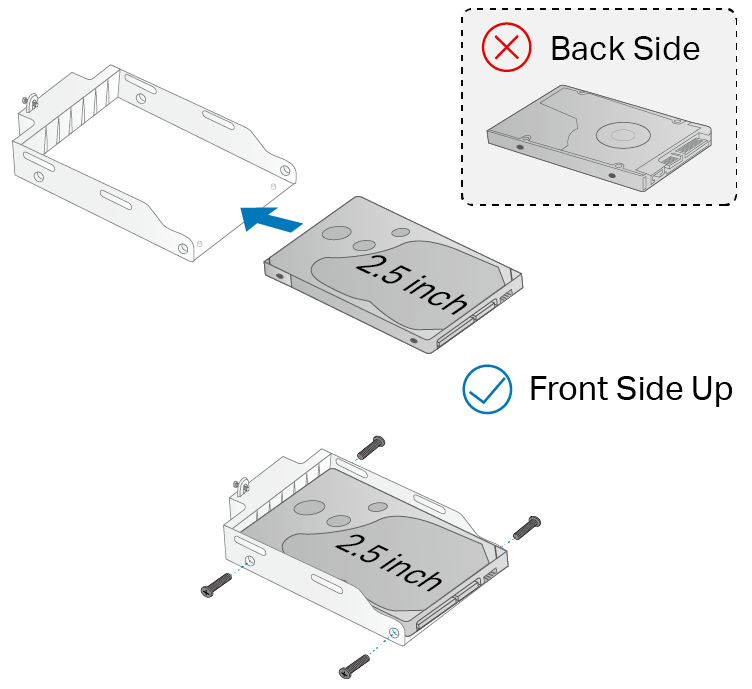
3. Secure the Hard Drive
Place the hard drive into the bracket with the front side up. Secure it in place with screws.
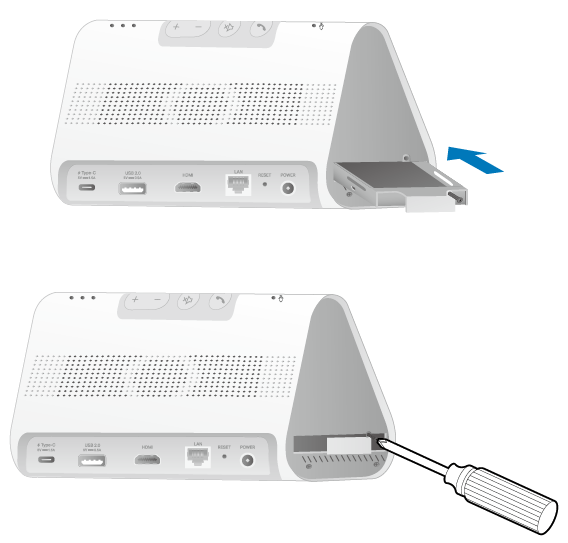
4. Secure the Bracket
Insert the bracket back into the CentralHubTM. Secure it with the screw, then replace the lid.
Note: Initialize the hard drive in the Tapo app.
Charge the Battery
The battery comes partially charged. We recommend fully charging the battery before mounting. A full charge can take up to 7 hours.
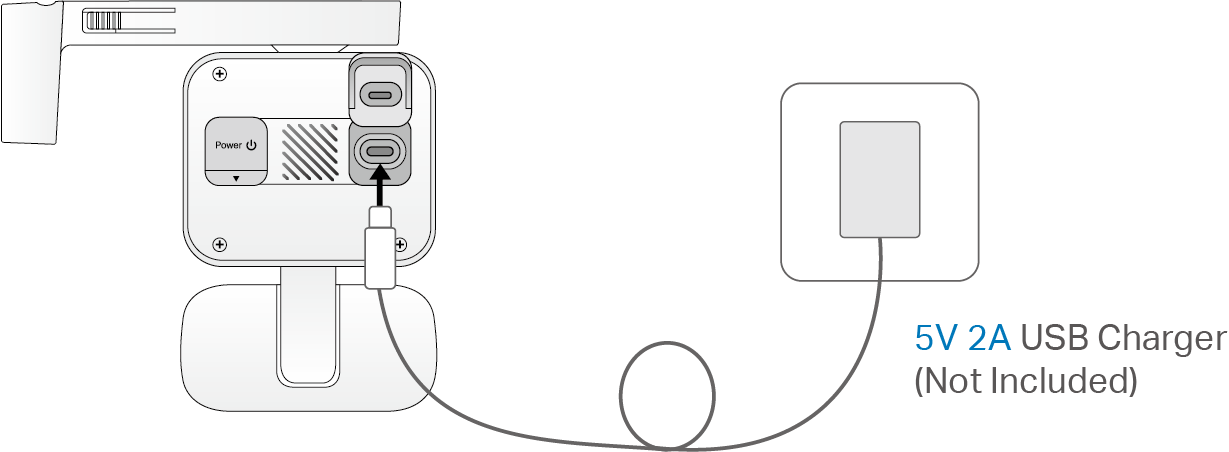
Notes:
1. Peel off the film from the camera before use.
2. Check the battery status on the Tapo app after setup.
3. The camera may not power up after falling. Plug in the USB charger to power it on again.
4. Keep the ports firmly covered when not in use to ensure waterproof and dustproof performance.
5. Do not tear off the silicone part by force as it may affect waterproof and dustproof performance.
6. Charge the battery using the included USB cable. Some third-party cables may cause slow or failed charging.
7. When you plug in the USB charger, the LED should blink amber quickly for 3 seconds. If not, make sure the power is running and check your connection.
Solar Camera Mounting Tips
Solar Panel Mounting Tips
The position and tilt angle of the solar panel greatly affect the solar efficiency.
1. Choose an unobstructed location where the solar panel receives the most sunlight throughout the year. Regularly wipe the panel to remove dust and debris.
2. Position the panel south-facing in the Northern Hemisphere or north-facing in the Southern Hemisphere. The recommended tilt angle between the panel and the horizontal ground is 35° ~ 45°.
Camera Mounting Tips
1. Avoid placing behind windows/glass. Windows and glass can block the motion sensor of your camera, preventing motion detection.
2. Choose your mounting location. Proper mounting of your camera will prevent issues such as frequent false alerts.
• Avoid pointing the camera directly at swaying trees.
• Avoid pointing the camera in high traffic areas unless that is the desired monitoring location.
• Avoid pointing the camera directly at streetlights or sunlight.
3. Do not place the camera upside down.
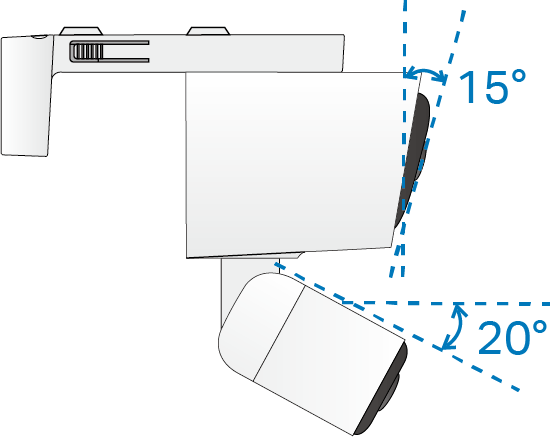
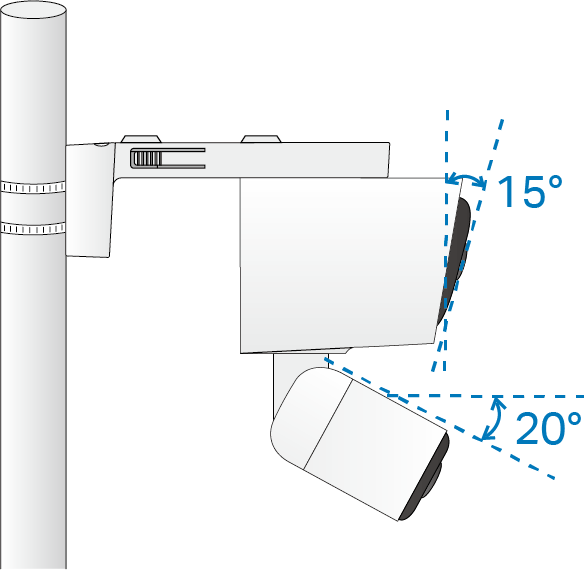
4. For optimal results, keep the motion sensor level, tilt the camera's wide-angle lens down at an angle of about 15°, and tilt the telephoto lens down at an angle of about 20°.
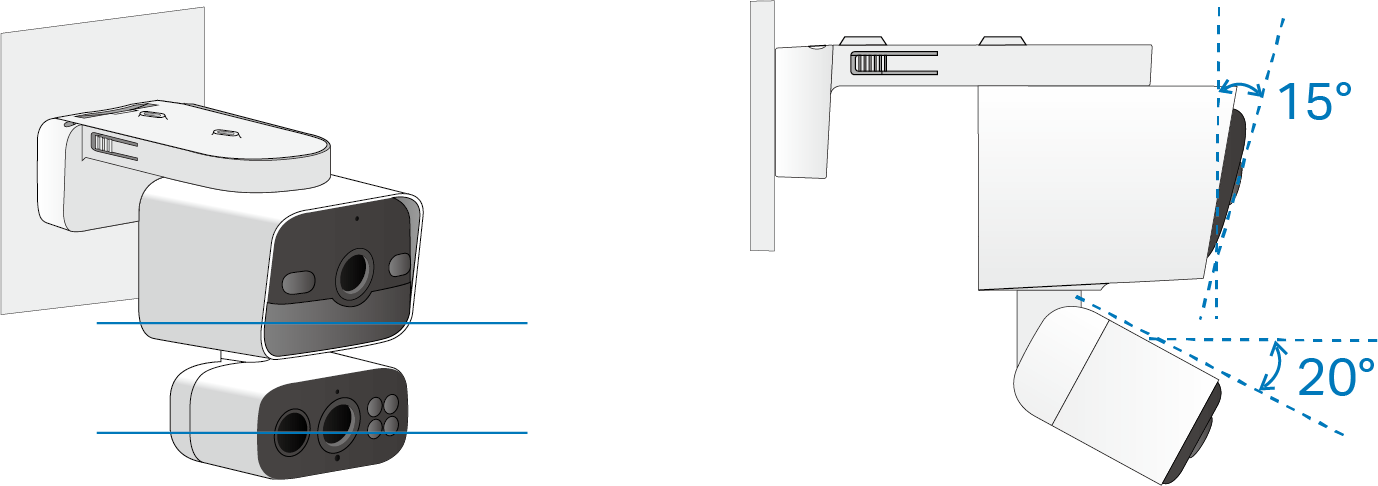
5. Mounting your camera at an angle so movement crosses the lens's field of view will provide more accurate motion detection and AI detection.
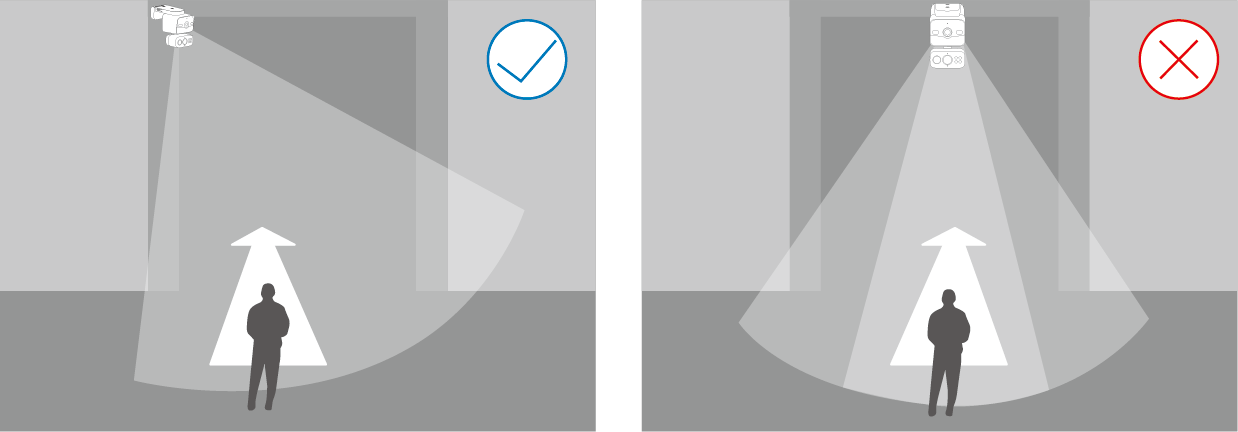
*Do not mount facing the direction of movement.
6. For optimal detection performance, we recommend mounting the camera 8 ft (2.5 m) above the ground.
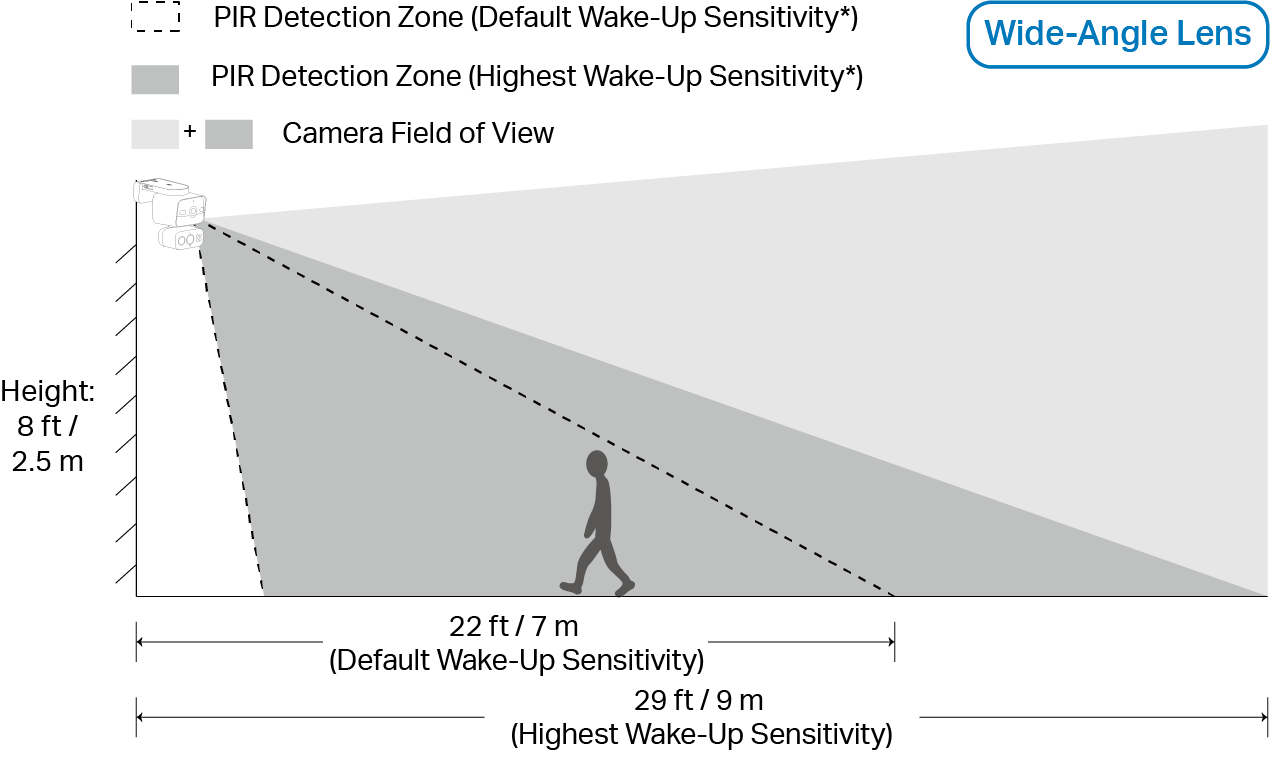
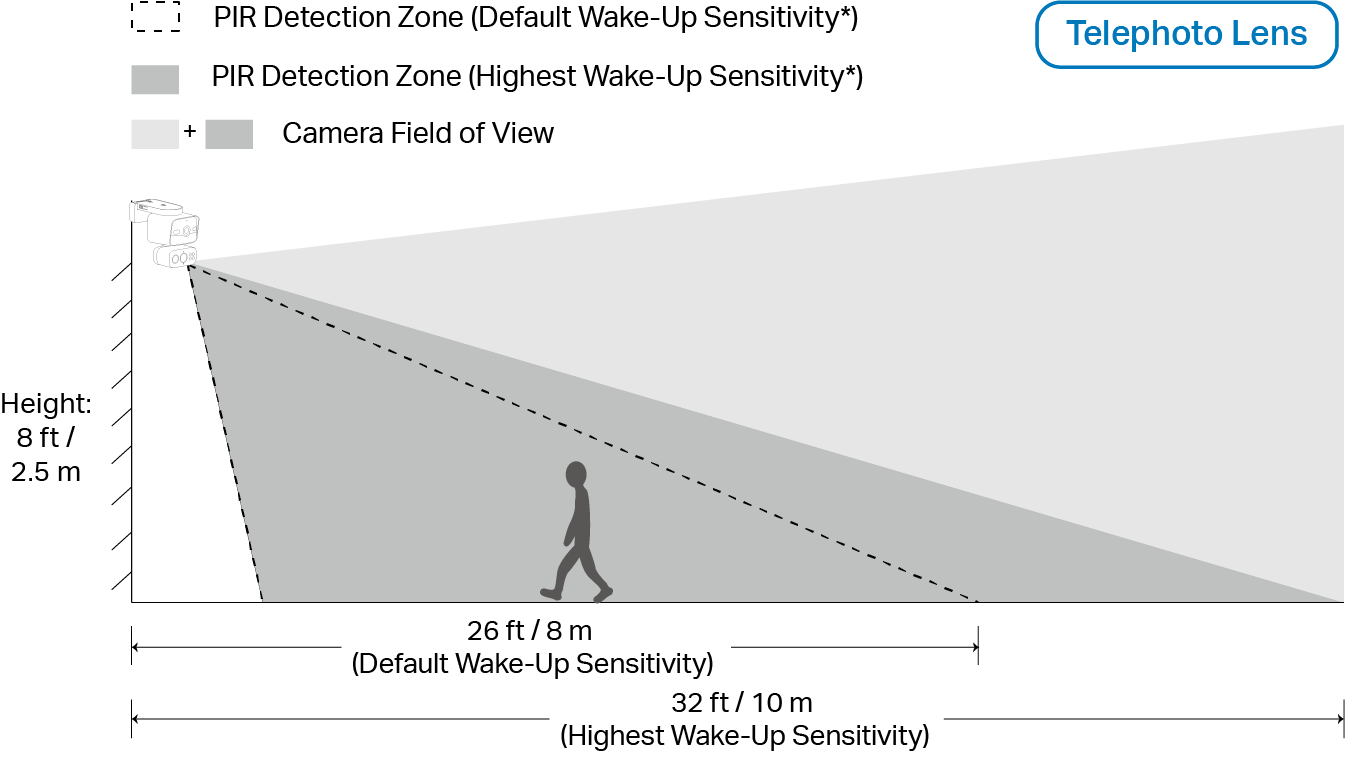
*You can adjust the sensitivity in Camera Settings > Detection > Wake-up Sensitivity.
Integrated Mounting
Mount Solar Panel & Camera Together
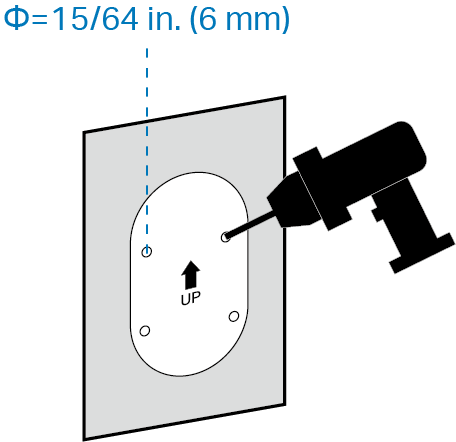
1. Drill Holes
Stick the mounting template sticker to a solid and level wall surface. Drill four screw holes according to the template.
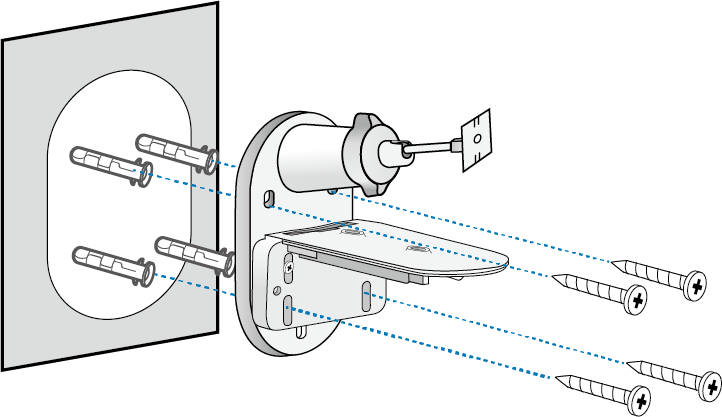
2. Secure the Bracket
Insert four anchors into the holes and use the screws to affix the bracket over the anchors.
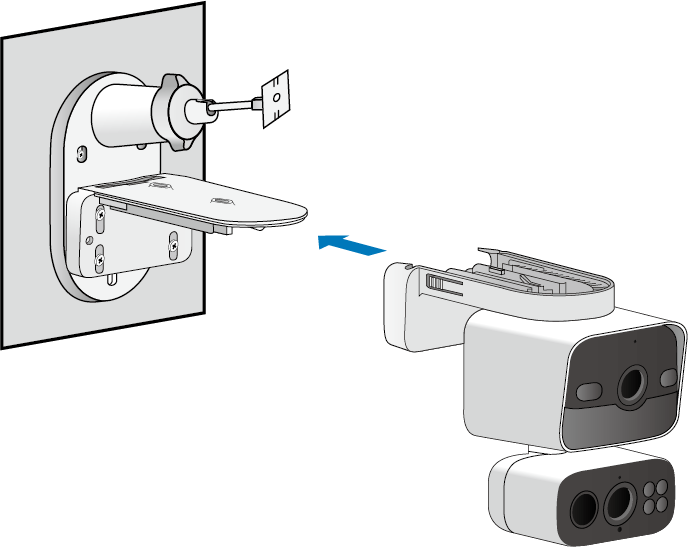
3. Attach the Camera
Slide the camera onto the camera bracket until it clicks into place.
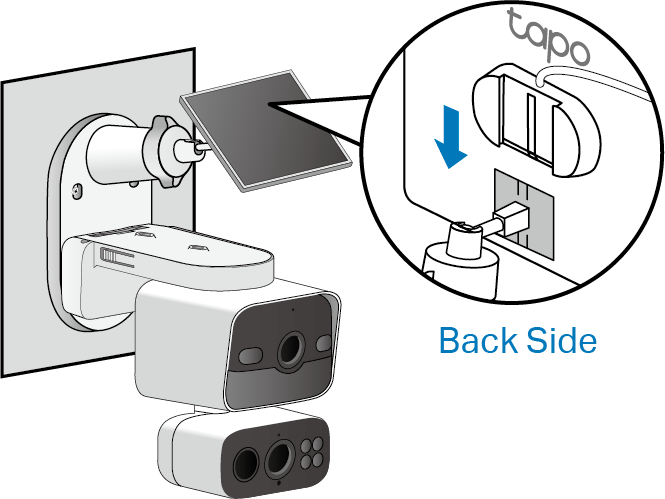
4. Install the Solar Panel
Slide the solar panel onto the solar panel mounting bracket until it clicks into place.
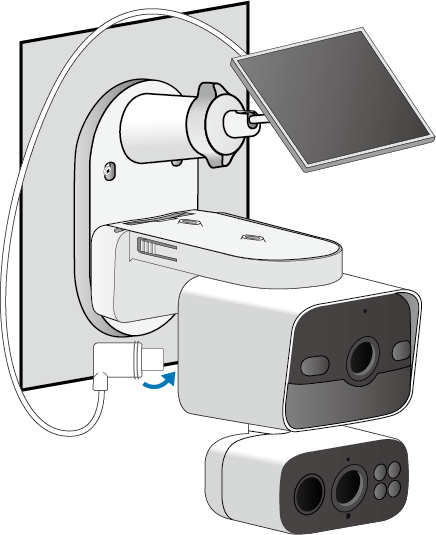
5. Connect the Camera to Solar Panel
Insert the connector into the camera's charging port until it is snug to begin charging.
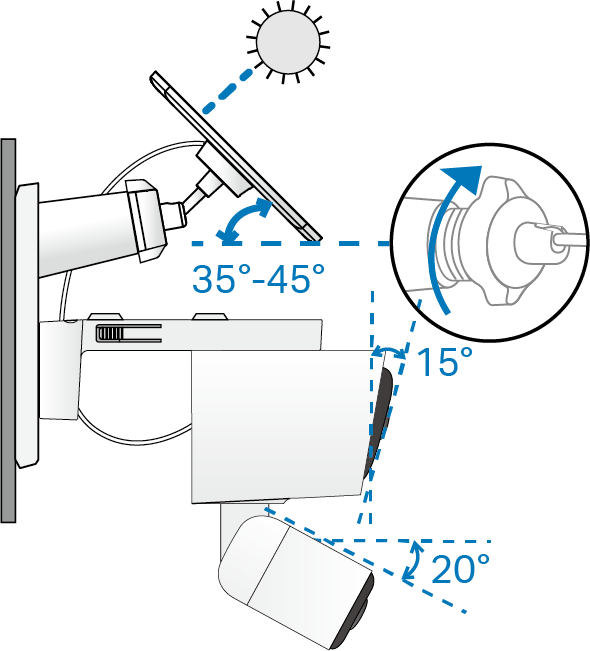
6. Adjust Camera & Solar Panel Angle
 1) Loosen the adjustable screw, tilt the solar panel to adjust the angle, and then tighten the adjustable screw. The recommended tilt angle between the panel and the horizontal ground is 35° ~ 45°.
2) Tilt the camera's wide-angle lens down at an angle of about 15°, and tilt the telephoto lens down at an angle of about 20°.
Individual Mounting
Mount the Camera & Solar Panel Individually
Mount the Camera
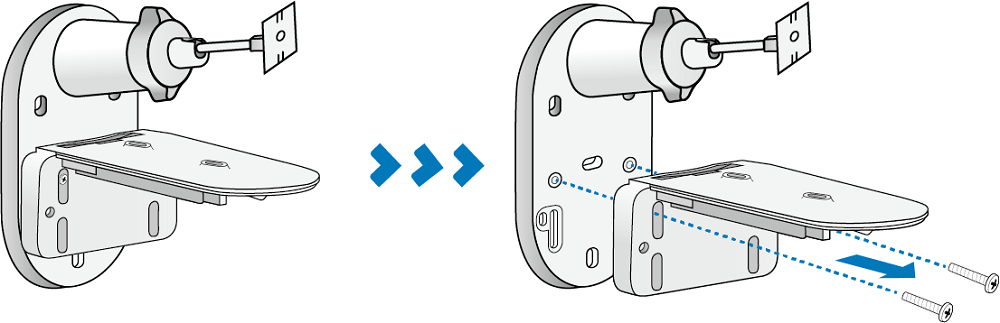
Before you start, separate the camera bracket and the solar panel bracket by unscrewing the two bracket screws.
A: Wall Mount/Eave Mount
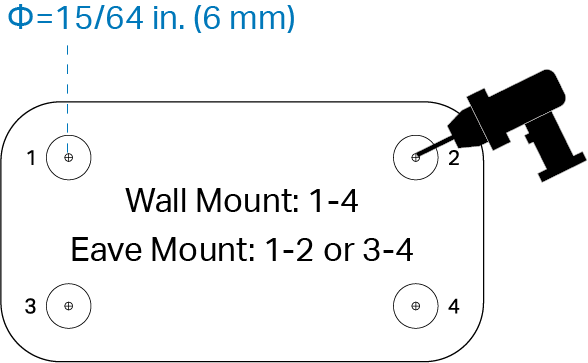
1. Drill Holes
Stick the mounting template sticker to a solid and level wall surface. Drill four holes (Wall Mount) or two holes (Eave Mount) according to the template.
2. Secure the Bracket
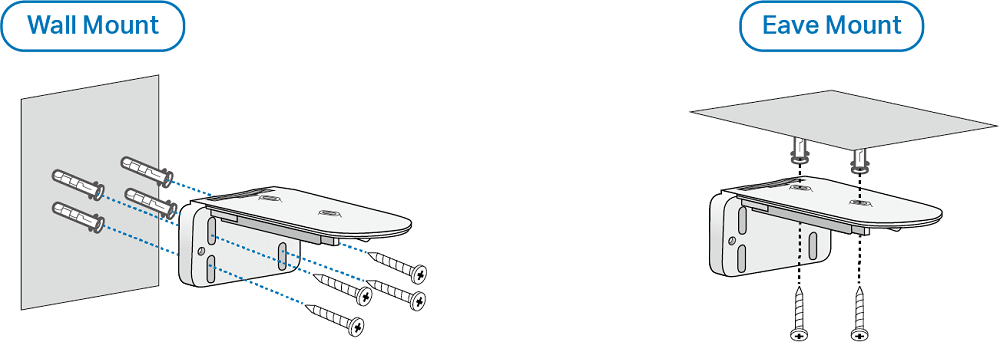
Insert four anchors (Wall Mount) or two anchors (Eave Mount) into the holes and use the screws to affix the camera bracket over the anchors.
3. Install the Camera
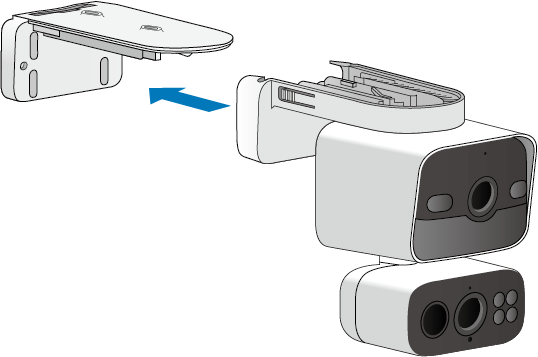
Slide the camera onto the camera bracket until it clicks into place.
4. Adjust the Angle
Tilt the camera's wide-angle lens down at an angle of about 15°, and tilt the telephoto lens down at an angle of about 20°.
B: Pole Mount
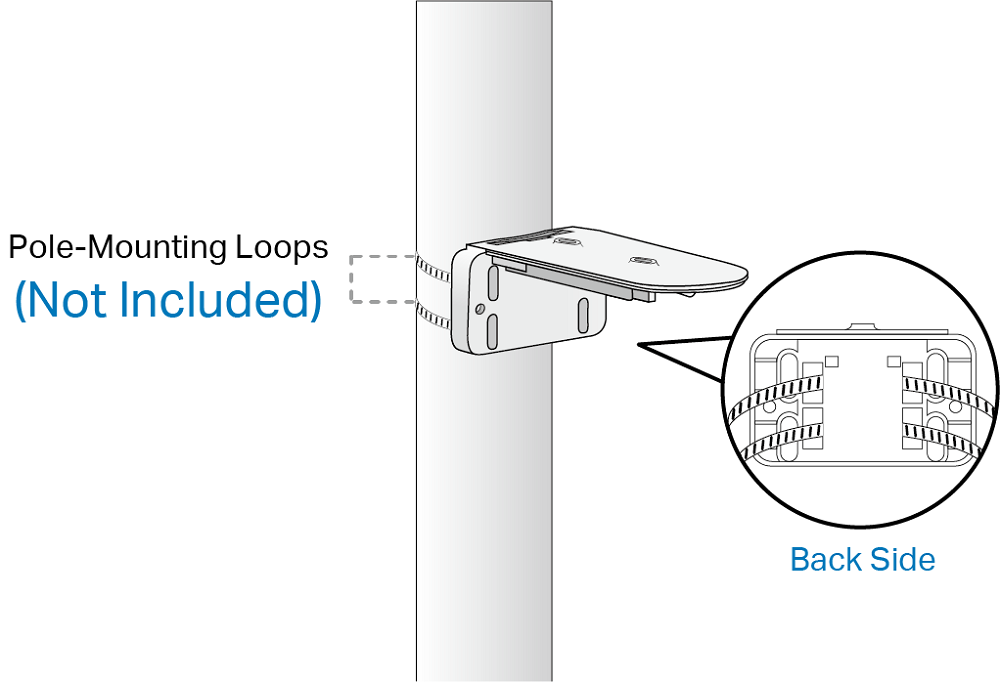
1. Secure the Bracket
Mount the bracket on the pole using two pole-mounting loops (loop width ≤ 12 mm).
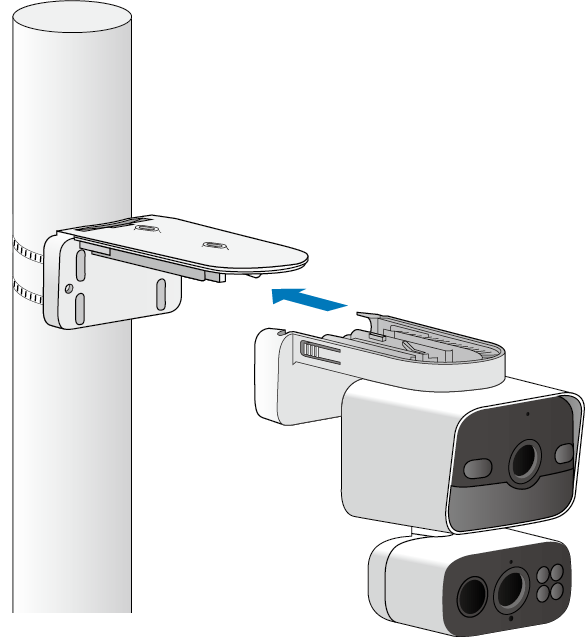
2. Install the Camera
Slide the camera onto the camera bracket until it clicks into place.
2. Install the Camera
Tilt the camera's wide-angle lens down at an angle of about 15°, and tilt the telephoto lens down at an angle of about 20°.
Mount the Solar Panel
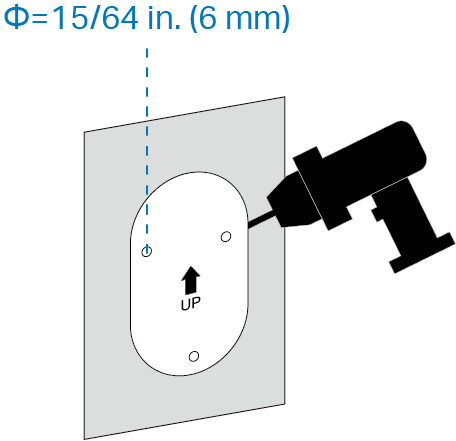
1. Drill Holes
Stick the mounting template sticker to a solid and level wall surface. Drill three holes according to the template.
2. Secure the Bracket
Insert three anchors into the holes and use the screws to affix the camera bracket over the anchors.
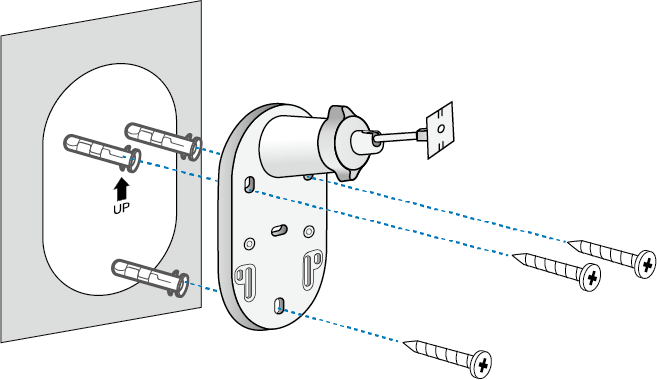
3. Install the Solar Panel
Slide the solar panel onto the solar panel mounting bracket until it clicks into place.
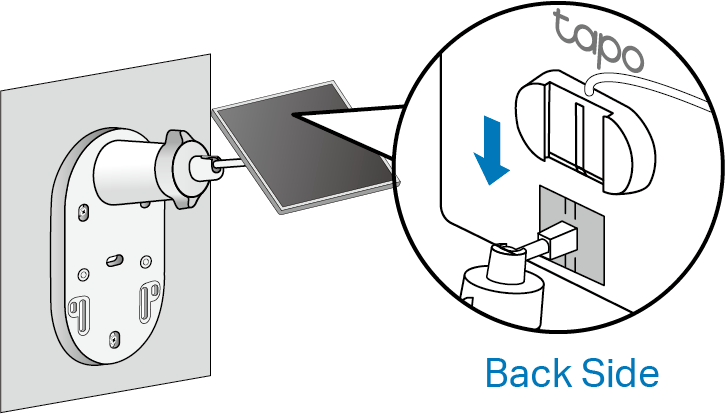
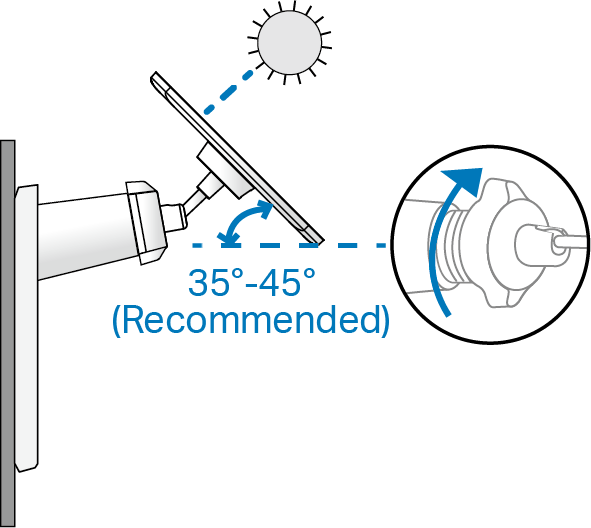
4. Adjust the Solar Panel Angle
Loosen the adjustable screw, tilt the solar panel to adjust the angle, and then tighten the adjustable screw. The recommended tilt angle between the panel and the horizontal ground is 35° ~ 45°.
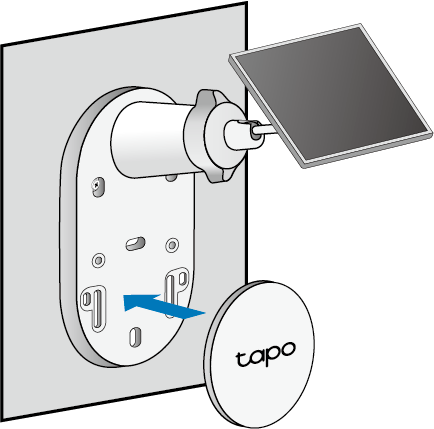
5. Install the Base Cover and Connect to the Camera
Install the base cover. Then insert the connector into the camera's charging port until it is snug to begin charging.
5. Connect to the Camera
Insert the connector into the camera's charging port until it is snug to begin charging.
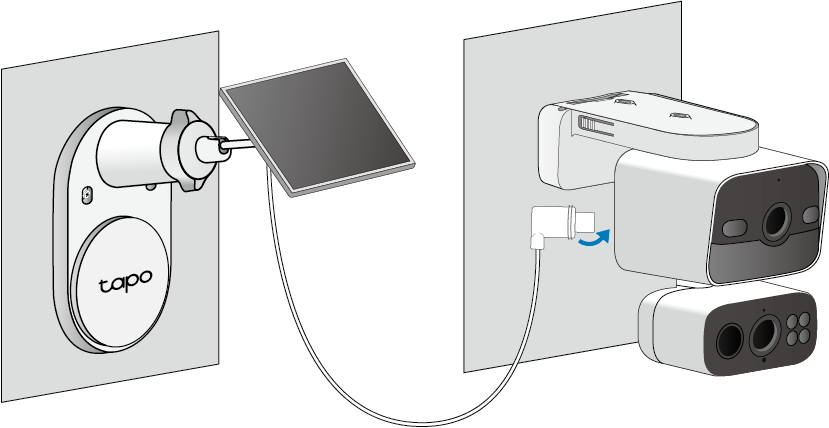
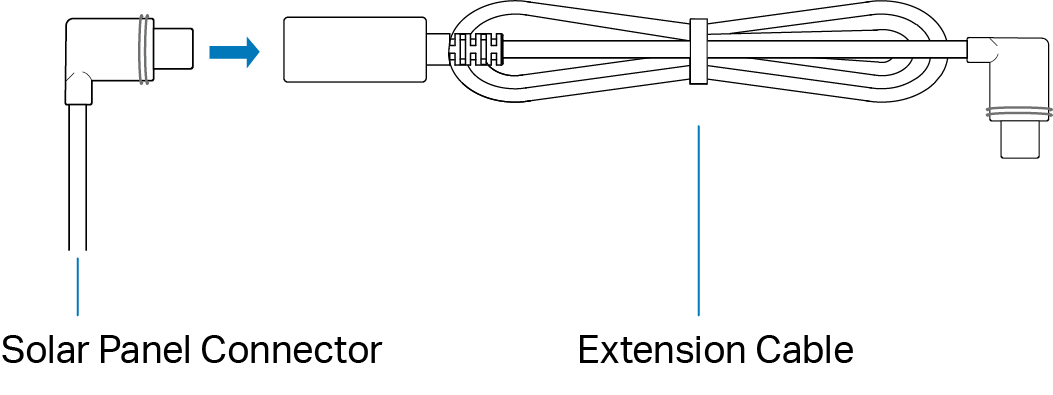
If the power cable is too short...
Extend the power cable using the provided extension cable. Insert the connector into the extension cable until snug and use the appropriate gasket when connecting the solar panel to your camera.
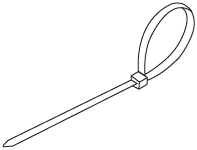
If the power cable is too long...
Use the cable zip tie provided to bundle up the excess cable. Once tightened, the zip tie cannot be easily adjusted. To release the tie, you will need to cut the zip tie.
Support
For technical support, the setup videos, FAQs, warranty and more, please visit https://www.tapo.com/support/
Authentication (CentralHubTM)
CE Mark Warning

OPERATING FREQUENCY (the maximum transmitted power)
2400 MHz-2483.5 MHz (20dBm)
863 MHz-868.6 MHz (25mW e.r.p)
5150 MHz-5250 MHz (23dBm)
5250 MHz-5350 MHz (23dBm)
5470 MHz-5725 MHz (23dBm)
EU Declaration of Conformity
TP-Link hereby declares that the CentralHubTM is in compliance with the essential requirements and other relevant provisions of directives 2014/53/EU, 2009/125/EC, 2011/65/EU and (EU)2015/863.
The original EU Declaration of Conformity may be found at https://www.tapo.com/en/support/ce/.
RF Exposure Information
This device meets the EU requirements (2014/53/EU Article 3.1a) on the limitation of exposure of the general public to electromagnetic fields by way of health protection.
The device complies with RF specifications when the device used at 20 cm from your body.
Frequency band: 5150 - 5250 MHz:
Indoor use: Inside buildings only. Installations and use inside road vehicles and train carriages are not permitted. Limited outdoor use: If used outdoors, equipment shall not be attached to a fixed installation or to the external body of road vehicles, a fixed infrastructure or a fixed outdoor antenna. Use by unmanned aircraft systems (UAS) is limited to within the 5170 - 5250 MHz band.
Frequency band: 5250 - 5350 MHz:
Indoor use: Inside buildings only. Installations and use in road vehicles, trains and aircraft are not permitted. Outdoor use is not permitted.
Frequency band: 5470 - 5725 MHz:
Installations and use in road vehicles, trains and aircraft and use for unmanned aircraft systems (UAS) are not permitted.
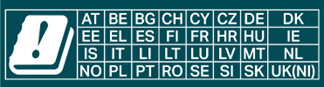

Attention: This device may only be used indoors in Great Britain.
UKCA Mark

UK Declaration of Conformity
TP-Link hereby declares that the CentralHubTM is in compliance with the essential requirements and other relevant provisions of the Radio Equipment Regulations 2017.
The original UK Declaration of Conformity may be found at https://www.tapo.com/support/ukca/.
Canadian Compliance Statement
This device contains licence-exempt transmitter(s)/receiver(s) that comply with Innovation, Science and Economic Development Canada’s licenceexempt
RSS(s). Operation is subject to the following two conditions:
1. This device may not cause interference.
2. This device must accept any interference, including interference that may cause undesired operation of the device.
L’émetteur/récepteur exempt de licence contenu dans le présent appareil est conforme aux CNR d’Innovation, Sciences et Développement
économique Canada applicables aux appareils radio exempts de licence. L’exploitation est autorisée aux deux conditions suivantes :
1. l’appareil ne doit pas produire de brouillage;
2. l’utilisateur de l’appareil doit accepter tout brouillage radioélectrique subi, meme si le brouillage est susceptible d’en compromettre le fonctionnement
Caution: The device for operation in the band 5150–5250 MHz is only for indoor use to reduce the potential for harmful interference to co-channel mobile satellite systems; DFS (Dynamic Frequency Selection) products that operate in the bands 5250- 5350 MHz, 5470-5600 MHz, and 5650-5725 MHz.
Avertissement: Le dispositif fonctionnant dans la bande 5150-5250 MHz est réservé uniquement pour une utilisation à l’intérieur afin de réduire les risques de brouillage préjudiciable aux systèmes de satellites mobiles utilisant les mêmes canaux; Les produits utilisant la technique d'atténuation DFS (sélection dynamique des fréquences) sur les bandes 5250- 5350 MHz, 5470-5600 MHz et 5650-5725 MHz.
Radiation Exposure Statement:
This equipment complies with IC radiation exposure limits set forth for an uncontrolled environment. This equipment should be installed and operated with minimum distance 20cm between the radiator & your body.
Déclaration d’exposition aux radiations:
Cet équipement est conforme aux limites d’exposition aux rayonnements IC établies pour un environnement non contrôlé. Cet équipement doit être installé et utilisé avec un minimum de 20 cm de distance entre la source de rayonnement et votre corps.
Industry Canada Statement
CAN ICES-003 (B)/NMB-003 (B)

Korea Warning Statements:
이 기기는 사용중 전파혼신 가능성이 있으며, 타 기기로부터 유해한 혼신을 받을 수 있음.
NCC Notice & BSMI Notice
注意!
取得審驗證明之低功率射頻器材,非經核准,公司、商號或使用者均不得擅自變更頻率、加大功率或變更原設計之特性及功能。
低功率射頻器材之使用不得影響飛航安全及干擾合法通信;經發現有干擾現象時,應立即停用,並改善至無干擾時方得繼續使用。
前述合法通信,指依電信管理法規定作業之無線電通信。
低功率射頻器材須忍受合法通信或工業、科學及醫療用電波輻射性電機設備之干擾。
應避免影響附近雷達系統之操作。
安全諮詢及注意事項
請使用原裝電源供應器或只能按照本產品注明的電源類型使用本產品。
清潔本產品之前請先拔掉電源線。請勿使用液體、噴霧清潔劑或濕布進行清潔。
插槽與開口供通風使用,以確保本產品的操作可靠並防止過熱,請勿堵塞或覆蓋開口。
請勿將本產品置放於靠近熱源的地方。除非有正常的通風,否則不可放在密閉位置中。
不要私自拆開機殼或自行維修,如產品有故障請與原廠或代理商聯繫。
注意防潮,請勿將水或其他液體潑灑到本產品上。
限用物質含有情況標示聲明書
| 設備名稱: Tapo 智慧網關 型號(型式):Tapo H500 Equipment name Type designation (Type) |
||||||
|---|---|---|---|---|---|---|
| 單元 Unit |
限用物質及其化學符號 Restricted substances and its chemical symbols |
|||||
| 鉛 Lead (Pb) |
汞 Mercury (Hg) |
鎘 Cadmium (Cd) |
六價鉻 Hexavalent chromium (Cr+6) |
多溴聯苯 Polybrominated biphenyls (PBB) |
多溴二苯醚 Polybrominated diphenyl ethers (PBDE) |
|
| PCB | ○ | ○ | ○ | ○ | ○ | ○ |
| 外殼 | ○ | ○ | ○ | ○ | ○ | ○ |
| 電源供應器 | − | ○ | ○ | ○ | ○ | ○ |
| 其他及其配件 | − | ○ | ○ | ○ | ○ | ○ |
| 備考1.〝超出0.1 wt %〞及〝超出0.01 wt %〞係指限用物質之百分比含量超出百分比含量基準值 Note 1:“Exceeding 0.1 wt %” and “exceeding 0.01 wt %” indicate that the percentage content of the restricted substance exceeds the reference percentage value of presence condition. 備考2.〝○〞係指該項限用物質之百分比含量未超出百分比含量基準值。 Note 2:“○” indicates that the percentage content of the restricted substance does not exceed the percentage of reference value of presence. 備考3.〝-〞係指該項限用物質為排除項目。 Note 3:The “−” indicates that the restricted substance corresponds to the exemption. |
||||||

Продукт сертифіковано згідно с правилами системи УкрСЕПРО на відповідність вимогам нормативних документів та вимогам, що передбачені чинними законодавчими актами України.

Safety Information
• Do not attempt to disassemble, repair, or modify the device. If you need service, please contact us.
• Do not use the device where wireless devices are not allowed.
• Adapter shall be installed near the equipment and shall be easily accessible.
• Use only power supplies which are provided by manufacturer and in the original packing of this product. If you have any questions, please don't hesitate to contact us.
• Keep the device away from water, fire, humidity or hot environments.
• Do not place near automatically controlled devices such as fire alarms. Radio waves emitted from this product may cause such devices to malfunction, resulting in an accident.
• Observe restrictions on using wireless products in fuel depots, chemical plants or when blasting operations are in progress.
• Never put metal objects inside the product. If a metal object enters the product, turn off the circuit breaker and contact an authorised electrician.
• This product is not intended to be used when providing medical care. Consult the manufacturer of any personal medical devices, such as pacemakers or hearing aids to determine if they are adequately shielded from external RF (radio frequency) energy.
• Do not use this product in health care facilities. Hospitals or health care facilities may be using equipment that could be sensitive to external RF energy.
• When you leave the product unused for a long time, unplug the product from the power outlet.
• This product may interfere with other electronic products such as TV, radios, personal computers, phones or other wireless devices.
• Operating Temperature: 0 °C ~ 40°C (32°F ~ 104°F)
|
CAUTION! |
Please read and follow the above safety information when operating the device. We cannot guarantee that no accidents or damage will occur due to improper use of the device. Please use this product with care and operate at your own risk.
Explanation of the symbols on the product label
Note: The product label is underneath the camera base. Symbols may vary from products.
注意:產品標籤位於攝影機底座下方。符號可能因產品而異。
| Symbol 符號解釋 |
Explanation 解釋 |
|---|---|
 |
Class II equipment Class II 設備 |
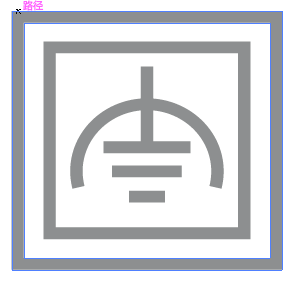 |
Class II equipment with functional earthing 具有功能接地的Class II 設備 |
 |
Alternating current 交流電 |
 |
DC voltage 直流電壓 |
 |
Polarity of output terminals 輸出端子極性 |
 |
Indoor use only 僅限室內使用 |
 |
Dangerous voltage 危險電壓 |
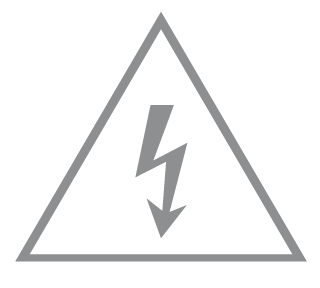 |
Caution, risk of electric shock 注意,有觸電危險 |
 |
Energy efficiency Marking 能源效率標示 |
 |
Protective earth 保護地線 |
 |
Earth 地線 |
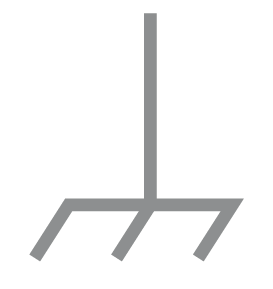 |
Frame or chassis 機架接地 |
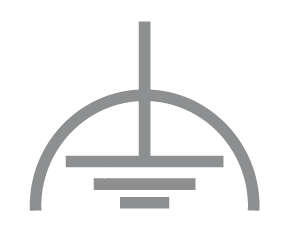 |
Functional earthing 功能地線 |
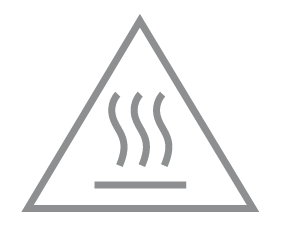 |
Caution, hot surface 警告,表面高溫 |
 |
Caution 警告 |
 |
Operator’s manual 操作手冊 |
 |
Stand-by 待機 |
 |
“ON”/”OFF” (push-push) 「開」/「關」 ( 按壓式) |
 |
Fuse 保險絲 |
 |
Fuse is used in neutral N 保險絲用於中性線N |
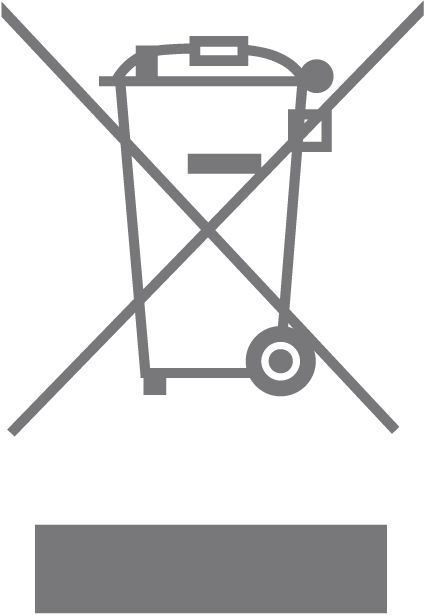 |
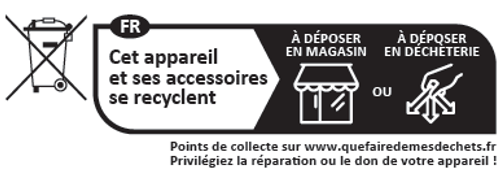
RECYCLING This product bears the selective sorting symbol for Waste electrical and electronic equipment (WEEE). This means that this product must be handled pursuant to European directive 2012/19/EU in order to be recycled or dismantled to minimize its impact on the environment. User has the choice to give his product to a competent recycling organization or to the retailer when he buys a new electrical or electronic equipment. 回收利用 本產品標示有「廢棄電氣電子設備(WEEE)」的分類回收標誌。這表示本產品必須依據歐盟指令 2012/19/EU 進行妥善回收或拆 解,以減少對環境的影響。 使用者可選擇將本產品交給合格的回收機構,或在購買新電器或電子設備時,交回給零售商進行回收處理。 |
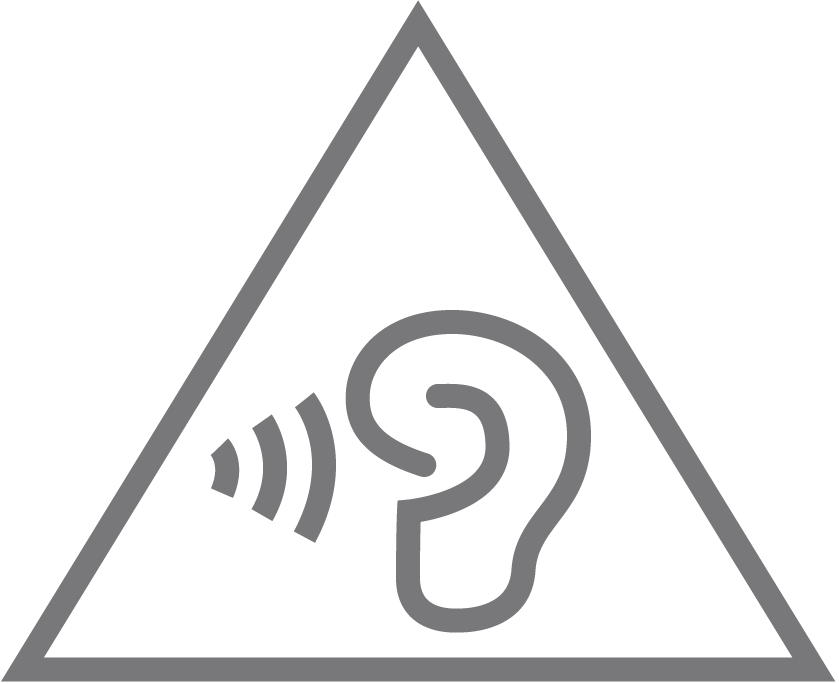 |
Caution, avoid listening at high volume levels for long periods 注意,避免長時間以高音量收聽 |
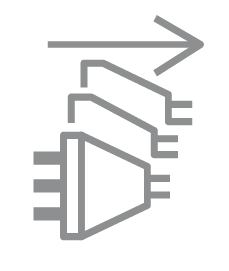 |
Disconnection, all power plugs 斷開所有電源插頭 |
Authentication (Solar Camera)
CE Mark Warning
OPERATING FREQUENCY (the maximum transmitted power)
2.4 GHz:
2412MHz—2472MHz (20dBm)
2402MHz—2480MHz (10dBm)
5 GHz:
5150-5350MHz (23dBm)
5470-5725MHz (23dBm)
5725-5850Mhz (23dBm)
Frequency band: 5150 - 5250 MHz:
Indoor use: Inside buildings only. Installations and use inside road vehicles and train carriages are not permitted. Limited outdoor use: If used outdoors, equipment shall not be attached to a fixed installation or to the external body of road vehicles, a fixed infrastructure or a fixed outdoor antenna. Use by unmanned aircraft systems (UAS) is limited to within the 5170 - 5250 MHz band.
Frequency band: 5250 - 5350 MHz:
Indoor use: Inside buildings only. Installations and use in road vehicles, trains and aircraft are not permitted. Outdoor use is not permitted.
Frequency band: 5470 - 5725 MHz:
Installations and use in road vehicles, trains and aircraft and use for unmanned aircraft systems (UAS) are not permitted.
EU Declaration of Conformity
TP-Link hereby declares that the battery camera is in compliance with the essential requirements and other relevant provisions of directives 2014/53/EU, 2009/125/EC, 2011/65/EU and (EU)2015/863.
The original EU Declaration of Conformity may be found at https://www.tapo.com/support/ce/.
TP-Link hereby declares that the solar panel is in compliance with the essential requirements and other relevant provisions of directives 2014/30/EU, 2011/65/EU and (EU)2015/863.
The original EU declaration of conformity may be found at https://www.tapo.com/support/ce/.
RF Exposure Information
This device meets the EU requirements (2014/53/EU Article 3.1a) on the limitation of exposure of the general public to electromagnetic fields by way of health protection.
The device complies with RF specifications when the device used at 20 cm from your body.
UKCA Mark
UK Declaration of Conformity
TP-Link hereby declares that the battery camera is in compliance with the essential requirements and other relevant provisions of the Radio Equipment Regulations 2017.
The original UK declaration of conformity may be found at https://www.tapo.com/support/ukca/.
TP-Link hereby declares that the solar panel is in compliance with the essential requirements and other relevant provisions of the Electromagnetic Compatibility Regulations 2016 and Electrical Equipment (Safety) Regulations 2016.
The original UK declaration of conformity may be found at https://www.tapo.com/support/ukca/.
Attention: In Great Britain, the operation in the frequency range 5150MHz - 5350MHz is only permitted indoors.
Canadian Compliance Statement
This device contains licence-exempt transmitter(s)/receiver(s) that comply with Innovation, Science and Economic Development Canada's licence-exempt RSS(s). Operation is subject to the following two conditions:
(1) This device may not cause interference.
(2) This device must accept any interference, including interference that may cause undesired operation of the device.
L'émetteur/récepteur exempt de licence contenu dans le présent appareil est conforme aux CNR d'Innovation, Sciences et Développement économique Canada applicables aux appareils radio exempts de licence. L'exploitation est autorisée aux deux conditions suivantes :
1) L'appareil ne doit pas produire de brouillage;
2) L'appareil doit accepter tout brouillage radioélectrique subi, même si le brouillage est susceptible d’en compromettre le fonctionnement.
Radiation Exposure Statement:
This equipment complies with IC radiation exposure limits set forth for an uncontrolled environment. This equipment should be installed and operated with minimum distance 20cm between the radiator & your body.
Déclaration d'exposition aux radiations:
Cet équipement est conforme aux limites d'exposition aux rayonnements IC établies pour un environnement non contrôlé. Cet équipement doit être installé et utilisé avec un minimum de 20 cm de distance entre la source de rayonnement et votre corps.
CAN ICES-003(B)/NMB-003(B)
Caution:
The device for operation in the band 5150–5250 MHz is only for indoor use to reduce the potential for harmful interference to co-channel mobile satellite systems;
DFS (Dynamic Frequency Selection) products that operate in the bands 5250- 5350 MHz, 5470-5600MHz, and 5650-5725MHz.
Avertissement:
Le dispositif fonctionnant dans la bande 5150-5250 MHz est réservé uniquement pour une utilisation à l'intérieur afin de réduire les risques de brouillage préjudiciable aux systèmes de satellites mobiles utilisant les mêmes canaux;
Les produits utilisant la technique d'atténuation DFS (sélection dynamique des fréquences) sur les bandes 5250- 5350 MHz, 5470-5600MHz et 5650-5725MHz.
Korea Warning Statements:
해당 무선설비는 운용중 전파혼신 가능성이 있음.
NCC Notice & BSMI Notice
注意!
取得審驗證明之低功率射頻器材,非經核准,公司、商號或使用者均不得擅自變更頻率、加大功率或變更原設計之特性及功能。
低功率射頻器材之使用不得影響飛航安全及干擾合法通信;經發現有干擾現象時,應立即停用,並改善至無干擾時方得繼續使用。
前述合法通信,指依電信管理法規定作業之無線電通信。
低功率射頻器材須忍受合法通信或工業、科學及醫療用電波輻射性電機設備之干擾。
為避免本器材影像畫面遭偷窺或擷取,本器材使用者應先修改預設密碼,並定期更新密碼。
應避免影響附近雷達系統之操作。
安全諮詢及注意事項
請使用原裝電源供應器或只能按照本產品注明的電源類型使用本產品。
清潔本產品之前請先拔掉電源線。請勿使用液體、噴霧清潔劑或濕布進行清潔。
插槽與開口供通風使用,以確保本產品的操作可靠並防止過熱,請勿堵塞或覆蓋開口。
請勿將本產品置放於靠近熱源的地方。除非有正常的通風,否則不可放在密閉位置中。
不要私自拆開機殼或自行維修,如產品有故障請與原廠或代理商聯繫。
請勿將本產品浸入水或者其他液體中。
安裝高度不得超過 2 公尺。
請使用符合BSMI認證的電源供應器(5Vdc,至少2A)並其輸出需符合LPS/PS2。
電池攝影機工作溫度:-20°C ~ 45°C(-4°F ~ 113°F)
限用物質含有情況標示聲明書
| 設備名稱:雙鏡頭旋轉式安全攝影機套組 型號(型式):Tapo C645D KIT Equipment name Type designation (Type) |
||||||
|---|---|---|---|---|---|---|
| 單元 Unit |
限用物質及其化學符號 Restricted substances and its chemical symbols |
|||||
| 鉛 Lead (Pb) |
汞 Mercury (Hg) |
鎘 Cadmium (Cd) |
六價鉻 Hexavalent chromium (Cr+6) |
多溴聯苯 Polybrominated biphenyls (PBB) |
多溴二苯醚 Polybrominated diphenyl ethers (PBDE) |
|
| 電路板 | ○ | ○ | ○ | ○ | ○ | ○ |
| 外殼 | ○ | ○ | ○ | ○ | ○ | ○ |
| USB線 | ○ | ○ | ○ | ○ | ○ | ○ |
| 其他及其配件 | − | ○ | ○ | ○ | ○ | ○ |
| 備考1.〝超出0.1 wt %〞及〝超出0.01 wt %〞係指限用物質之百分比含量超出百分比含量基準值 Note 1:“Exceeding 0.1 wt %” and “exceeding 0.01 wt %” indicate that the percentage content of the restricted substance exceeds the reference percentage value of presence condition. 備考2.〝○〞係指該項限用物質之百分比含量未超出百分比含量基準值。 Note 2:“○” indicates that the percentage content of the restricted substance does not exceed the percentage of reference value of presence. 備考3.〝-〞係指該項限用物質為排除項目。 Note 3:The “−” indicates that the restricted substance corresponds to the exemption. |
||||||
Продукт сертифицировано згідно с правилами системи УкрСЕПРО на відповідність вимогам нормативних>Продукт сертифіковано згідно с правилами системи УкрСЕПРО на відповідність вимогам нормативних документів та вимогам, що передбачені чинними законодавчими актами України.
Safety Information
For Solar Panel:
• Keep the device away from fire or hot environments. DO NOT immerse in water or any other liquid.
• Do not attempt to disassemble, repair, or modify the device. If you need service, please contact us.
For Battery Camera:
• This equipment can be powered only by equipment that complies with Power Source Class 2 (PS2) or Limited Power Source (LPS) defined in the standard of IEC 62368-1.
• Do not use damaged charger or USB cable to charge the device.
• Do not use the device where wireless devices are not allowed.
• When using a USB charger, make sure the charger is easily accessible.
• Use only power supplies which are provided by manufacturer and in the original packing of this product. If you have any questions, please don't hesitate to contact us.
• Keep the device away from fire or hot environments. DO NOT immerse in water or any other liquid.
• Do not disassemble, repair, or modify the product.
• Do not place near automated devices such as fire alarms. Radio waves emitted from this product may cause such devices to malfunction, resulting in an accident.
• Observe restrictions on using wireless products in fuel depots, chemical plants, or during blasting operations.
• Do not use liquid to clean the product. Only use a dry cloth.
• Never put metal objects inside the product. If a metal object enters the product, turn off the circuit breaker and contact an authorised electrician.
• This product is not intended to be used when providing medical care. Consult the manufacturer of any personal medical devices, such as pacemakers or hearing aids to determine if they are adequality shielded from external RF (radio frequency) energy.
• Do not use this product in healthcare facilities. Hospitals or health care facilities may be using equipment that could be sensitive to external RF energy.
• Do not place heavy objects on top of the product.
• When you leave the product unused for a long time, unplug the product from the power outlet.
• This product may interfere with other electronic products such as TV, radios, personal computers, phones, or other wireless devices.
• Operating Temperature: -20 °C ~ 45 °C (-4 °F ~ 113 °F)
•The battery charging temperature should be maintained between 0°C (32°F) and 45°C (113°F).
|
CAUTION! |
Please read and follow the above safety information when operating the device. We cannot guarantee that no accidents or damage will occur due to improper use of the device. Please use this product with care and operate at your own risk.
Explanation of the symbols on the product label
Note: The product label is on the bottom of the product and its power supply. Symbols may vary from products.
注意:產品標籤位於產品底部和電源供應器上。符號可能因產品而異。
| Symbol 符號解釋 |
Explanation 解釋 |
|---|---|
|
Class II equipment Class II 設備 |
|
Class II equipment with functional earthing 具有功能接地的Class II 設備 |
|
Alternating current 交流電 |
|
DC voltage 直流電壓 |
|
Polarity of output terminals 輸出端子極性 |
|
Indoor use only 僅限室內使用 |
|
Dangerous voltage 危險電壓 |
|
Caution, risk of electric shock 注意,有觸電危險 |
 |
Energy efficiency Marking 能源效率標示 |
|
Protective earth 保護地線 |
|
Earth 地線 |
|
Frame or chassis 機架接地 |
|
Functional earthing 功能地線 |
|
Caution, hot surface 警告,表面高溫 |
|
Caution 警告 |
|
Operator’s manual 操作手冊 |
|
Stand-by 待機 |
|
“ON”/”OFF” (push-push) 「開」/「關」 ( 按壓式) |
|
Fuse 保險絲 |
|
Fuse is used in neutral N 保險絲用於中性線N |
|
RECYCLING This product bears the selective sorting symbol for Waste electrical and electronic equipment (WEEE). This means that this product must be handled pursuant to European directive 2012/19/EU in order to be recycled or dismantled to minimize its impact on the environment. User has the choice to give his product to a competent recycling organization or to the retailer when he buys a new electrical or electronic equipment. 回收利用 本產品標示有「廢棄電氣電子設備(WEEE)」的分類回收標誌。這表示本產品必須依據歐盟指令 2012/19/EU 進行妥善回收或拆 解,以減少對環境的影響。 使用者可選擇將本產品交給合格的回收機構,或在購買新電器或電子設備時,交回給零售商進行回收處理。 |
|
Caution, avoid listening at high volume levels for long periods 注意,避免長時間以高音量收聽 |
|
Disconnection, all power plugs 斷開所有電源插頭 |