How to set up Access Control List in Access Point Mode on TP-Link wireless router
User’s Application Scenario
You can switch the router into an access point to create a wireless network from an Ethernet connection. The Access Point mode is suitable for dorm rooms or homes where there’s already a wired router but you need a wireless hotspot.
The Access Control function of the Access Point mode is used to block or allow specific client devices to access the access point’s network (via wired or wireless) based on a list of blocked devices (Deny List) or a list of allowed devices (Allow List).
How can I do that?
Step 1. Set Up the Router as an Access Point
1. Visit http://tplinkwifi.net, and log in with your TP-Link ID or the password you set for the router.
2. Go to Advanced > System > Operation Mode, select Access Point, and click SAVE. The router will reboot and switch to the Access Point mode.
3. After rebooting, connect the router to your existing wired router via an Ethernet cable.
4. Log in again to the web management page http://tplinkwifi.net, and go to Advanced > Quick Setup.
5. Configure your wireless settings and click Next.
6. Confirm the information and click SAVE. Now, you can set up the access control rules.
Step 2. Set Up the Access Control List
1. In the Access Point mode of the router, go to Advanced > Security > Access Control.
2. Toggle on to enable Access Control.
3. Select the access mode to either block (recommended) or allow the device(s) in the list.
To block specific device(s):
1) Select Deny List.

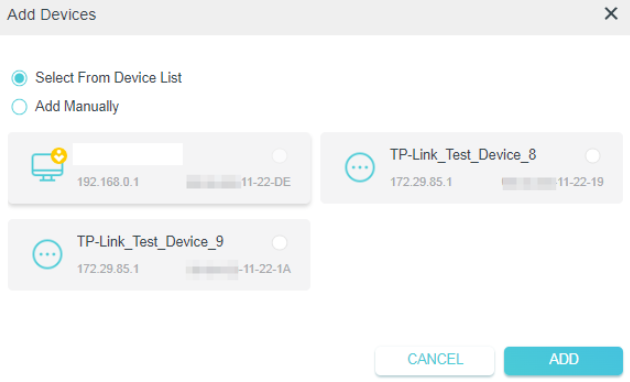
2) Click ![]() and select the devices you want to be blocked and click ADD. You can choose to select the devices from the device list, or to add manually.
and select the devices you want to be blocked and click ADD. You can choose to select the devices from the device list, or to add manually.

3) The Operation Succeeded message will appear on the screen, which means the selected devices have been successfully added to the Deny List.

To allow specific device(s):
1) Select Allow List and click SAVE.

2) Your own device is in the Allow List by default and cannot be deleted. Click ![]() to add other devices to the Allow List. You can choose to select the devices from the device list, or to add manually.
to add other devices to the Allow List. You can choose to select the devices from the device list, or to add manually.
3) The Operation Succeeded message will appear on the screen, which means the device has been successfully added to the Allow List.

Done!
Now you can block or allow specific client devices to access your network (via wired or wireless).
Byla tato FAQ užitečná?
Vaše zpětná vazba nám pomůže zlepšit naše webové stránky
_normal_20250418093949d.png)